

375°F and I still got it wrong the first time.
I set the oven to 375°F, lined two sheet pans with parchment, and felt completely confident — and then pulled out twelve completely flat, slightly burnt cookies that tasted fine but looked like I’d sat on them.
The second batch was better. The third one was what I was after.
What actually makes these buttery.
A full cup of softened butter — not melted, not cold from the fridge, but genuinely softened, the kind that holds a thumbprint when you press it.
I thought about browning the butter — actually no, I skipped it. The plain softened butter, beaten with both sugars for a solid 3 minutes, gives you that pale, almost whipped base that makes the texture work.
That creaming step is the one people rush. Don’t.
The thing about the flour.
Overmixing the flour in is how you get cookies that chew like rubber bands.
I stir the dry mixture in until I can barely see a streak of flour left — then I stop, even if it looks uneven, because the folding of the chocolate chips finishes it.
Quick tip: Spoon your flour into the measuring cup instead of scooping — scooping packs it down and you end up with almost 20% more flour than you need, which dries the whole dough out.
It looked wrong. It wasn’t.
At 10 minutes the centers look underdone — soft, almost wet-looking, and your instinct is going to be to give them two more minutes.
Pull them out anyway.
They finish on the hot pan during that 2-minute rest, and if you wait until they look done in the oven, they come out dry and a little sad by the time they cool.
The refrigerator thing — is it worth it?
My neighbor Rosa swears by chilling the dough overnight and honestly her cookies are noticeably chewier than mine when I skip it.
30 minutes in the fridge is the minimum that actually makes a difference — less than that and I couldn’t tell.
Have you ever chilled your cookie dough before baking, and did it actually change things for you?
One thing I noticed that no recipe ever mentions.
The cookies on the outer edges of the pan — the ones closest to the oven walls — always go golden about 90 seconds before the ones in the middle, and if you’re doing two pans at once,
the bottom rack cookies will be darker on the base even if they look identical on top.
I rotate my pans halfway through now, every time, and it evened things out completely.
—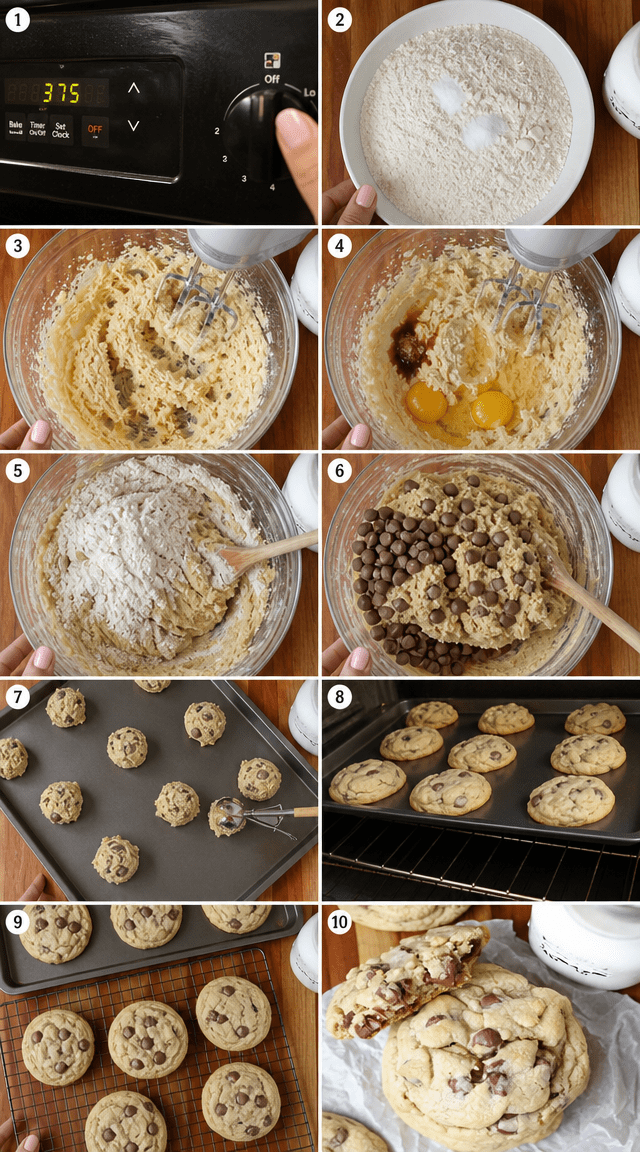
Step 1: Heat your oven to 375°F and line your baking sheets with parchment paper. I used to skip the parchment and just grease the pan — the bottoms came out darker and stickier, and two cookies tore when I tried to lift them. Parchment is not optional.
Step 2: Whisk the flour, baking soda, and salt together in a medium bowl and set it aside. (Don’t skip this pre-mixing — if the baking soda isn’t evenly distributed, you’ll get uneven rise and some cookies will puff weird while others stay flat.)
Step 3: Beat the softened butter with both sugars on medium speed for about 3 minutes. You want it pale and fluffy, not just combined. This is the step I used to rush before I understood why it mattered — the air you’re beating in here is what gives you lift.
Step 4: Add the eggs one at a time, then the vanilla, mixing until fully incorporated after each. Do you add your eggs one at a time or all at once — and have you ever noticed a difference? Share below!
Step 5: Slowly stir the flour mixture into the wet ingredients until just combined. Stop the second you don’t see dry flour. Overmixing here is the thing that actually ruins the texture more than anything else in this whole recipe.
Step 6: Fold in the chocolate chips with a wooden spoon or spatula. (If you want a more rustic result, swap half the chips for roughly chopped chocolate chunks — the uneven pieces melt into pockets instead of dots, and it’s a different cookie entirely.)
Step 7: Scoop rounded tablespoons onto your prepared baking sheets, leaving about 2 inches between each one. They spread more than you think they will.
Step 8: Bake for 10 to 12 minutes until the edges are golden and the centers still look slightly underdone. The first time I made these I went a full 14 minutes because I didn’t trust the soft centers — every single cookie came out hard by the next morning.
Step 9: Rest the cookies on the baking sheet for 2 minutes before moving them to a wire rack. They’re fragile right out of the oven. Give them the 2 minutes.
Ways to Change It Up
Try this: Swap half the chocolate chips for dark chocolate chunks and add a pinch of flaky sea salt on top right before baking. The salt hits the chocolate differently and my husband asks for this version specifically now.
Try this: Chill the dough for a full hour before baking for a chewier, slightly denser cookie with more caramel-like flavor in the brown sugar.
Try this: Replace 1/4 cup of the all-purpose flour with almond flour for a softer, slightly nuttier cookie that spreads a little more but stays chewy in the center longer after cooling.
Which would you go for? Drop it in the comments.
How to Serve It
Straight off the wire rack while the chips are still a little melty — that’s the window, and it’s about 8 minutes wide.
Sandwiched around a scoop of vanilla ice cream that starts melting immediately because the cookies are still warm. Messy. Worth it.
Crumbled over a bowl of plain Greek yogurt the next morning — my youngest started doing this and I’m not going to pretend it isn’t good.
What would you pair it with?
—
Storing It Without Ruining It
Room temperature in an airtight container, they stay soft for about 3 days — after that the texture starts getting crumbly even if they’re sealed.
Fridge works but it dries them out faster than you’d expect, so I don’t bother unless I’m keeping them longer than 4 days.
Freeze the baked cookies in a zip bag with the air squeezed out — they thaw at room temp in about 20 minutes and taste almost the same. You can also freeze raw dough balls on a tray, then transfer them to a bag; bake straight from frozen at 375°F for 13 to 14 minutes.
To reheat: 10 seconds in the microwave if you want them warm and soft again. 15 seconds and you’ve gone too far.
Have you ever saved leftovers like this? Tell me below!
Mistakes I Made So You Don’t Have To
I once used butter that was too cold because I forgot to set it out — I microwaved it for 15 seconds to soften it, it half-melted around the edges, and the dough was greasy and loose before it even hit the pan. The cookies spread into thin, lacy discs. I served them anyway.
I used packed brown sugar once without actually packing it, just spooned it loosely into the cup, and the cookies came out noticeably less chewy and kind of pale. It matters more than it sounds like it should.
I added the vanilla too early, before the eggs, honestly I wasn’t paying attention,
and it didn’t ruin the cookies but it definitely didn’t distribute as evenly — one batch tasted almost bland and another batch had this sharp vanilla hit in certain bites.
Did something like this happen to you?
Questions I Actually Get About These Cookies
Can I use salted butter instead of unsalted?
You can, and I’ve done it. The cookies come out slightly saltier — not in a bad way, actually kind of good — but reduce the added salt in the recipe to about half a teaspoon. It depends on the brand; some salted butters are much saltier than others.
Why do my cookies come out cakey instead of chewy?
Too much flour is usually the culprit. Measure by spooning into the cup, not scooping. And if you added an extra egg thinking it would help — I tried this once and it made them puff up like little cakes. One egg too many changes the whole structure.
How long does the dough keep in the fridge?
About 4 days, covered tight. But the longer it sits, the more the brown sugar deepens in flavor, so day 2 or 3 dough actually bakes up better than fresh dough in my opinion.
Can I make these without a mixer?
Yes. Your arm will be tired. It takes about 5 minutes of hard stirring to get the butter and sugar where they need to be, and you will know when it’s there because the mixture goes from grainy to smooth and slightly pale. But it works.
What kind of chocolate chips work best?
It depends on what you want. Semi-sweet is the standard and it balances the sweetness well. I tried milk chocolate chips once and found them too sweet against the brown sugar base. Dark chocolate chips — 60% or higher — are my actual preference now.
Can I double the recipe?
Easily. And the dough freezes well in portions, so it’s worth doubling just to have frozen dough balls on hand. Bake time stays the same from frozen, just add 2 to 3 minutes.
Which answer helped you most?
So, are you going to make them?
These aren’t complicated cookies. They don’t need special equipment or unusual ingredients.
What they need is the butter actually soft, the creaming actually done, and the oven actually trusted when you pull them out early.
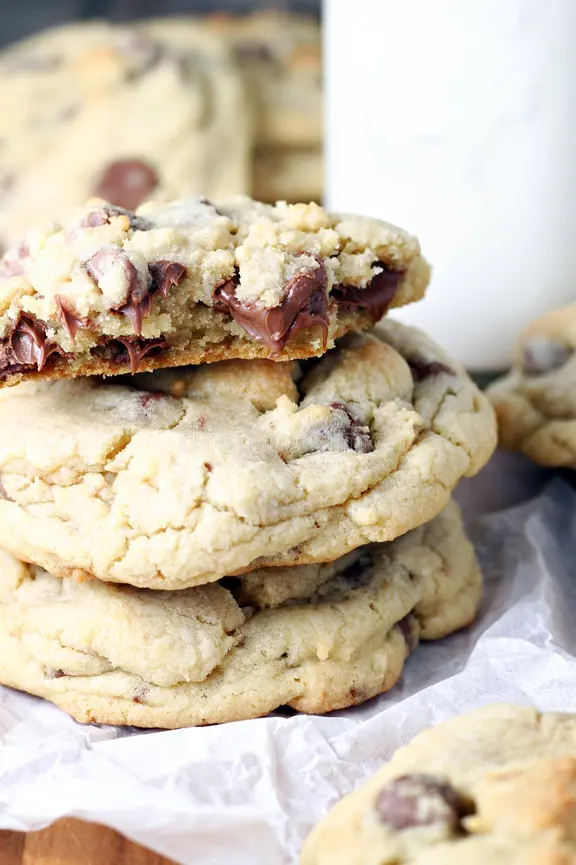
Honestly? It’s not that deep. But those three things are the difference between cookies you eat out of politeness and cookies you think about the next day.
Fun fact: Brown sugar is just white sugar with molasses added back in — that molasses is what pulls moisture into the cookie and keeps it soft days after baking, which is why all-white-sugar cookies go stiff much faster.
My sister thought my first batch needed more vanilla. She was probably right.
Will you make this soon? Drop a comment and let me know how yours turned out — or what you changed, because I’m always curious what people do differently.
Happy cooking! —Marina Caldwell
Achieving the Ultimate Timeless Buttery Chocolate Chip Cookie
Ingredients
- 2 1/4 cups all-purpose flour
- 1 teaspoon baking soda
- 1 teaspoon salt
- 1 cup butter, softened
- 3/4 cup granulated sugar
- 3/4 cup packed brown sugar
- 2 large eggs
- 2 teaspoons vanilla extract
- 2 cups chocolate chips
Instructions
- 1Heat your oven to 375°F (190°C) and line baking sheets with parchment paper.
- 2Whisk together flour, baking soda, and salt in a medium bowl and set aside.
- 3Using a hand or stand mixer, beat softened butter with both sugars on medium speed until light and fluffy, about 3 minutes.
- 4Mix in eggs one at a time, then blend in vanilla extract until fully incorporated.
- 5Slowly add the flour mixture into the wet ingredients, stirring until just combined — do not overmix.
- 6Gently fold in chocolate chips using a wooden spoon or spatula.
- 7Scoop rounded tablespoons of dough onto prepared baking sheets, spacing 2 inches apart.
- 8Bake for 10-12 minutes until edges are golden but centers appear slightly underdone.
- 9Rest cookies on the baking sheet for 2 minutes before transferring to a wire rack to cool completely.
Notes
– For chewier cookies, refrigerate the dough for at least 30 minutes before baking – Pull cookies out while centers still look soft — they continue cooking on the hot pan – Substitute half the chocolate chips with chunks for a more rustic, gooey texture


