

The Loaf That Made Me Actually Understand Bread
I left the dough on the counter overnight and woke up to something that looked almost alive — bubbled, tripled, a little terrifying.
That was the first time I made ciabatta. It did not go well. But that second time? That’s the one I want to tell you about.
Why Ciabatta Feels Scary But Isn’t
The dough is wet. Wetter than anything you’ve probably handled.
Most people see it sticking to everything and assume they’ve done something wrong. You haven’t. That’s exactly what it’s supposed to do at that stage.
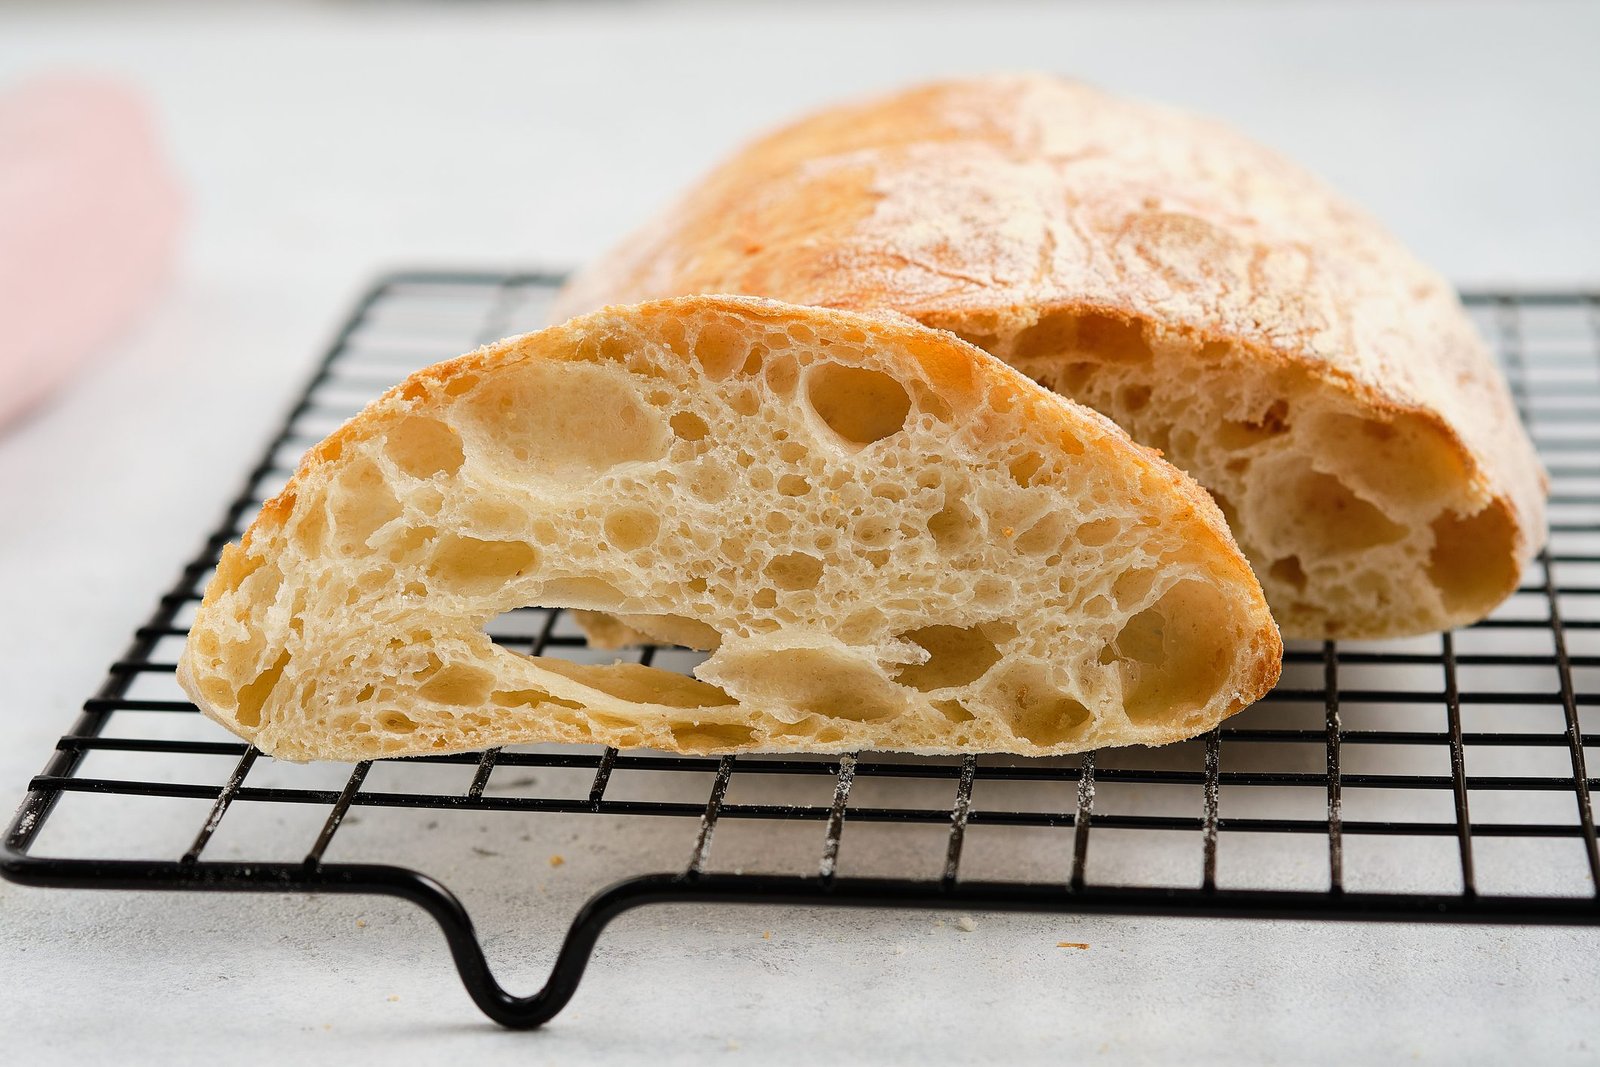
The high hydration is what gives you those big, irregular holes inside — the ones that soak up olive oil and trap little pools of soup. That’s the whole point.
The Overnight Part Changed Everything
I’ve made same-day ciabatta. It’s fine. It tastes like bread.
But the overnight version — left out for 14 hours in my kitchen at around 68°F — had this faint tang, almost like a very mild sourdough, that I didn’t expect from a yeast loaf.
The longer fermentation does something to the flavor that you just can’t rush. Sixteen hours is the sweet spot I keep coming back to.
Something I Only Noticed After Making It Four Times
The flour dusting on top isn’t just decorative. It’s functional.
When you dust the shaped loaves generously before the final proof, that flour creates a kind of skin during baking that holds the shape and contributes to the crisp exterior. I under-dusted my third batch and the crust was noticeably softer — not bad, just different from what I wanted.
Quick tip: Use a fine-mesh sieve to dust the flour over the loaves just before they go into the final proof — you get even coverage without disturbing the shape you’ve worked for.
An Honest Admission
I skipped the steam on my very first attempt because I didn’t want to deal with it. The crust came out pale and almost leathery — not the shattering kind I was after.
The empty pan on the lower rack with hot water poured in right as the bread goes in — that step is not optional. It transformed the crust completely when I finally stopped being lazy about it.
Have You Ever Made Bread That Scared You a Little?
Because ciabatta did that to me. The dough looked wrong every single time until it suddenly didn’t.
It’s one of those recipes where trusting the process matters more than trusting your eyes. If you’ve made something that felt like a disaster mid-way and turned out fine — I’d genuinely love to know what it was.
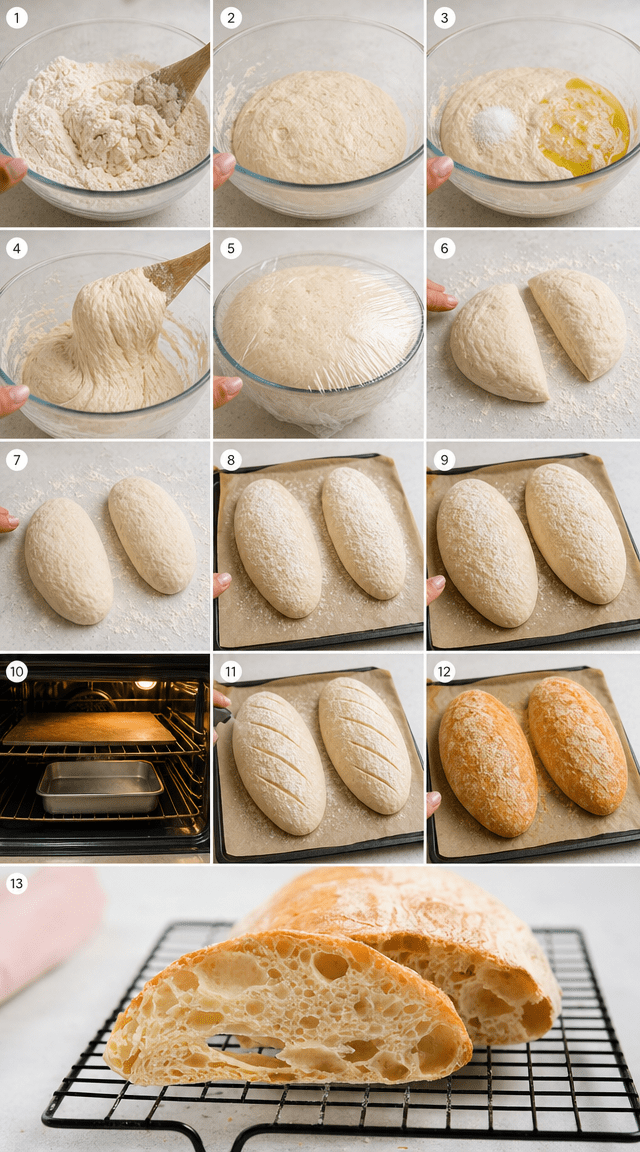
How to Make It, Step by Step
Step 1: Pour 325ml of warm water into a large bowl and stir in the 7g of instant yeast. Let it sit for about two minutes, then gradually fold in the 500g of bread flour until you get a rough, shaggy dough. Don’t worry about it being smooth — you’re just getting everything combined at this point.
Step 2: Cover the bowl with a clean towel and leave it completely alone for 20 minutes. This rest period is called autolyse and it lets the flour absorb the water on its own, which makes the gluten develop without you having to do extra work. I always use this time to clean up the mess I made getting here.
Step 3: Drizzle in the 30ml of olive oil and sprinkle the 10g of salt evenly over the surface. Work both in with your hands, squeezing and folding until the dough has fully absorbed everything — this takes about 3 minutes and will feel slippery at first. (Don’t add more flour here no matter how tempted you are — the stickiness is the point.)
Step 4: Turn the dough onto a surface and knead firmly for 8 to 10 minutes until it becomes smooth but still slightly tacky under your hands. It should pull away from the surface cleanly when you lift it, but leave a faint stickiness behind. I remember the first time it finally hit that texture — I actually said “oh, there it is” out loud to my empty kitchen.
Step 5: Transfer the dough to a lightly oiled bowl, cover tightly with plastic wrap, and leave it at room temperature for 12 to 16 hours. By morning it should have tripled in size and look bubbly and alive across the surface. Sixteen hours gave me noticeably more flavor than twelve.
Step 6: Turn the risen dough onto a generously floured surface — and I mean generously — then cut it into two equal portions with a bench scraper. Gently fold the outer edges of each piece toward the center, like closing an envelope. Do this only once or twice per piece; you are not trying to deflate it.
Step 7: Let the folded portions rest uncovered for 30 minutes. Then carefully stretch each one into a long oval, roughly 10 to 12 inches, working from the center outward with your fingertips. The dough will resist slightly — ease it, don’t force it.
Step 8: Lay both loaves on parchment-lined baking trays and sift flour over the tops generously. Cover loosely with oiled plastic wrap and leave for 1 to 2 hours until they look visibly puffed and feel airy when you gently press the edge.
Step 9: About 20 minutes before baking, heat your oven to 240°C (465°F) with an empty metal pan on the lowest rack. When the oven is ready, score each loaf with three diagonal cuts using a sharp knife or lame, then mist the surface generously with water from a spray bottle.
Step 10: Slide the trays into the oven and immediately pour about half a cup of hot water into the empty pan on the lower rack — close the oven door fast. Bake for 25 to 30 minutes until the crust is deeply golden and sounds hollow when you tap the bottom. Transfer to a wire rack and do not cut for at least one hour while the interior finishes setting.
Did your crust come out the way you hoped? Share below!
Ways to Change It Up
Try this: Add 2 tablespoons of fresh rosemary and a handful of roughly chopped black olives into the dough when you work in the salt and oil — the olives release their brine during baking and the whole loaf smells like a trattoria.
Try this: Swap 100g of the bread flour for whole wheat flour for a nuttier, slightly denser crumb — the crust still shatters but the interior has more body and the flavor is earthier.
Try this: After shaping, press dimples into the surface with your fingertips and drizzle with extra olive oil before the final proof — it bakes up closer to a focaccia-ciabatta hybrid with crispy, oily patches on top.
Which would you go for? Drop it in the comments.
How to Serve It
Tear it while it’s still slightly warm and drag it through a shallow pool of good olive oil with a pinch of flaky salt on the side. That’s it. That’s the whole experience.
Slice it thick and use it for a sandwich built with prosciutto, fresh mozzarella, and a few leaves of basil — the open crumb holds everything without going soggy the way softer bread does.
Float a thick slice in a bowl of tomato soup and let it absorb until the bottom goes soft while the top stays crusty. My neighbor does this every Sunday and I’ve started copying her.
What would you pair it with?
Storing It Without Ruining It
Room temperature, paper bag or wrapped in a clean towel, two days max. The crust softens by day two but the crumb stays good.
Do not put it in the fridge. I know that feels wrong but the fridge makes bread stale faster — it pulls moisture out of the crumb and you’ll end up with something dry and dense by the next morning.
Freezing works really well with ciabatta. Slice it first, lay the slices on a tray until frozen solid, then transfer to a zip bag. Pull out individual slices and toast them straight from frozen at 375°F for about 8 minutes — they come back almost entirely.
To reheat a whole loaf from the freezer, wrap it loosely in foil and put it in a 350°F oven for 15 minutes, then unwrap it for the last 5 minutes so the crust crisps back up.
Have you ever saved leftovers like this? Tell me below!
Mistakes I Made So You Don’t Have To
I once tried to speed up the overnight proof by leaving the dough near my oven while it preheated for dinner. The dough went from tripled to completely over-proofed in about two hours — flat, sticky, and full of burst bubbles. The bread baked up dense and barely rose. Room temperature means room temperature, not warm-kitchen temperature.
Over-handling the shaped loaves killed my second batch. I kept nudging and adjusting the oval after I’d already stretched it, and I knocked out most of the gas. The crumb came out tight and chewy in the wrong way — more like a dense roll than the open, airy texture ciabatta is supposed to have. Shape it once, then leave it alone.
I cut into the loaf at 20 minutes out of the oven because I couldn’t wait and the inside was genuinely gummy — not raw, but not set. The full hour rest on the wire rack is doing real work; the interior is still cooking from residual heat during that time. Did something like this happen to you?
Questions I Get Asked About This Bread
Can I use all-purpose flour instead of bread flour? You can, but the result will be noticeably different. Bread flour has a higher protein content — usually around 12 to 13 percent compared to all-purpose at about 10 to 11 percent — and that extra protein builds more gluten, which gives ciabatta its characteristic chewy, stretchy crumb and helps it hold the large air pockets that form during fermentation. All-purpose flour will give you a softer, slightly less structured loaf. It’ll still taste good, but the crumb will be tighter and the crust won’t shatter quite the same way.
What if my dough didn’t triple overnight — did I kill the yeast? Maybe, but probably not. First, check the temperature — if your kitchen was below about 65°F, the yeast was likely just working slowly. Give it another 2 to 3 hours before assuming it’s dead. If you used water that was above 120°F when you added the yeast, that can kill instant yeast, and you’d see almost no bubbling at all on the surface after several hours. Also check the expiration date on your yeast packet — old yeast underperforms even when conditions are right.
Do I really need to wait an hour before cutting? Yes, and I know it’s genuinely hard. What’s happening during that hour is that the steam inside the loaf is redistributing through the crumb structure as it cools. If you cut in early, that steam escapes all at once and the interior sets up gummy and slightly dense instead of the open, slightly springy texture you want. I’ve tested this side by side — same batch, one loaf cut at 20 minutes, one at 60 minutes. The difference in crumb texture was visible and the early-cut loaf was noticeably gummier near the center.
Why does my crust go soft after a few hours? This is really common and it comes down to humidity. Once the bread cools, moisture from the crumb migrates outward toward the crust, softening it from the inside. You can slow this by storing it cut-side down on a wooden board or wrapped in a paper bag rather than plastic — plastic traps moisture and speeds up the softening significantly. If you want the crust crisp again the next day, 5 minutes in a 400°F oven without any wrapping will bring most of it back.
Can I make this without an overnight rest — just a few hours? You can do a same-day version using slightly more yeast and a warmer environment, but honestly the flavor difference is real enough that I’d push for at least 8 hours if you can manage it. The long, cold-ish fermentation develops organic acids in the dough that give ciabatta its faint tang and complexity. A 3-hour room temperature proof with the same amount of yeast will give you a loaf that tastes mostly like plain wheat and olive oil — not bad, just flat compared to what overnight produces.
My loaves spread sideways instead of rising up — what went wrong? Almost always one of two things: the dough was too warm and over-proofed before baking, or you were too rough during shaping and knocked out the gas structure that would have supported upward rise. Ciabatta does spread more than a boule or bâtard by nature — it’s a flat bread — but if yours came out like a wide, flat pancake with almost no height, the dough likely over-proofed during the final 1-to-2 hour rest. Try reducing that final proof by 20 to 30 minutes next time and handle the shaped loaves as gently as possible when moving them to the baking tray.
Which answer helped you most?
Okay, Go Make This Bread
I won’t pretend it’s effortless. It asks for your attention at a few key moments and then asks you to leave it completely alone for hours at a time.
That balance — knowing when to work the dough and when to just walk away — is actually the skill ciabatta teaches you. And it transfers to almost every other bread you’ll ever make.
The steam step, the flour dusting, the full rest after baking — none of those feel important until you skip one and notice the difference. Then they feel very important.
Will you make this soon? I genuinely hope so, and I hope your kitchen smells like mine did on that second attempt — hot crust, toasted flour, and something faintly tangy underneath it all.
Fun fact: Bread flour’s higher protein content — typically around 12–13% — isn’t just about strength. That extra gluten network is what traps carbon dioxide bubbles during fermentation, which is exactly why ciabatta gets those large, irregular holes that make it so distinctly itself.
Happy cooking! —Marina Caldwell
Baking Chewy Ciabatta With A Shatteringly Crisp Crust
Ingredients
- 500g bread flour
- 325ml warm water
- 10g salt
- 7g instant yeast
- 30ml olive oil
- Extra flour for dusting
Instructions
- 1Combine warm water and yeast in a large bowl, then gradually fold in the bread flour until a shaggy dough forms
- 2Allow the mixture to rest undisturbed for 20 minutes, giving the gluten network time to develop naturally
- 3Drizzle in olive oil and sprinkle salt over the dough, working both in thoroughly until fully absorbed
- 4Turn dough onto a surface and knead firmly for 8-10 minutes until the texture becomes smooth yet slightly tacky
- 5Transfer to a lightly oiled bowl, cover tightly with plastic wrap, and leave at room temperature for 12-16 hours until the dough has tripled in volume
- 6Turn the risen dough onto a generously floured surface and cut into two equal portions, gently folding the outer edges toward the center
- 7Rest the portions for 30 minutes before carefully stretching each into a long, rustic oval shape
- 8Lay both loaves on parchment-lined baking trays and dust liberally with flour
- 9Allow a final proof of 1-2 hours until visibly puffed and airy
- 10Heat oven to 240°C (465°F), placing an empty pan on the lower rack for steam
- 11Score each loaf with diagonal cuts and mist the surface generously with water
- 12Bake 25-30 minutes until deeply golden with a crackling crust
- 13Transfer to a wire rack and resist cutting for at least one hour while the interior sets
Notes
– The longer the overnight fermentation, the more complex and tangy the flavor will become — 16 hours is ideal – Adding steam during the first few minutes of baking is essential for achieving that signature open, chewy crumb – Avoid over-handling the dough during shaping, as ciabatta’s airy texture depends on preserving those large internal gas bubbles


