

The Night This Chili Saved Dinner
It was a Friday in October, wind doing that thing where it sneaks under the back door, and I had exactly one pack of smoked sausage and some pantry cans staring back at me. That’s how this chili started — not planned, not styled, just hungry and cold.
I’ve made it probably a dozen times since. It’s the kind of thing I text my neighbor about when I know she’s had a rough week.
Why the Sausage Matters More Than You Think
The sausage you pick changes everything here. I used a hickory-smoked rope sausage the first time, and the difference compared to regular kielbasa was noticeable — that deeper, almost woodsy smell when it hit the hot oil.
Slice it into rounds about a half-inch thick. Not too thin or they curl up and dry out before they get a chance to brown properly.
Quick tip: Press the sausage rounds gently against the pan when you first add them — they’ll make better contact with the heat and brown more evenly in those first 2 minutes.
The BBQ Sauce Question
I know. BBQ sauce in chili sounds like a shortcut someone takes when they’ve given up. But hear me out.
One cup of a chipotle-style barbecue sauce folds into the tomatoes and broth and becomes something entirely different — not sweet, not tangy on its own, just this low background smokiness that you’d never identify as “barbecue sauce” if you didn’t already know it was there. My husband guessed smoked paprika. He was partly right, but not entirely.
Have you ever added something to a recipe that you were embarrassed to admit was in there? Because this was that for me, and now I tell everyone.
Toasting the Spices — Don’t Skip This Part
After the onion and garlic go in, the spices go in dry. Just for a minute. They hit that hot pot bottom and start smelling almost nutty.
I skipped this step once when I was in a hurry. The chili tasted fine. But fine isn’t the same as what happens when you don’t skip it — there’s a flatness without that toasted minute that I noticed immediately.
The Long Simmer Is Doing Real Work
Thirty-five to forty minutes uncovered. I know that sounds like a commitment on a weeknight, but it’s mostly hands-off — occasional stir, maybe pour yourself something.
What happens in that simmer is the liquid reduces, the beans start absorbing the sauce, and the sausage rounds go from just cooked to actually tasting like they belong in this pot. It thickens noticeably around the 30-minute mark.
Honest admission: the first time I made this, I got impatient at 20 minutes and called it done. It was watery and a little one-note. I almost wrote the whole recipe off. Let it go the full time — it’s worth it.
What It Looks Like When It’s Ready
The color goes from a bright red-orange to something deeper, almost rust-colored. The sausage rounds look a little glossy.
Drag a spoon through the middle of the pot — it should take a second or two before the chili fills back in. That’s your sign.
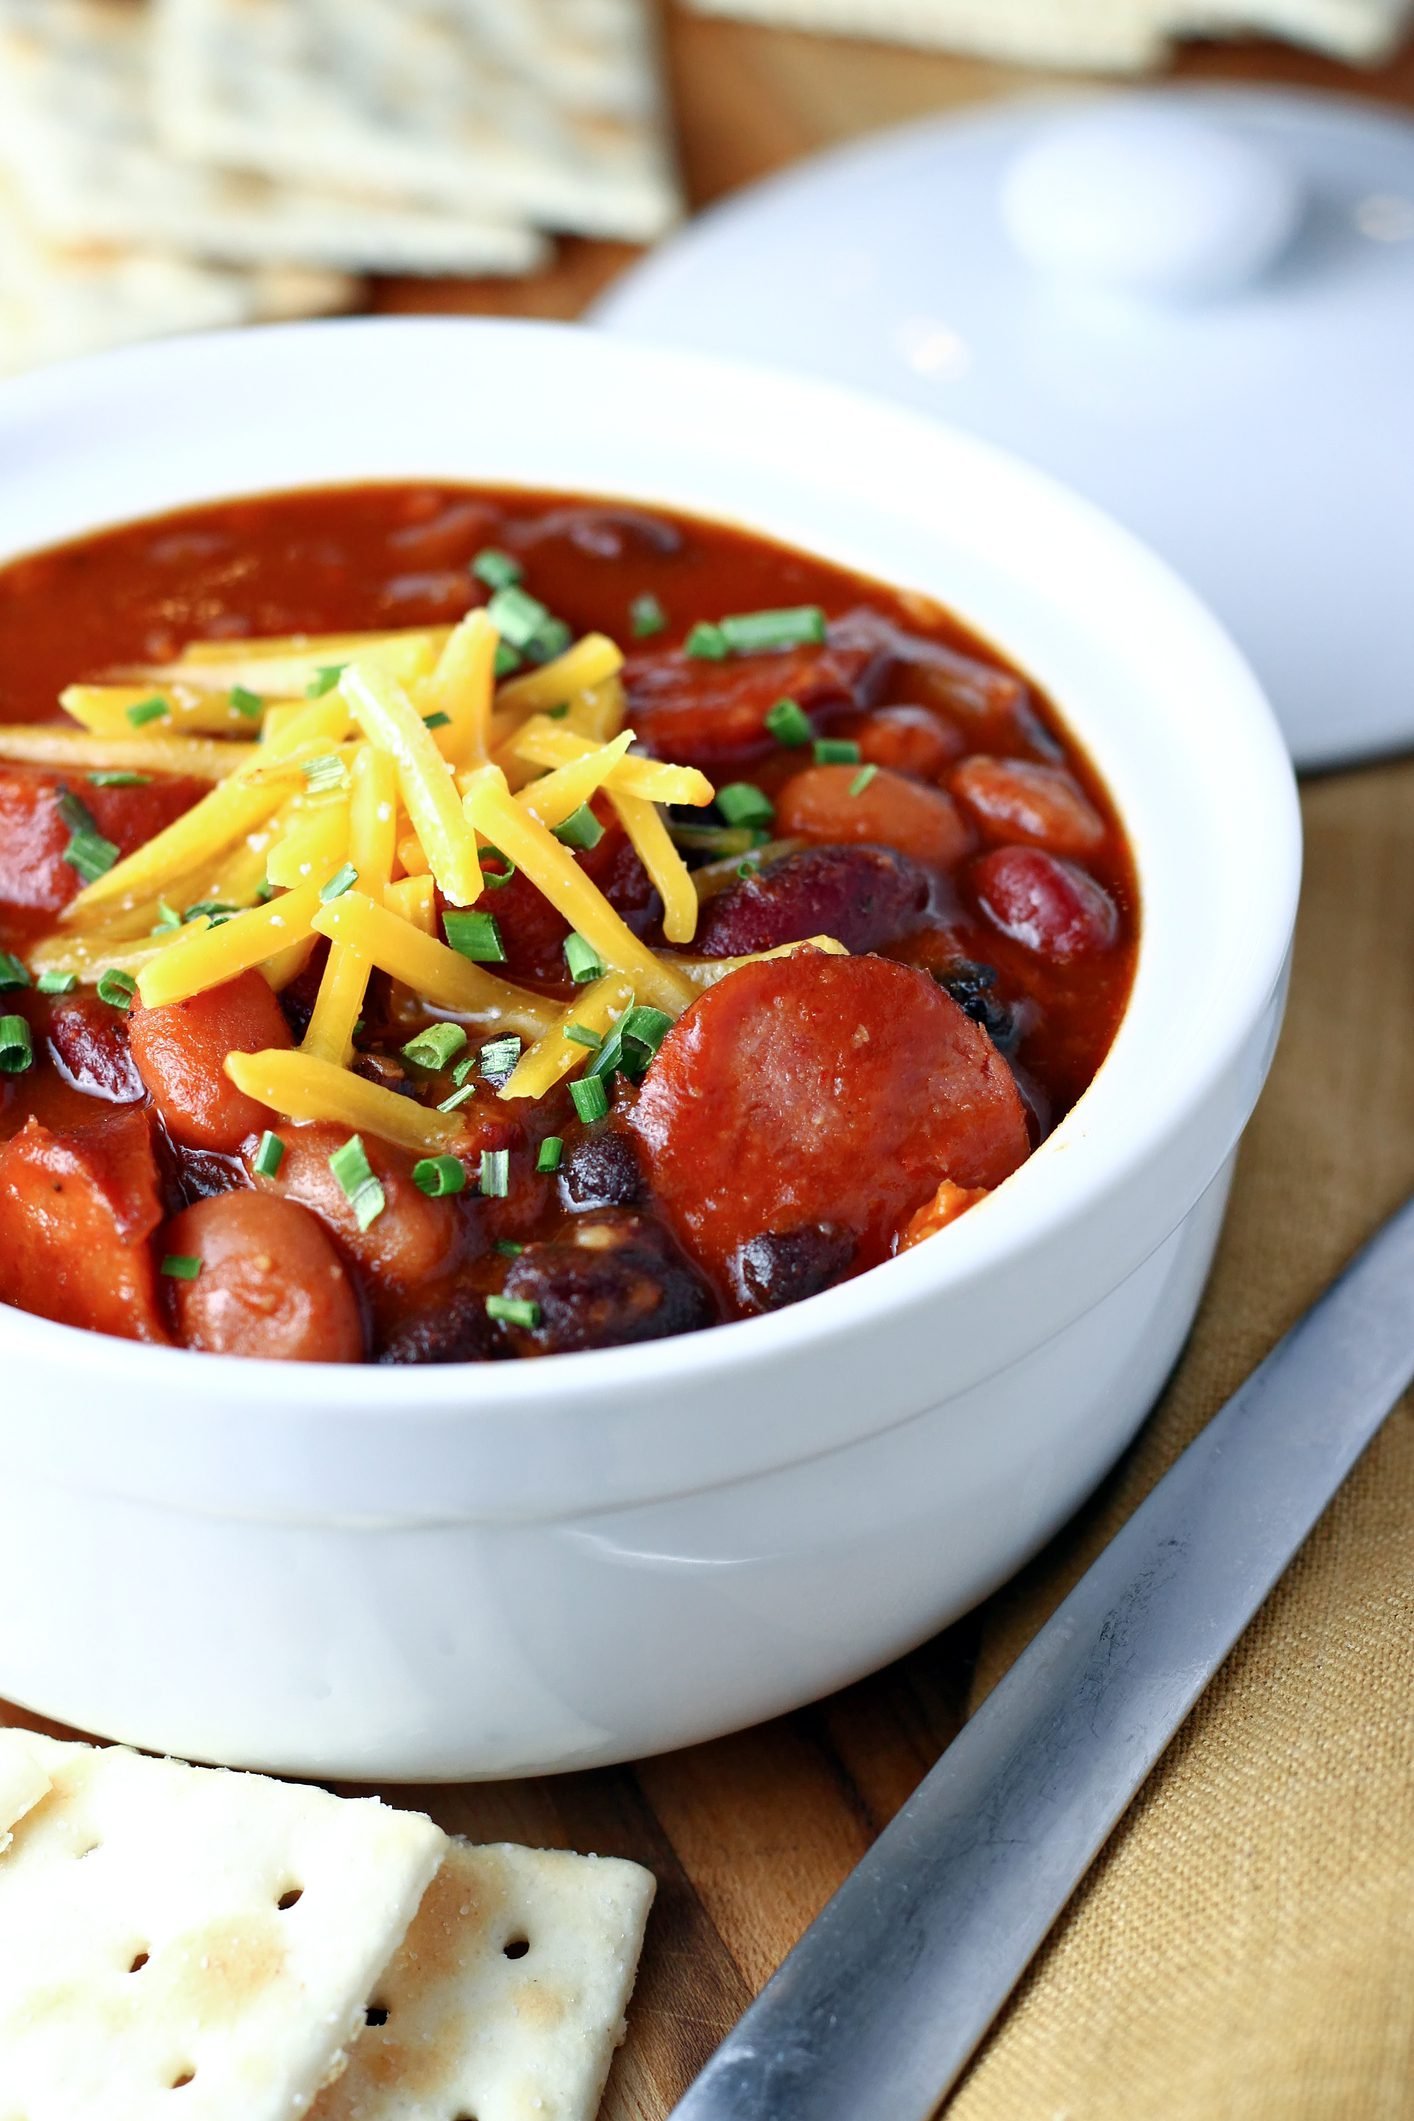
Top it with sour cream, sharp cheddar, maybe some jalapeño slices if your crowd can handle it. My sister always skips the jalapeños and adds extra cilantro, which honestly isn’t bad either.
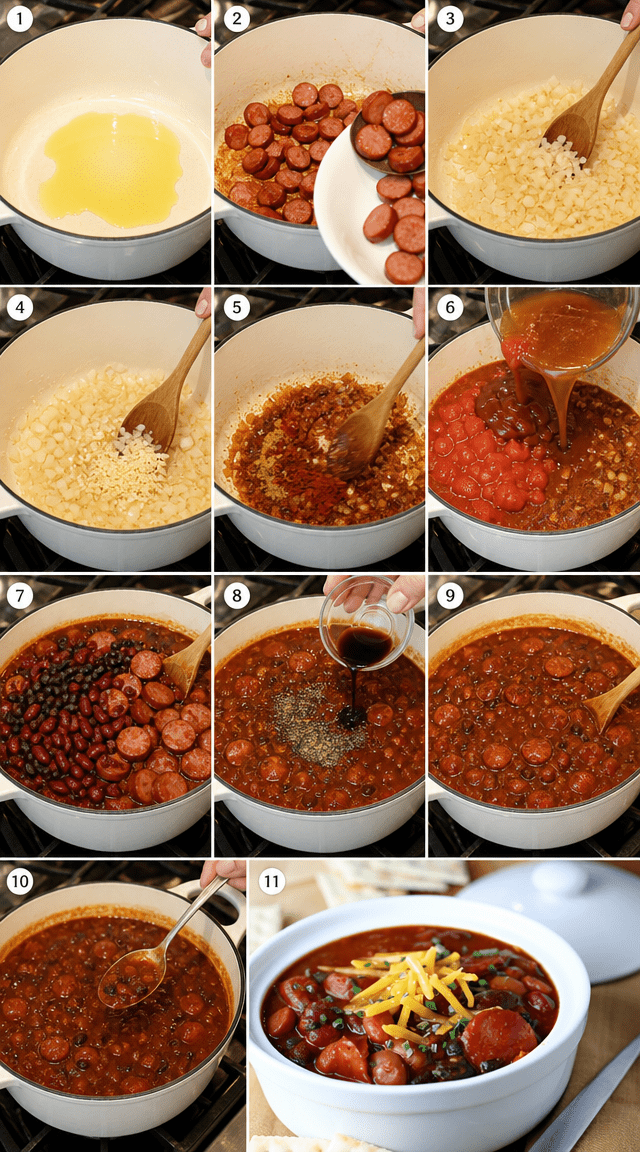
Step 1: Warm 2 tablespoons of olive oil in a large heavy-bottomed pot over medium-high heat until it shimmers. You want the pan genuinely hot before anything goes in — if it’s not, the sausage will steam instead of sear, and you’ll lose that browned crust that carries flavor through the whole pot.
Step 2: Add your sausage rounds in a single layer and leave them alone for about 2 to 3 minutes. Flip them and give the other side another 2 minutes until both sides are deeply browned. (Don’t crowd the pan — if your pot isn’t wide enough, do two batches rather than piling them in.) Transfer to a plate and set aside.
Step 3: Drop the diced onion straight into the same pot without wiping it out. All those browned bits on the bottom? Scrape them up as the onion cooks — they dissolve right into the base and that’s flavor you’d otherwise leave behind. Cook for about 3 minutes until the onion goes translucent.
Step 4: Push the onion to the edges and add the minced garlic to the center of the pot. Stir it for 30 seconds. I love this moment — the smell changes completely when the garlic hits the heat and it’s my favorite part of making this recipe, if I’m being honest.
Step 5: Sprinkle in the 2 tablespoons of chili powder, 1 tablespoon of paprika, and 1 tablespoon of cumin. Stir constantly for a full minute. The spices will darken slightly and smell almost toasty — that’s exactly what you want.
Step 6: Pour in the 28-oz can of crushed tomatoes, 1 cup of barbecue sauce, and 1/2 cup of beef broth. Stir everything together until the spice mixture is fully incorporated into the liquid — no dark clumps left on the bottom.
Step 7: Nestle the sausage rounds back into the pot, then add both cans of drained kidney beans and the drained black beans. Add 1 teaspoon of Worcestershire sauce. Season with salt and pepper — I usually start with about 3/4 teaspoon of salt and go from there.
Step 8: Bring the chili up to a gentle boil, then reduce the heat to medium-low and let it simmer uncovered for 35 to 40 minutes, stirring every 8 to 10 minutes. The chili will thicken significantly — you’ll see it happen around the 30-minute mark when the surface starts looking more like stew and less like soup.
Step 9: Taste it. Adjust the salt, add a little more chili powder if you want more heat, or a splash more broth if it’s gotten too thick. Ladle into bowls and add whatever toppings you’re using.
What topping do you always reach for first on a bowl of chili? Share below!
Ways to Change It Up
Try this: Swap the smoked sausage for spicy andouille and reduce the chili powder to 1 tablespoon — the andouille brings its own heat and the whole pot shifts to something with more of a Cajun edge.
Try this: Add one diced chipotle pepper in adobo sauce along with the garlic in Step 4 for a smokier, slightly hotter version. It changes the color of the chili too — goes darker, almost mahogany.
Try this: Stir in a cup of frozen corn in the last 10 minutes of simmering. It adds a little sweetness that balances the smoke, and my kids eat the whole bowl when corn is in it.
Which would you go for? Drop it in the comments.
How to Serve It
Ladle it over a scoop of white rice in a wide shallow bowl — the rice soaks up the sauce from the bottom and every bite has something going on.
Serve it alongside thick slices of cornbread, the kind with a little crunch on the bottom from a cast iron skillet. You’ll use the bread to drag across the bowl at the end.
Or go simple — just the chili, a handful of shredded cheddar melted over the top, and a cold drink. That’s honestly how I eat it most often on a Tuesday night.
What would you pair it with?
Storing It Without Ruining It
Fridge: let it cool fully before lidding the container — I give it about 45 minutes on the counter. It keeps for 4 days easily, and honestly tastes better on day two once everything has had time to sit together.
Freezer: portion it into individual containers before freezing. I use 2-cup containers so each one is basically one meal. It freezes well for up to 3 months — I’ve pulled some out at the 2.5-month mark and it was totally fine.
Reheating: add a splash of beef broth before warming it on the stovetop over medium-low heat. The chili thickens a lot as it sits and you’ll need that extra liquid or it’ll stick to the bottom before it’s fully warmed through.
Have you ever saved leftovers like this? Tell me below!
Mistakes I Made So You Don’t Have To
I once used a sweet Hawaiian-style barbecue sauce because it was all I had in the fridge. The chili came out tasting like a cookout dessert. It was not good. Use a smoky or chipotle-style sauce — the sweetness level matters here.
I also skipped rinsing the canned beans one time when I was rushing. The starchy liquid from the cans made the whole chili slightly gluey in a way that wasn’t the same as naturally thickened. Rinse your beans. It takes 20 seconds.
Third mistake: I put the lid on during the simmer. The whole point of simmering uncovered is that the liquid reduces and concentrates — with the lid on, I ended up with watery chili at the 40-minute mark and had to cook it an extra 20 minutes just to get it where it needed to be. Did something like this happen to you?
Questions I Get About This Chili
Can I use a different type of sausage? Yes, definitely. Andouille works really well if you want more heat and a Cajun-leaning flavor. Kielbasa is milder and slightly more garlicky. Italian sausage — out of the casing and crumbled — gives you a totally different texture but it still works. The thing to keep in mind is that smoked sausage brings a specific depth that unsmoked sausages don’t, so if you swap to something unsmoked, consider adding an extra half teaspoon of smoked paprika to compensate for what you’re losing.
Is this chili very spicy? As written, it’s more smoky than spicy — there’s a mild warmth from the chili powder and cumin but nothing that would bother someone with a low heat tolerance. If you want more heat, add a diced chipotle in adobo with the garlic, or throw in a half teaspoon of cayenne with the spices. If you’re feeding kids or someone sensitive to heat, cut the chili powder to 1 tablespoon and skip the jalapeño topping — it’ll still have great flavor without any real burn.
Can I make this in a slow cooker? You can, but I still strongly recommend searing the sausage and toasting the spices on the stovetop first before moving everything to the slow cooker. If you skip those steps and just dump everything in raw, the chili will taste noticeably flat — those two steps build the base of the flavor that the whole pot depends on. Once you’ve done the stovetop prep, transfer everything to the slow cooker and cook on low for 6 to 7 hours or high for 3 to 4 hours.
What if my chili gets too thick? This happens especially with leftovers. Just add beef broth a quarter cup at a time while reheating on medium-low, stirring it in and giving it a minute to loosen up before adding more. Water works in a pinch but broth keeps the flavor from thinning out. I keep a box of beef broth in the pantry specifically because of this chili — I’ve needed it more than once.
Do I have to use both kinds of beans? No. You can use all kidney beans if that’s what you have — three 15-oz cans instead of two kidney and one black bean. The black beans are slightly smaller and add a different texture that I like, but the recipe doesn’t fall apart without them. I’ve also made it with pinto beans when I was out of the others and it worked fine. The beans are really more about substance and texture than flavor here.
Can I make this ahead of time for a party? This is actually one of those dishes that’s better the next day. Make it the evening before, let it cool, refrigerate it overnight, and reheat it in the pot over medium-low with a splash of broth the next afternoon. The flavors settle together overnight in a way that makes the whole thing taste more cohesive. I’ve made it 24 hours ahead for a group of 10 before and it was the easiest part of the whole meal.
Which answer helped you most?
Make This On a Night When You Need It
This chili doesn’t ask much of you. One pot, pantry staples, about an hour from start to finish.
It’s the recipe I come back to when October gets cold, when my week was too long, when I want something that smells like dinner should smell.
The smoky depth in the title isn’t just a description — it’s what happens when you let simple ingredients do their thing over low heat without rushing them.
Will you make this soon? I hope you do. And I hope you let it simmer the full 40 minutes.
Fun fact: Smoked paprika — one of the key spices in this chili — is made from peppers that are slowly dried and smoked over oak wood fires for several weeks before being ground. That’s why it carries actual wood smoke flavor, not just heat.
Happy cooking! —Marina Caldwell
Campfire Sausage and Bean Chili With Smoky Depth
Ingredients
- 5 lbs smoked sausage, sliced into rounds
- 2 tablespoons olive oil
- 1 large onion, diced
- 3 garlic cloves, minced
- 2 cans (15 oz each) kidney beans, drained and rinsed
- 1 can (15 oz) black beans, drained and rinsed
- 1 can (28 oz) crushed tomatoes
- 1 cup barbecue sauce
- 1/2 cup beef broth
- 2 tablespoons chili powder
- 1 tablespoon paprika
- 1 tablespoon cumin
- 1 teaspoon Worcestershire sauce
- Salt and pepper to taste
- Optional toppings: sour cream, shredded cheddar, sliced jalapeños, fresh cilantro
Instructions
- 1Warm olive oil in a large heavy-bottomed pot over medium-high heat until shimmering.
- 2Sear sausage rounds in a single layer until deeply browned on both sides, roughly 5 minutes. Transfer to a plate and reserve.
- 3Drop diced onion into the same pot, scraping up any browned bits, and cook until translucent, about 3 minutes.
- 4Push onions to the side, add garlic, and stir for 30 seconds until aromatic.
- 5Sprinkle in chili powder, paprika, and cumin, stirring constantly for 1 minute to toast the spices and build depth.
- 6Pour in crushed tomatoes, barbecue sauce, and beef broth, stirring everything together.
- 7Nestle the reserved sausage back into the pot along with both kidney and black beans.
- 8Add Worcestershire sauce and season generously with salt and pepper, stirring to combine.
- 9Bring the chili to a gentle boil, then reduce heat and simmer uncovered for 35-40 minutes, stirring occasionally until thickened.
- 10Do a final taste test and adjust seasoning as needed.
- 11Ladle into bowls and finish with your preferred toppings.
Notes
– For a deeper smoky flavor, use hickory-smoked sausage and a smoky chipotle-style barbecue sauce. – The chili thickens considerably as it sits, so add a splash of beef broth when reheating leftovers. – This recipe freezes beautifully for up to 3 months — store in individual portions for easy weeknight meals.


