

Festive Sugar Cookies Crowned With Colorful Candy Gems
We all know that feeling, a special one, when you pull a tray of sugar cookies fresh from the oven, especially if they are decorated with colorful candy gems. Those gems really catch the light, almost like small jewels set in the cookie.
These holiday sugar cookies have everything you generally want in a festive treat; they are buttery, quite tender, have just correct amount of sweetness, and honestly they look fantastic. It does not matter if one bakes for a Christmas cookie exchange, or a birthday party, or may be for a spring celebration, even just to make your kitchen smell good.
These partic͏ular cookies really hit the mark. The basic idea here is not complicated, but what you end up with looks quite impressive.
You take a traditional sugar cookie dough, made even better with real butter and a little bit of both vanilla and almond extract. Then, you roll out the dough and cut it into whatever shapes you prefer. Before you put them in the oven, you press different colored candy-coated chocolate pieces onto each cookie.
Things like M&Ms or Sixlets, even other round candy pieces, get gently pushed into the dough. This makes sure they bake right into the cookie itself. What you get from this is a cookie that looks like it belongs in a fancy bakery window, but anyone can make them at home with just everyday ingredients.
Ingredients You Will Need
For making the sugar cookie dough, you are going to need a few things. First off, get two and three-quarter cups of universal flour, then one teaspoon of baking powder, and a half-tea͏spoon of fine sea salt. Regarding the wet stuff, have one cup of unsalted butter ready; it should be softened to room temperature, one cup of white granulated sugar, one large egg, about one and a half teaspoons of pure vanilla extract, and half a teaspoon of almond extract, also. That almond extract, it is small but it actually makes a big difference, giving the cookies a deep flavor, like from a bakery.
Do not skip it, if you can avoid that. W͏hen it comes to the candy gem topping, plan on needing about one and a half to two cu͏ps of bright, candy-coated chocolates. Things like M&Ms or Sixlets work really well for this.
You could sort these out by color ahead of time if you want specific color designs on each cookie, or just let everyone put them on randomly, which is fun especially for kids. Either way, the cookies definitely look great. Also, it might be a good idea to have some extra granulated or sanding sugar around, just a light dusting to sprinkle over the tops before they bake. This gives them a nice sparkle and a little bit of crunch once th͏ey come out of the oven.
Step-By-Step Instructions
Begin by whisking together the all-purpose flour, baking powder, and salt in a medium bowl. Set this dry mixture aside. In the bowl of a stand mixer fitted with the paddle attachment, or using a hand mixer and a large bowl, beat the softened butter and granulated sugar together on medium-high speed for about three to four minutes, until the mixture is pale, fluffy, and noticeably increased in volume. This step is important — properly creamed butter and sugar creates that light, tender crumb that makes sugar cookies so irresistible.
Add the egg to the butter mixture and beat well until fully incorporated. Scrape down the sides of the bowl, then add the vanilla extract and almond extract and mix again until everything is smooth and fragrant. With the mixer on low speed, gradually add the flour mixture in three additions, mixing just until the dough comes together and no dry flour streaks remain. Be careful not to overmix at this stage, as overworking the dough can result in tough cookies.
Turn the dough out onto a lightly floured surface and divide it into two equal portions. Flatten each portion into a disk, wrap tightly in plastic wrap, and refrigerate for at least one hour or up to two days. Chilling the dough is a non-negotiable step — it firms up the fat so the cookies hold their shape beautifully during baking and prevents excessive spreading. When you are ready to bake, preheat your oven to 350 degrees Fahrenheit and line two baking sheets with parchment paper.
Working with one disk of dough at a time, roll the chilled dough out on a lightly floured surface to about one-quarter inch thickness. Use your favorite cookie cutters — stars, circles, hearts, trees, or any shape that suits your celebration — to cut out the cookies and transfer them carefully to the prepared baking sheets, spacing them about two inches apart. Gently press five to eight candy gems into the surface of each cookie, arranging them however you like. If desired, sprinkle a pinch of sanding sugar over each cookie for extra sparkle.
Bake the cookies for ten to twelve minutes, or until the edges are just barely beginning to turn golden. The centers may look slightly underdone when you pull them out — that is exactly what you want. Sugar cookies continue to set as they cool, and pulling them out a minute early ensures they stay soft and chewy rather than becoming hard and dry. Allow the cookies to cool on the baking sheet for five minutes before transferring them to a wire rack to cool completely. Repeat with the remaining dough and candy gems.
Tips for Perfect Cookies Every Time
The single most important tip for sugar cookie success is to use butter that is truly at room temperature — not melted, not cold, but soft enough to leave an indent when you press your finger into it. Cold butter will not cream properly and will result in a dense, greasy dough. Melted butter will cause the cookies to spread too much. If your butter is too cold, cut it into small pieces and let it sit on the counter for twenty to thirty minutes before proceeding.
When rolling out your dough, work quickly so it does not warm up too much. If at any point the dough becomes sticky or soft, simply slide the whole sheet of dough onto a cutting board and pop it in the freezer for five minutes. Cold dough cuts cleanly and transfers easily without losing its shape. You can also roll the dough between two sheets of parchment paper to prevent sticking without adding extra flour, which can toughen the dough if overused.
For the most vibrant, beautiful candy gems on your cookies, press the candies in firmly but gently — you want them embedded in the dough, not sitting loosely on top. If any candies fall off after baking, a tiny dab of corn syrup or royal icing can be used to glue them back in place once the cookies are completely cool. Store the finished cookies in an airtight container at room temperature for up to five days, or freeze them (without the candy topping for best results) for up to three months.
Variations and Creative Customizations
One of the greatest joys of this recipe is how endlessly customizable it is. For a chocolate version, replace a quarter cup of the all-purpose flour with unsweetened cocoa powder to create a rich chocolate sugar cookie base that pairs beautifully with the colorful candy gems on top. For a citrus twist, add the zest of one lemon or orange to the dough along with a teaspoon of the corresponding extract for a bright, sunny flavor that is especially lovely in spring and summer.
You can also experiment with the candy toppings beyond traditional M&Ms. Gummy gems, Skittles, mini jelly beans, or even unwrapped Rolos pressed into the center of each cookie before baking create different and delightful textures and flavor combinations. For an extra fancy presentation, drizzle the finished cookies with a simple glaze made from powdered sugar and milk, then add the candy gems on top of the wet glaze so they adhere extra securely and the whole surface gleams beautifully.
Why These Cookies Are Worth Making Again and Again
Beyond their obvious visual appeal, these festive sugar cookies crowned with colorful candy gems earn their place as a go-to recipe for several very practical reasons. The dough can be made days in advance and stored in the refrigerator, making holiday baking far less stressful. The recipe scales up easily — simply double or triple the ingredients — if you need to produce large quantities for a cookie swap or school party. And because the decoration is built right into the baking process rather than applied after, there is no need for separate royal icing, elaborate piping skills, or a drying time of hours.
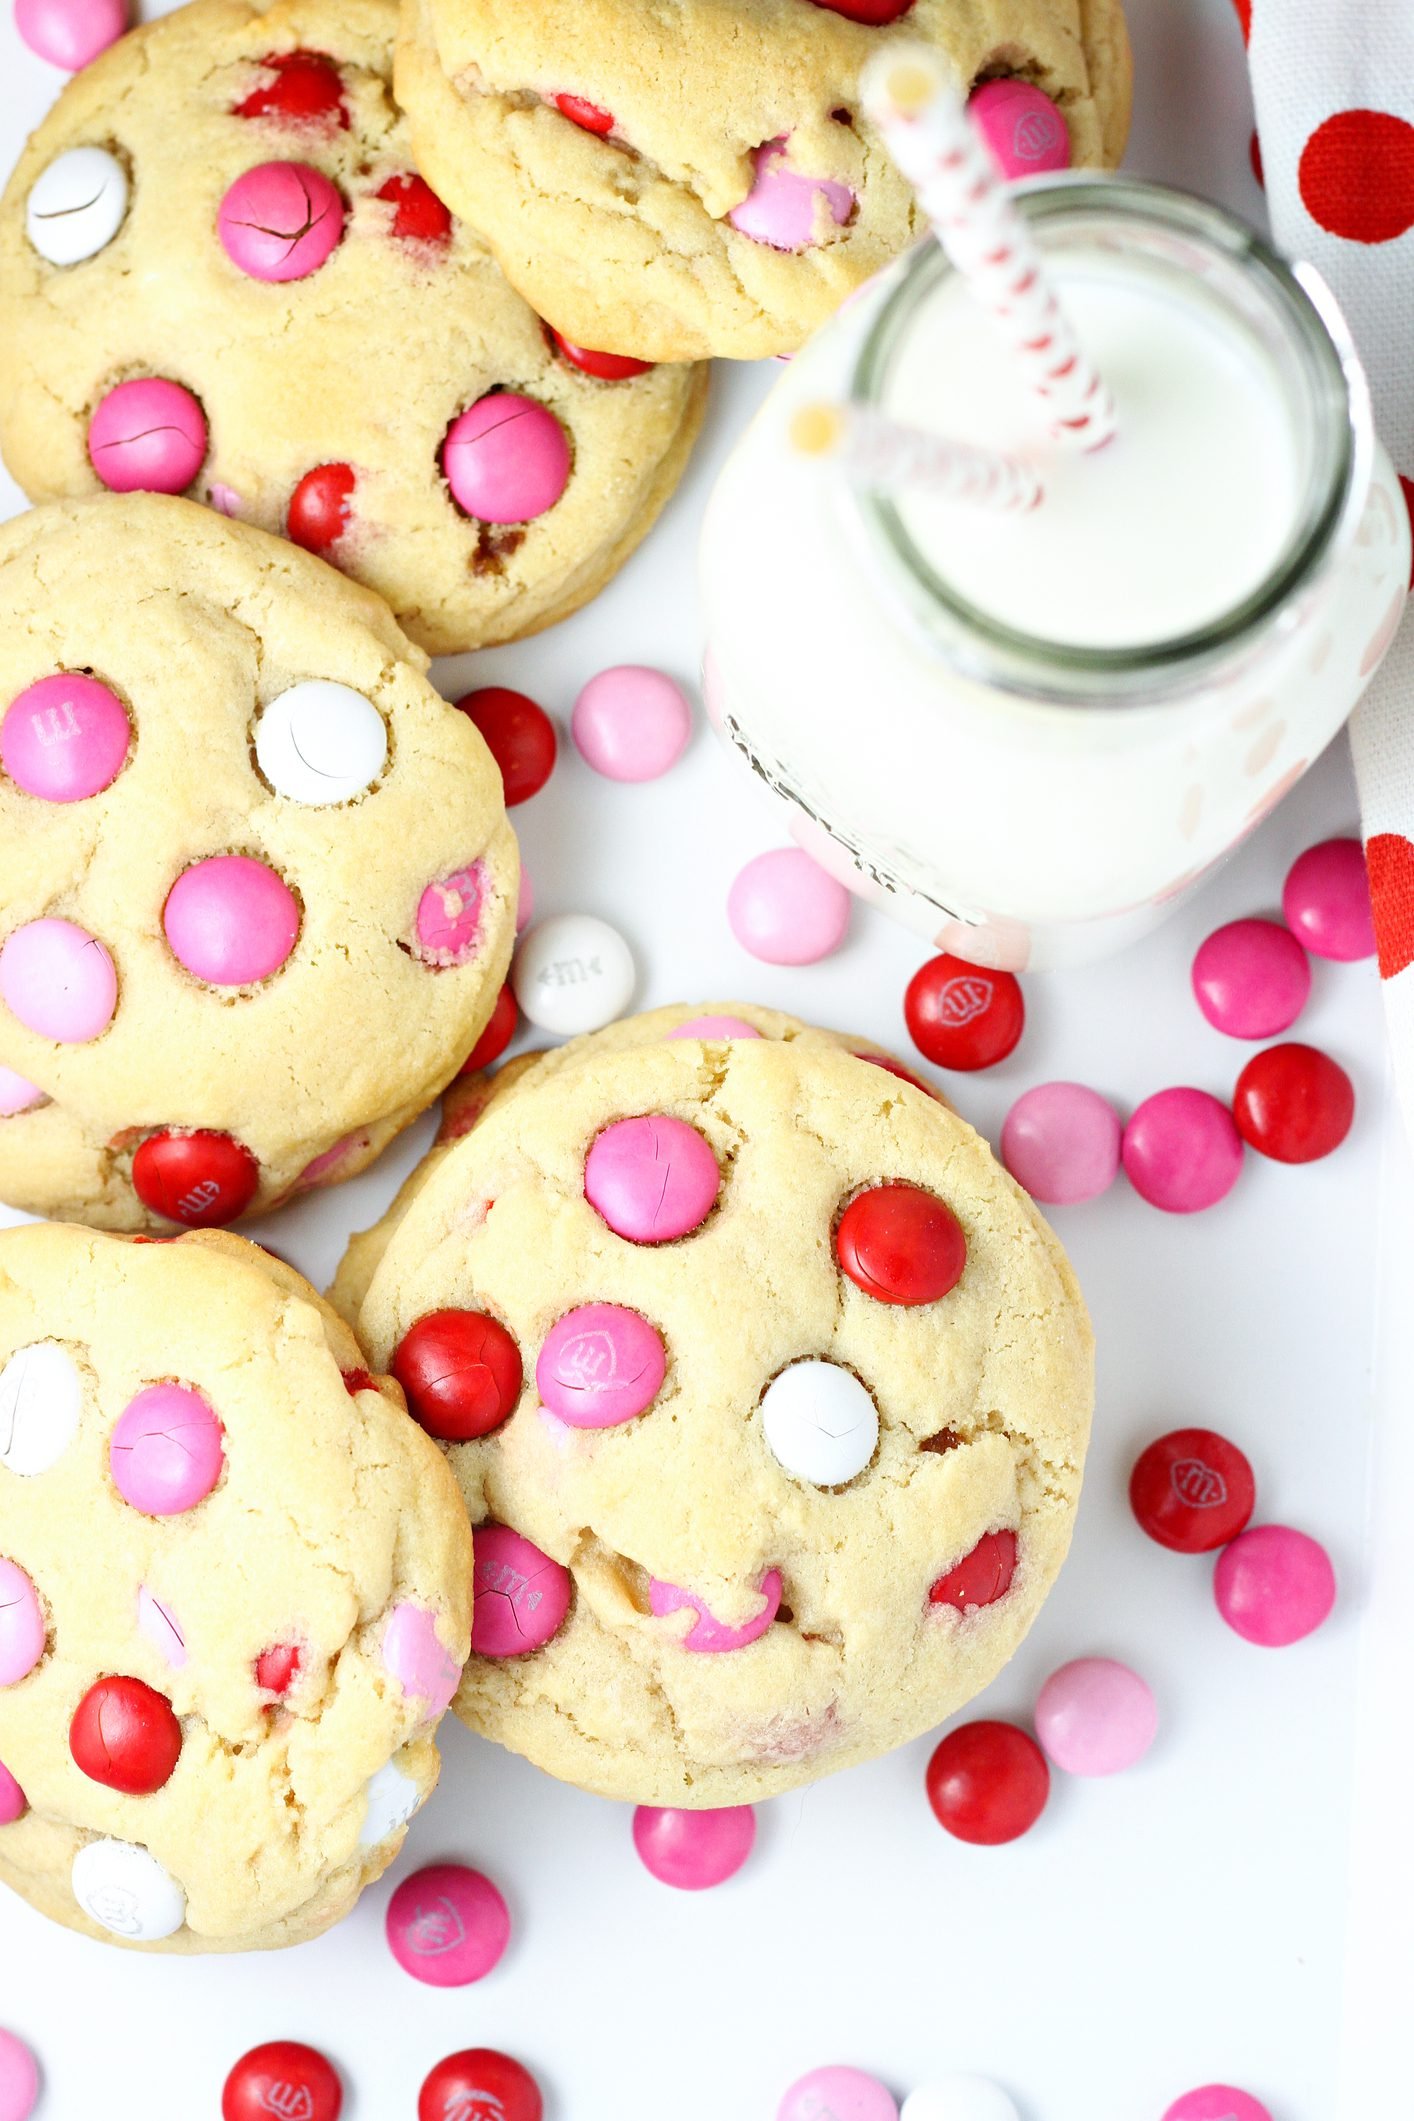
These cookies also travel well, holding their shape and staying fresh for days, which makes them ideal for gift-giving, shipping to loved ones, or packing into holiday tins. Every single time you make them, they are met with gasps of delight and requests for the recipe. They are the kind of cookie that makes people feel genuinely celebrated and cared for — and really, that is the highest compliment any cookie can receive. Bake a batch, share them generously, and watch the smiles multiply.
Festive Sugar Cookies Crowned With Colorful Candy Gems
Ingredients
- 2 3/4 cups all-purpose flour
- 1 teaspoon baking soda
- 1/2 teaspoon salt
- 1 cup butter, softened
- 1 1/2 cups granulated sugar
- 1 egg
- 1 teaspoon vanilla extract
- 1 cup powdered sugar
- 2-3 tablespoons milk
- 1/2 teaspoon vanilla extract (frosting)
- Pink, red, and white candy pearls or sprinkles
- Food coloring (optional)
Instructions
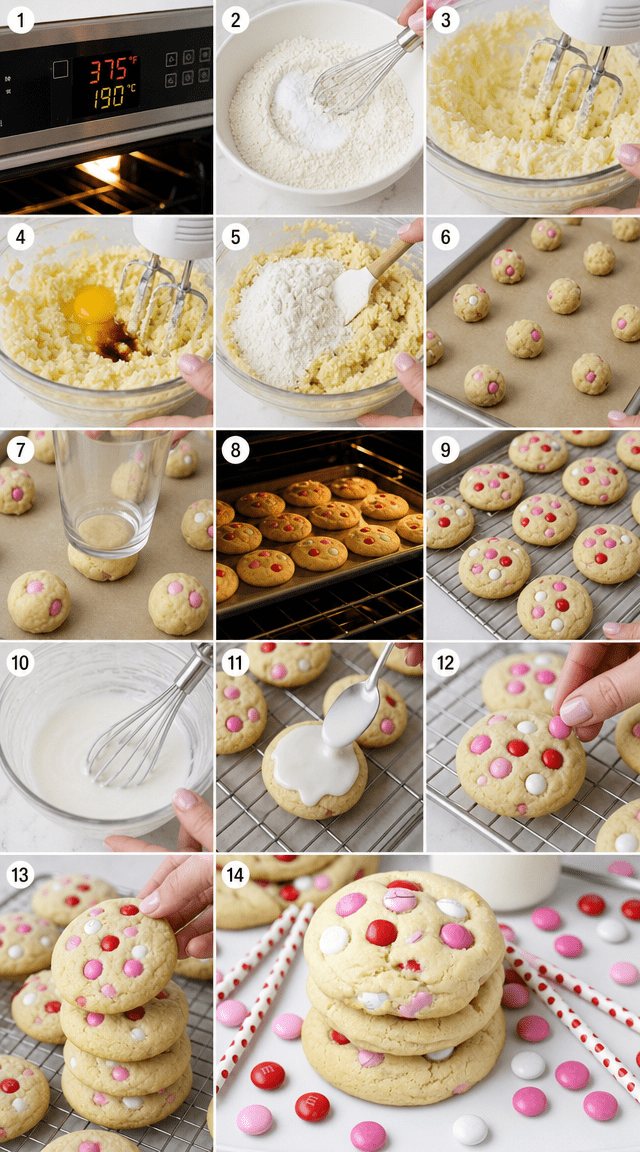
- 1Heat oven to 375°F and line baking sheets with parchment paper.
- 2Whisk flour, baking soda, and salt together in a bowl and set aside.
- 3Beat softened butter and granulated sugar until pale and fluffy, about 3 minutes.
- 4Add egg and vanilla, mixing until fully incorporated.
- 5Slowly blend in the flour mixture until a soft dough comes together.
- 6Scoop and roll dough into 1-inch balls, placing them 2 inches apart on prepared sheets.
- 7Gently press each ball flat using a smooth-bottomed glass.
- 8Bake 8-10 minutes until edges turn lightly golden.
- 9Rest cookies on the pan for 2 minutes before moving to a cooling rack.
- 10Whisk powdered sugar, milk, and vanilla into a smooth, spreadable glaze.
- 11Add food coloring to glaze if desired, then frost each cooled cookie.
- 12Scatter candy pearls and sprinkles over wet frosting immediately.
- 13Let frosting set completely before handling or stacking.
- 14Stack finished cookies in a tower to showcase the colorful toppings.
Notes
– Chill the dough for 30 minutes before rolling if it feels too sticky to handle easily. – For cleaner glaze lines, use a piping bag rather than spreading with a knife. – Store finished cookies in a single layer until frosting is fully set to avoid smudging decorations.


