

The Sunday These Rolls Changed My Fall Baking
It was a gray October Sunday and I had half a can of pumpkin puree sitting in the fridge from Thursday’s soup. I didn’t want to waste it.
I’d made dinner rolls a hundred times. But pumpkin in a roll dough? That was new for me. I wasn’t sure the texture would work, and honestly, my first batch didn’t — I’ll get to that.
These turned golden in about 15 minutes and my kitchen smelled like cinnamon and something faintly earthy that I couldn’t quite name. It was the cloves. Just a tiny fraction of a teaspoon and it changed everything.
Why Pumpkin Actually Makes Sense in Bread Dough
Pumpkin puree adds moisture the same way a little oil does — quietly, without making the dough sticky or heavy. The color it gives the rolls is this warm amber-orange that looks like fall in baked form.
Something only someone who’s made this would notice: the dough feels softer than a standard roll dough, almost a little tacky, and you’ll be tempted to add more flour. Don’t. That softness is exactly what gives you the pillowy interior.
Quick tip: If your pumpkin puree is very wet — like it’s been sitting in the fridge — blot it gently with a paper towel before using it so the dough doesn’t end up too slack to shape.
The Spiced Honey Swirl Part
The honey goes right into the dough itself — just one tablespoon — and it doesn’t make the rolls sweet so much as it rounds out the spices. My neighbor Terri thought there was brown sugar in them. There wasn’t.
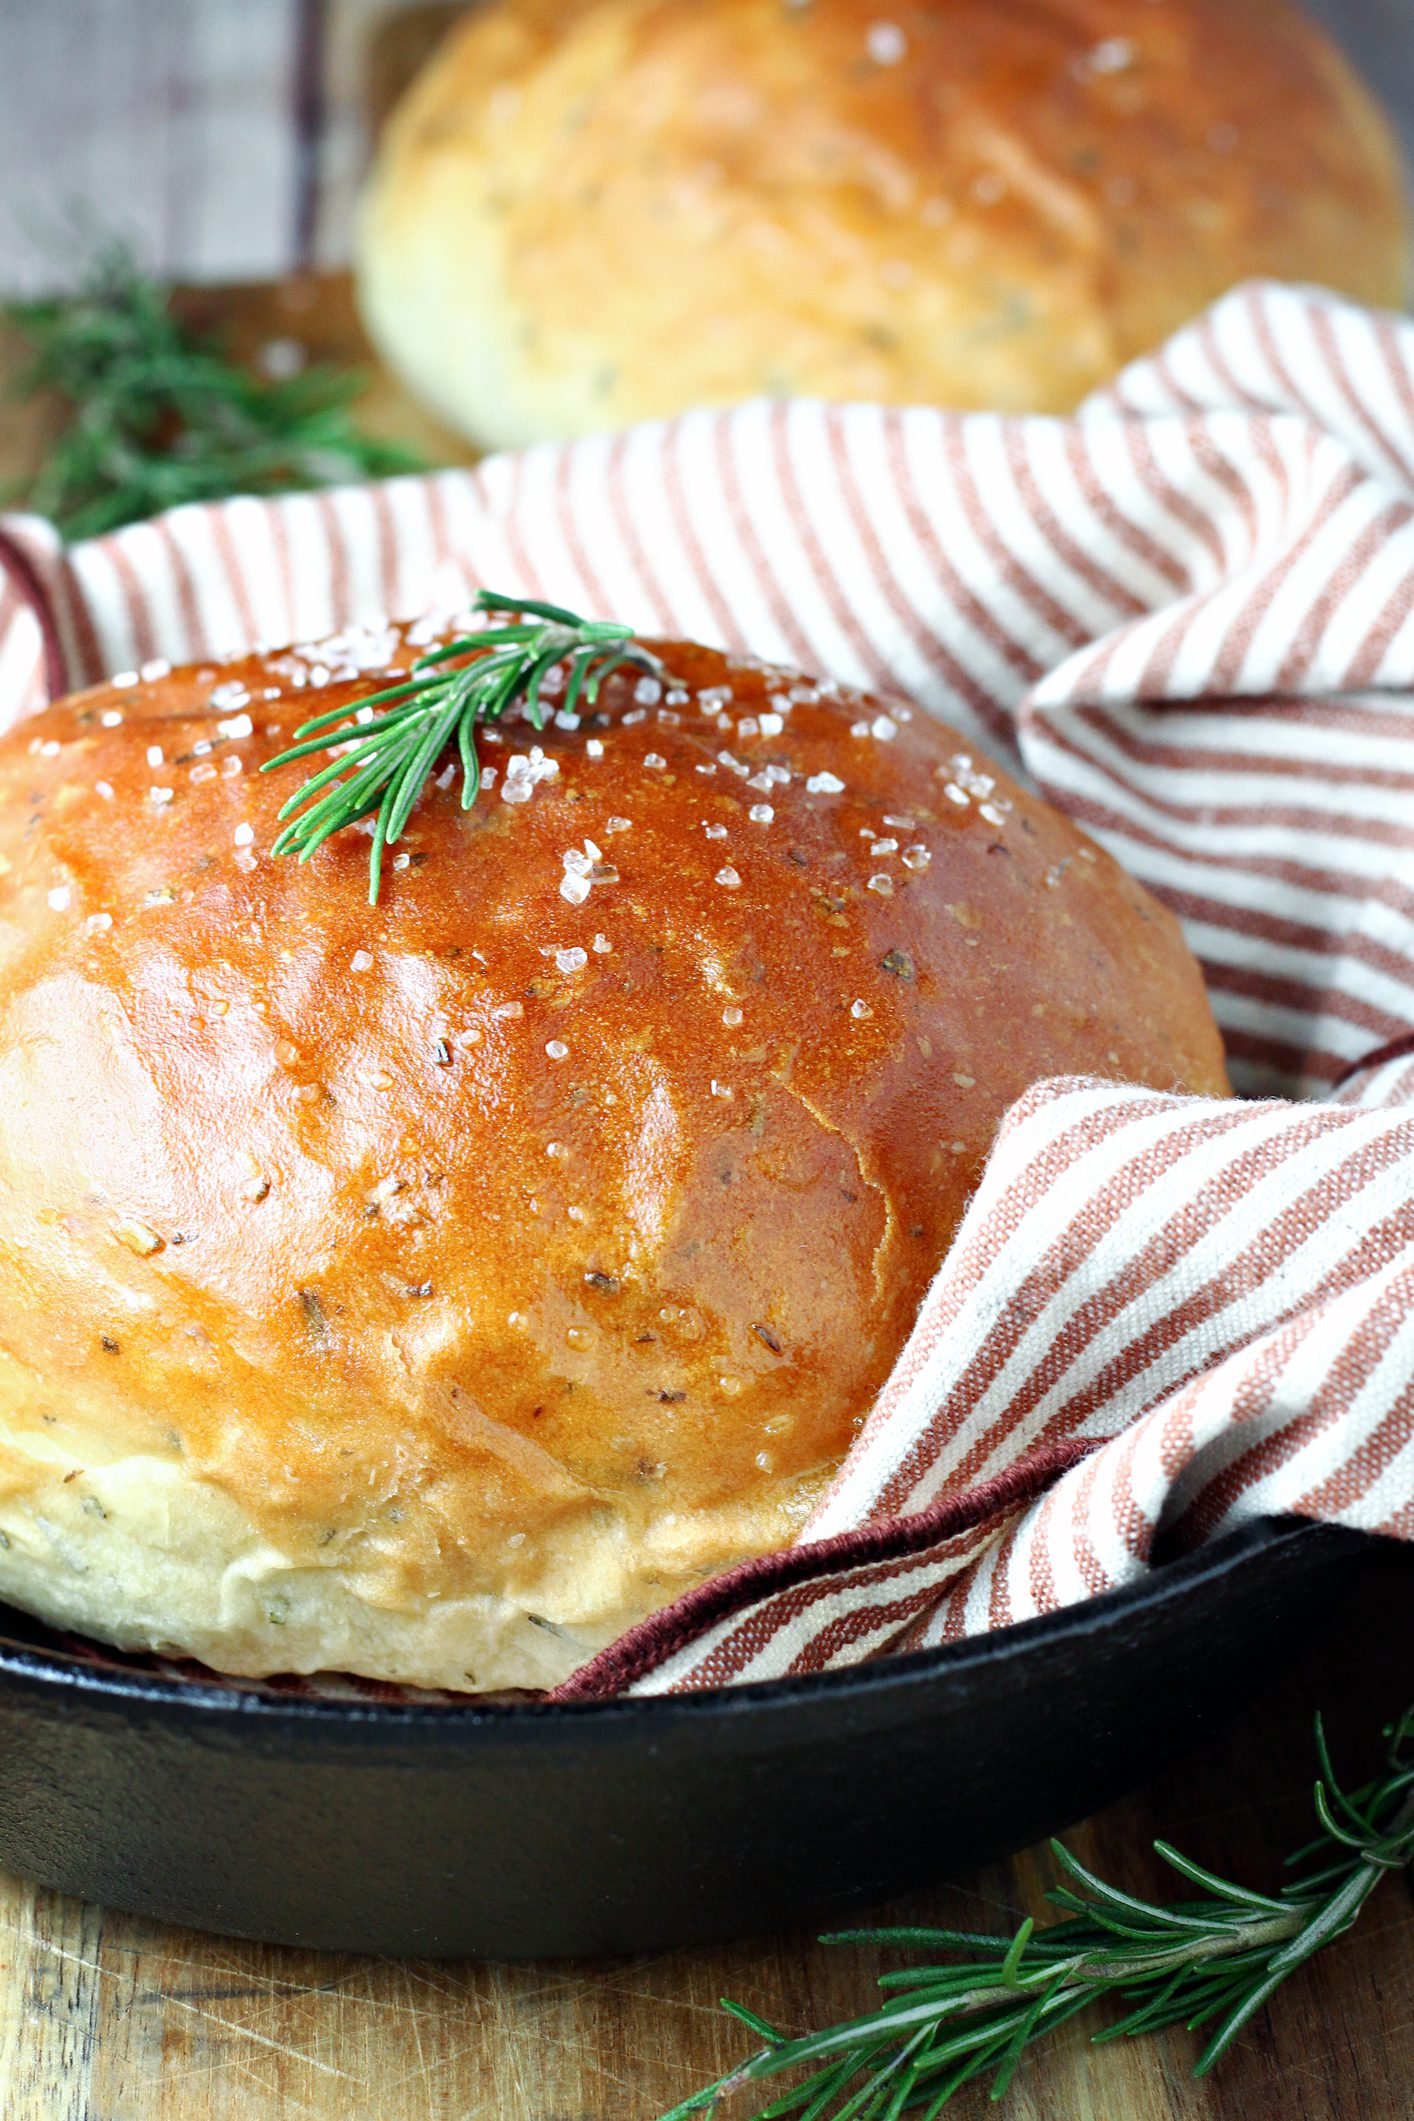
If you want a more obvious honey presence, brush warm honey over the tops right as they come out of the oven. That sticky glaze sets in about three minutes and gives the crust this gorgeous sheen.
The Batch I Burned and What I Learned
My first attempt, I baked them at 400°F because I was in a hurry. The outside went dark in under 12 minutes but the centers were still doughy. Not ideal.
375°F is the right call here. Lower and slower lets the pumpkin dough cook through evenly. That tapping test — knock the bottom of a roll and listen for a hollow sound — actually works, and I don’t say that about every bread recipe.
Have You Baked With Pumpkin Before?
I always wonder if people reach for pumpkin puree outside of pie season. Do you bake with it year-round, or is it strictly an October thing for you?
Either way, this recipe doesn’t require it to be autumn to make sense. The spice level is restrained enough that it doesn’t feel costume-y in March.
What Makes These Worth Making on a Weeknight
The ingredient list looks long but the active time is genuinely short. You’re looking at about 15 minutes of hands-on work — mostly mixing and kneading — and then a 10-minute rest before baking.
No stand mixer needed. No overnight rise. Just a bowl, your hands, and a baking sheet.
Each roll comes in at 98 calories and 17g of carbs, which means you can eat two without doing math. That’s not nothing.
How to Make Homemade Pumpkin Rolls Swirled With Warm Spiced Honey
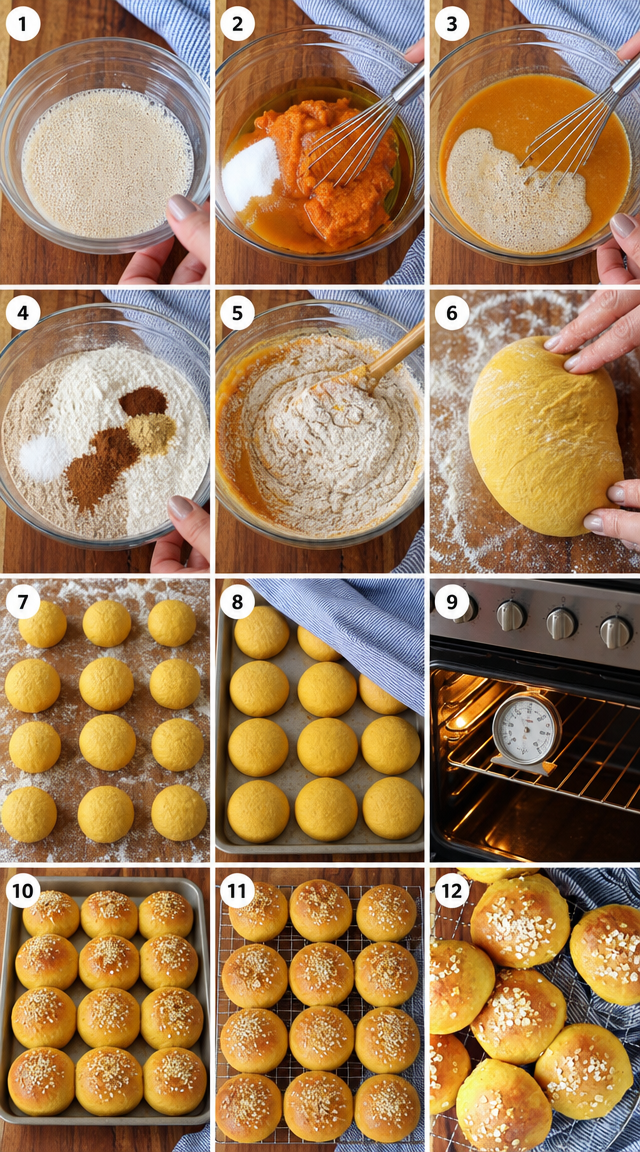
Step 1: Pour 1/4 cup warm water into a small bowl and sprinkle in 1/2 teaspoon instant yeast. Let it sit for 5 minutes until a foamy layer builds on top. If nothing happens after 5 minutes, your water was probably too hot or too cold — start over with water that feels like a warm wrist, not a hot tap.
Step 2: In a large mixing bowl, whisk together 1 cup pumpkin puree, 2 tablespoons sugar, 1 tablespoon honey, and 2 tablespoons vegetable oil until the mixture looks smooth and cohesive. It’ll be thick, almost like a very soft batter. That’s right.
Step 3: Pour the foamy yeast water into the pumpkin mixture and stir until fully combined. The color shifts to a slightly lighter orange at this point. I always think it looks like butternut squash soup at this stage, which is either appetizing or alarming depending on your mood.
Step 4: In a separate bowl, sift together 3/4 cup all-purpose flour, 1/2 cup whole wheat flour, 1 teaspoon salt, 1/2 teaspoon ground cinnamon, 1/4 teaspoon ground ginger, 1/8 teaspoon ground nutmeg, and 1/8 teaspoon ground cloves. (Don’t skip the sifting — the spices distribute so much more evenly and you won’t bite into a pocket of straight clove.)
Step 5: Slowly fold the dry ingredients into the wet, stirring as you go, until a soft dough comes together. It will feel slightly sticky. Turn it out onto a lightly floured surface and knead firmly for 5 full minutes until the dough is silky and springs back when you poke it.
Step 6: Divide the dough into 12 roughly equal pieces — I use a bench scraper and eyeball it — and roll each piece into a smooth tight ball by cupping your hand over it on the counter and using small circular motions. Arrange them on a lightly greased baking sheet, cover loosely with a damp towel, and let them rest for 10 minutes.
Step 7: While the rolls rest, heat your oven to 375°F. Don’t rush the preheat. A hot oven from the first minute matters for how the crust sets.
Step 8: Bake for 15 minutes until the rolls are deeply golden and sound hollow when you tap the bottom. Move them immediately to a wire rack — leaving them on the hot pan will keep cooking the bottoms and you’ll lose that tender interior. Cool completely before serving for the best texture.
Did yours turn that deep golden color, or did they stay pale? Share below!
Ways to Change It Up
Try this: Swap the vegetable oil for melted butter, measure for measure. The rolls come out slightly richer with a more rounded flavor — my sister actually prefers them this way and she’s not wrong.
Try this: Add 2 tablespoons of finely chopped toasted pecans to the dry ingredients before folding them in. The nuts don’t disrupt the dough structure and they give every third bite a little crunch.
Try this: Brush a mix of 1 tablespoon honey and 1/4 teaspoon cinnamon over the tops of the rolls the moment they come out of the oven. It sets into a glossy, spiced glaze that makes them look like they came from a bakery case.
Which would you go for? Drop it in the comments.
How to Serve It
Serve them warm alongside a bowl of butternut squash soup or a thick chicken stew — the rolls are sturdy enough to tear and dip but soft enough that they don’t feel like work to eat.
Split one open and spread it with salted butter while it’s still slightly warm. The butter melts into the crumb and the cinnamon smell doubles. That’s genuinely a good five minutes of your day.
They also work on a cheese board — set a few next to a sharp cheddar or an aged gouda and watch them disappear before the crackers do.
What would you pair it with?
Storing It Without Ruining It
Room temperature in an airtight container works for up to 3 days. After day two they’re best warmed for about 8 minutes in a 300°F oven — just enough to wake them back up without drying them out.
For freezing, wait until they’re fully cooled, then wrap each roll individually in plastic wrap and toss them into a zip bag. They keep for up to a month. Thaw on the counter for an hour or go straight to a low oven.
Don’t microwave them to reheat. I know it’s tempting. The texture turns gummy in about 20 seconds and you’ll be disappointed. Oven only.
Have you ever saved leftovers like this? Tell me below!
Mistakes I Made So You Don’t Have To
I once used pumpkin pie filling instead of plain pumpkin puree because I grabbed the wrong can without reading the label. The rolls were edible but overwhelmingly sweet — almost dessert-level — and the added spices in the filling made the flavor chaotic. Check the can.
I skipped the 10-minute rest after shaping on a night when I was rushing dinner. The rolls baked up noticeably denser, more biscuit-like than pillowy. That rest matters more than it looks like it should — even 10 minutes gives the dough time to relax and puff slightly before the heat sets it.
I also under-kneaded the dough once, stopping at about 3 minutes because my arms were tired. The rolls didn’t hold their ball shape well and the crumb was uneven — some parts chewy, some parts tight. Full 5 minutes. Set a timer if you need to.
Did something like this happen to you?
Questions I Get About These Rolls
Can I use active dry yeast instead of instant yeast? Yes, but you’ll need to proof it a little longer — closer to 10 minutes rather than 5 — and make sure the water temperature is between 100°F and 110°F. Active dry yeast has larger granules and takes more time to fully dissolve and activate. If it’s foamy and bubbly at the 10-minute mark, you’re good to go. If not, the yeast may be old and worth replacing before you commit the rest of your ingredients.
My dough feels too wet and sticky to knead. What do I do? Add flour one teaspoon at a time, not by the tablespoon. Pumpkin dough sits on the stickier side naturally, and dumping in too much flour at once is what leads to dense, dry rolls. Lightly flour your hands and the surface instead of the dough itself first. After a minute of kneading with that extra surface flour, most batches settle into a manageable texture without you needing to add anything directly to the dough.
Can I make these ahead and bake the next day? Shape the rolls, put them on the greased baking sheet, cover tightly with plastic wrap, and refrigerate overnight. In the morning, pull them out about 20 minutes before baking to take the chill off. The cold slow-rise actually develops the flavor a little more, so next-day rolls often taste slightly better than same-day ones. Bake at the same temperature and check them at 15 minutes as usual.
Do I have to use whole wheat flour, or can I use all-purpose for the full amount? You can use all-purpose for the entire amount — 1 and 1/4 cups total — and the rolls will still work. They’ll be a bit softer and lighter in color. The whole wheat adds a mild nuttiness and a slightly more substantial texture that I think suits the pumpkin and spices well, but it’s not a structural requirement. This is a good swap if whole wheat flour isn’t something you keep on hand regularly.
Why do my rolls look pale even after 15 minutes? A few possible reasons: your oven runs cool and may need an extra 3–4 minutes, or the rolls were too far apart on the pan and the heat wasn’t reflecting evenly between them. Try moving the rack one notch higher — closer to the upper heating element — and check again at 18 minutes. Also make sure you’re baking at 375°F and not a lower setting. The hollow-tap test is more reliable than color alone if you’re unsure.
Can I double the recipe? Absolutely. The dough scales up cleanly — just double every ingredient. You’ll need a larger bowl for mixing and two baking sheets, or bake in two batches. If using two sheets simultaneously, rotate them halfway through baking so both get even heat. The kneading time stays roughly the same — 5 minutes — but you may find the larger dough mass takes a minute or two longer to come fully together when you’re folding in the dry ingredients.
Which answer helped you most?
If You Make One Baked Thing This Season, Make It This
I know that sounds like a lot. But these rolls are genuinely low-effort for what you get out of them.
No special equipment. No overnight rest required. Just about 40 minutes start to finish.
The spice combination — cinnamon, ginger, nutmeg, cloves — sounds like a lot on paper but it reads as warm and subtle in the finished roll, not overwhelming. My husband, who actively avoids anything labeled “pumpkin spice,” ate three of these without comment. That’s a win.
Fun fact: Pumpkin puree is about 90% water, which is why it adds moisture to baked goods without making them greasy the way oil or butter can.
Will you make this soon? I hope so. And if you try the honey glaze on top, let me know — I’ve made it both ways and honestly can’t pick a favorite.
Happy cooking! —Marina Caldwell
Homemade Pumpkin Rolls Swirled With Warm Spiced Honey
Ingredients
- 1 cup pumpkin puree
- 3/4 cup all-purpose flour
- 1/2 cup whole wheat flour
- 2 tablespoons sugar
- 1 tablespoon honey
- 1 teaspoon salt
- 1/2 teaspoon instant yeast
- 1/2 teaspoon ground cinnamon
- 1/4 teaspoon ground ginger
- 1/8 teaspoon ground nutmeg
- 1/8 teaspoon ground cloves
- 2 tablespoons vegetable oil
- 1/4 cup warm water
Instructions
- 1Dissolve instant yeast in warm water and rest for 5 minutes until a foamy layer develops on top
- 2Whisk together pumpkin puree, sugar, honey, and vegetable oil in a large mixing bowl until smooth
- 3Pour the activated yeast mixture into the pumpkin base and stir until fully incorporated
- 4Sift together both flours, salt, cinnamon, ginger, nutmeg, and cloves in a separate bowl
- 5Slowly fold dry ingredients into the wet mixture, stirring until a cohesive soft dough comes together
- 6Turn dough onto a lightly floured surface and knead firmly for 5 minutes until silky and elastic
- 7Portion dough into 12 even pieces, rolling each into a smooth tight ball
- 8Arrange rolls on a lightly greased baking sheet, cover loosely with a damp towel, and rest 10 minutes
- 9Heat oven to 375°F while rolls finish rising
- 10Bake for 15 minutes until deeply golden and hollow-sounding when tapped underneath
- 11Immediately move rolls to a wire rack to stop residual cooking
- 12Cool completely before serving for best texture
Notes
– For richer flavor, substitute melted butter for the vegetable oil – Do not skip the rest period after shaping, as even this short rise noticeably improves texture – Store cooled rolls in an airtight container for up to 3 days or freeze for up to one month


