

The tray was gone in under six minutes.
I brought thirty of these to my neighbor Rosa’s holiday party and counted the time myself. The first batch I ever made, though — the cheese mixture was too warm and they flattened out before I even got to the rolling part.
What actually goes in here.
Cream cheese, sharp cheddar, parmesan, a little butter — all beaten together until you can’t see any lumps, which takes longer than you’d think with a hand mixer.
Garlic powder, onion powder, a quarter teaspoon of cayenne.
The coating is where it gets interesting — finely chopped pecans, crispy bacon bits, and sesame seeds spread flat in a shallow dish so you can roll the balls through without chasing them around the counter.
About the chill time.
Ten minutes in the fridge before you start rolling — that’s the number that matters here. I thought about skipping it once, actually no, I tried skipping it, and the balls just stuck to my palms and came apart.
Cold mixture holds its shape.
Quick tip: Lightly spray your hands with cooking spray before rolling — the mixture won’t cling and you’ll get cleaner, rounder balls in about half the time.
The thing only someone who made these would know.
If your pecans aren’t toasted, the coating tastes a little flat — not bad, just quiet, the way an untoasted walnut tastes next to a warm one. Five minutes in a dry pan at medium heat changed the whole thing.
My husband asked if I’d added something new the second time around. I hadn’t. Just toasted the nuts.
It looked wrong. It wasn’t.
After the 30-minute refrigeration, the outside coating gets — and I mean this — a little matte and dense-looking, not the glossy appetizer photo you might expect. I almost re-rolled a batch because I thought I’d done something wrong,
and then I bit into one and the inside was soft and sharp and the outside had this crunch from the sesame and bacon that made it completely worth setting aside the aesthetic concern.
Have you made something like this before?
I’m curious whether other people do the full tray for parties or make them as a smaller snack situation — does anyone actually make these just for a Tuesday?
Because I did, once. My kids ate eleven of them before dinner and I called it a win.
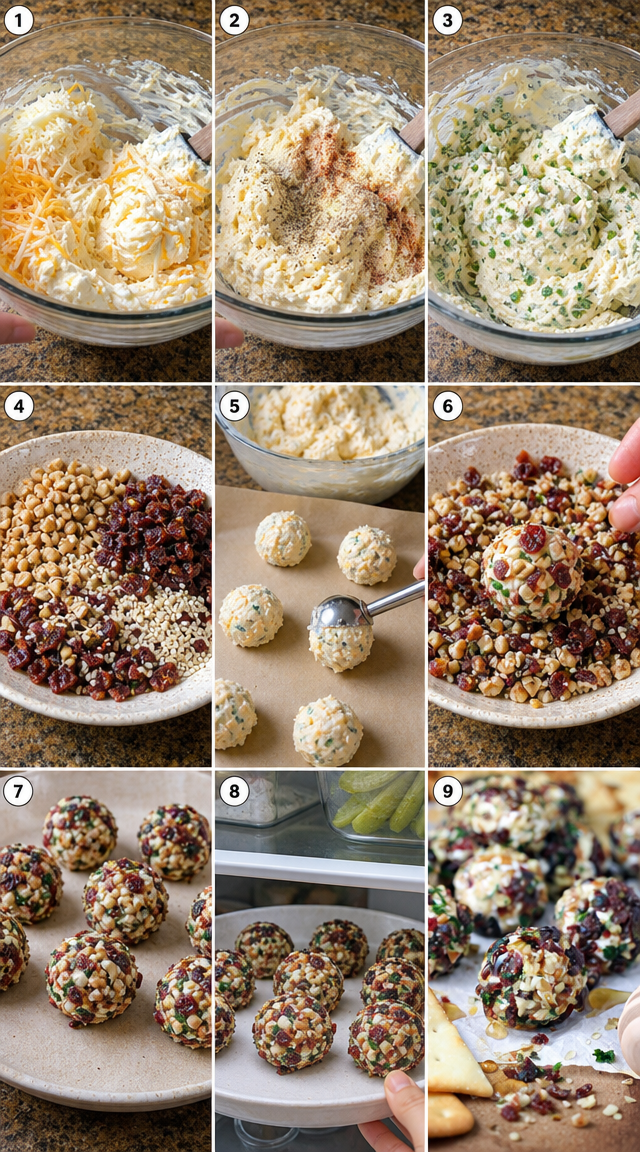
Step 1: Beat the cream cheese, butter, shredded cheddar, and parmesan together until the mixture is fully smooth — no streaks, no lumps. This took me about 3 minutes with a hand mixer on medium. (Don’t rush this step; uneven mixing means the balls won’t hold together cleanly when you roll them.)
Step 2: Add the garlic powder, onion powder, cayenne, salt, and pepper directly into the cheese mixture and stir until everything is evenly distributed. Taste it here — this is your last easy chance to adjust seasoning before it firms up.
Step 3: Fold in the chopped fresh chives gently so they stay green and distributed instead of bruised and clumped. I use a rubber spatula for this part, not the mixer.
Step 4: Cover the bowl and refrigerate the cheese mixture for 10 minutes. It goes from sticky and difficult to handle to something you can actually scoop cleanly. This step genuinely matters more than it sounds like it does.
Step 5: Spread the finely chopped pecans, bacon bits, and sesame seeds together in a flat shallow dish — a pie plate works great here. Make sure the coating layer is even so every ball gets full coverage when you roll it through.
Step 6: Using a small cookie scoop or a spoon, portion the chilled mixture into 1-inch balls. I got about 28 to 30 balls from one batch. (Spray your hands lightly with cooking spray first — it makes a real difference in how cleanly the balls form.)
Step 7: Roll each ball firmly through the coating, pressing lightly so the pecans and bacon bits actually stick rather than just sitting on the surface. My personal reaction here: this step is oddly satisfying, which I was not expecting.
Step 8: Arrange the finished cheeseballs on a parchment-lined tray and refrigerate for at least 30 minutes before serving. They need that time to firm back up after all the handling. Do you serve these straight from the fridge or let them sit at room temp for a few minutes first? Share below!
Ways to Change It Up
Try this: Swap the cayenne for a teaspoon of smoked paprika if you want the heat dialed way back but still want depth in the coating.
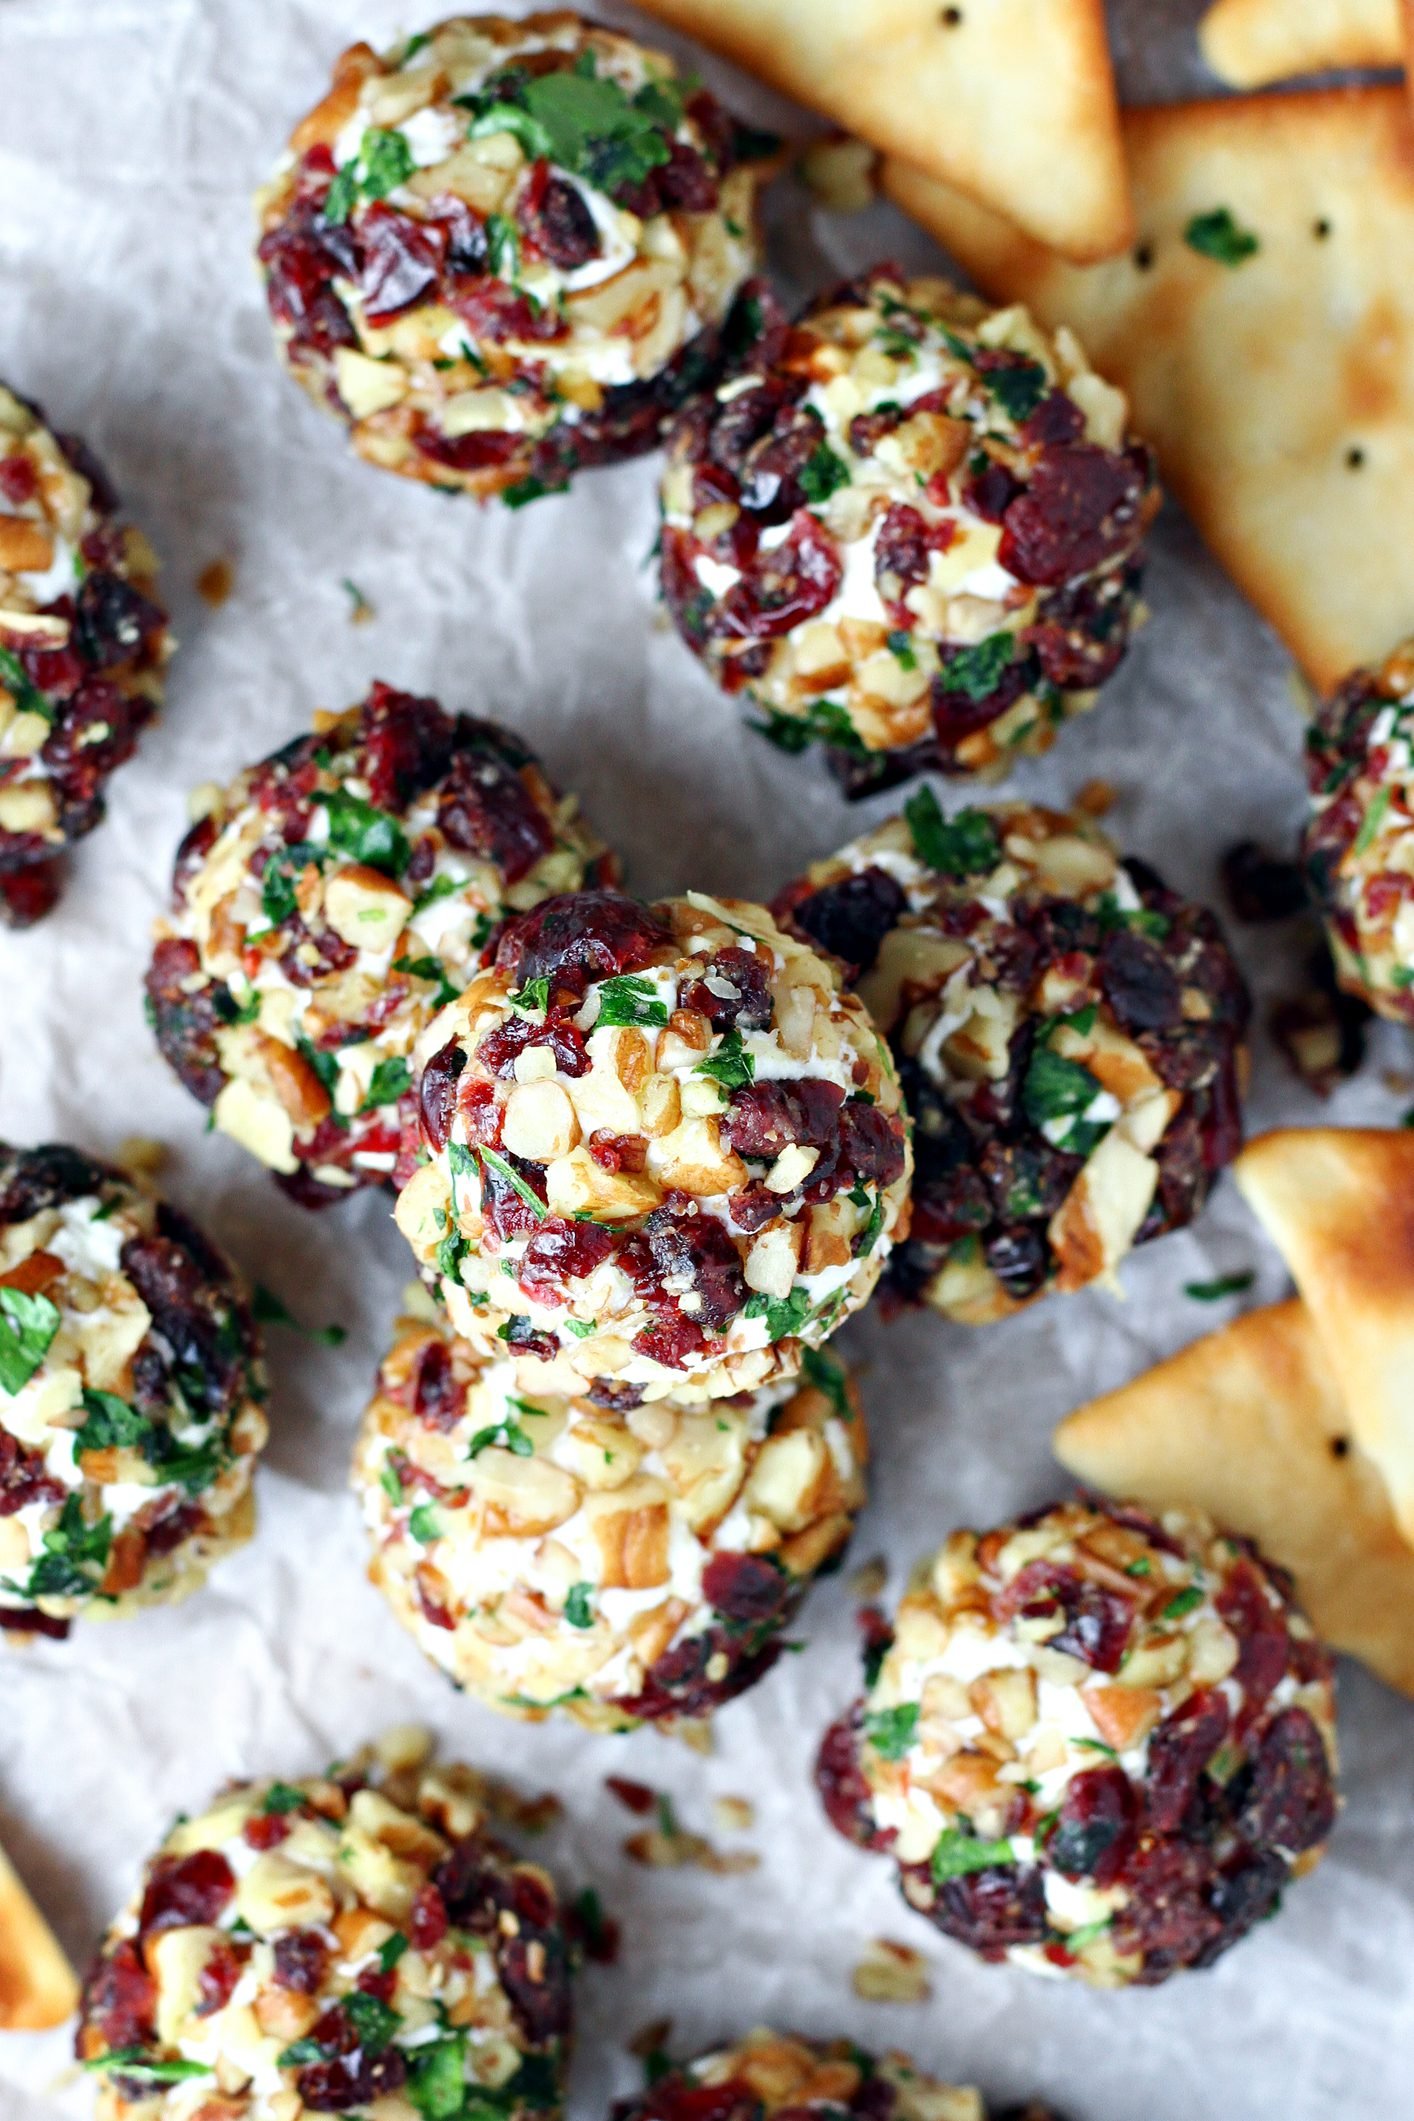
Try this: Replace the pecans with finely chopped walnuts and add a tablespoon of dried cranberries to the coating for a sweet-savory version that works well on a cheese board.
Try this: Add a tablespoon of hot sauce directly into the cheese mixture before chilling — the heat gets distributed evenly and doesn’t sit on top the way extra cayenne sometimes does.
Which would you go for? Drop it in the comments.
How to Serve It
Set them out on a wooden board with toothpicks and a handful of crackers — something thin and sturdy, like a water cracker, that won’t compete with the coating. The contrast in texture is the whole point.
They also work alongside a charcuterie spread where you want something that holds its shape at room temperature for up to an hour without collapsing.
For a smaller gathering, I’ve served them stacked on a small slate tile with a couple of cornichons on the side — the brine cuts through the richness of the cream cheese in a way that keeps you reaching for another one.
What would you pair it with?
Storing It Without Ruining It
These keep covered in the fridge for up to 48 hours — actually, I’ve pushed it to 60 hours and they were fine, the coating just softened slightly near the bottom where they rested against the tray.
Freezing them works in theory but the sesame seeds get a little strange in texture after thawing, so I’d skip the coating before freezing and roll them fresh when you pull them out.
No reheating needed — these are a cold appetizer and they’re better that way. Straight from the fridge, or rested at room temp for about 10 minutes.
Have you ever saved leftovers like this? Tell me below!
Mistakes I Made So You Don’t Have To
I once made the cheese mixture, decided it needed more cayenne, added another half teaspoon without measuring, and ended up with cheeseballs that made my mother-in-law’s eyes water. She was polite about it. I was not proud.
The coating fell off the first batch entirely — I’d rolled them too gently and barely pressed. They looked fine going into the fridge and came out bare. I served them anyway and just put a bowl of the coating on the side as a “dipping option,” which is not what it was.
Skipping the chill step between mixing and rolling means 20 minutes of frustration trying to shape something that doesn’t want to be shaped. Set a timer. Walk away. It’s actually faster overall.
Did something like this happen to you?
Questions I actually get about these
Can I make these more than a day ahead? Up to 48 hours works well. But past that, the coating starts to absorb moisture from the cheese and loses its crunch — especially the sesame seeds. Make them the day before if you can.
What if I can’t find pecans? Walnuts work almost identically at the same quantity. I tried this once and honestly couldn’t tell the difference in the finished bite — the bacon flavor dominates the coating anyway.
Do I have to toast the nuts first? It depends on how much flavor depth you want. Untoasted, the coating is mild. Toasted at 350°F for about 6 minutes, it’s noticeably nuttier and more textured. And the difference is worth the extra step.
Can I use pre-shredded cheese? You can, but pre-shredded cheddar has an anti-caking coating that makes the mixture slightly grainy. Block cheese grated fresh melts into the cream cheese smoother. Not a dealbreaker, just worth knowing.
How many does one batch make? About 28 to 30 balls at 1 inch each. I’ve gotten as few as 24 when I wasn’t paying attention to portion size — the scoop makes a difference. Use a small cookie scoop and you’ll be consistent.
Can I leave out the bacon for a vegetarian version? It depends on what you want from the coating. The bacon adds a smokiness and a salty chew that the nuts and sesame seeds don’t replicate on their own. But smoked almonds, finely chopped, get you surprisingly close — I tried this once at a dinner where someone couldn’t eat meat and no one asked questions.
Which answer helped you most?
Go ahead and make a double batch.
I say that because one batch disappears faster than you expect, and you will want more.
They’re easy to prep the night before, which means the day of your party you have literally nothing to do but pull the tray out of the fridge and stick toothpicks in them.
Fun fact: Pecans are the only tree nut native to North America, and they contain over 19 vitamins and minerals — though I’ll be honest, that’s not why I put them in this recipe.
The texture contrast is what keeps people coming back for the third and fourth one without really meaning to.
Will you make this soon?
If you do, leave a comment and let me know if you toasted the nuts or skipped it — I’m genuinely curious how many people take that extra step.
Happy cooking! —Marina Caldwell
Miniature Cheeseballs Rolled in Smoky Bacon Pecan Coating
Ingredients
- 8 oz cream cheese, softened
- 1 cup sharp cheddar cheese, shredded
- 1/4 cup parmesan cheese, grated
- 2 tablespoons butter, softened
- 1/2 teaspoon garlic powder
- 1/2 teaspoon onion powder
- 1/4 teaspoon cayenne pepper
- 1/4 cup fresh chives, chopped
- 1/2 cup pecans or walnuts, finely chopped
- 1/2 cup crispy bacon bits
- 1/4 cup sesame seeds
- Salt and pepper to taste
Instructions
- 1Beat cream cheese, butter, cheddar, and parmesan together until completely smooth and fluffy.
- 2Season the mixture with garlic powder, onion powder, cayenne, salt, and pepper, stirring thoroughly.
- 3Gently fold in fresh chives until evenly incorporated throughout the mixture.
- 4Chill the cheese mixture for 10 minutes to make handling easier.
- 5Spread chopped nuts, bacon bits, and sesame seeds together across a flat shallow dish.
- 6Portion the chilled mixture into uniform 1-inch balls using a small scoop or spoon.
- 7Roll each ball firmly through the coating mixture, pressing lightly to ensure full coverage.
- 8Arrange finished cheeseballs on a parchment-lined tray and refrigerate at least 30 minutes before serving.
Notes
– The cheeseballs can be made up to 48 hours ahead and stored covered in the refrigerator, making them ideal for party planning. – Toast the pecans or walnuts beforehand for a deeper, richer flavor in the coating. – For cleaner shaping, lightly coat your hands with cooking spray to prevent the mixture from sticking while rolling.


