
Why This No-Bake Black Forest Cheesecake Actually Works
I have made a lot of cheesecakes. Baked ones. No-bake ones. The kind that crack and the kind that don’t. This No Bake Black Forest Cheesecake Easy Recipe is the one I keep coming back to.
It is not complicated. You do not turn on the oven. You do not worry about water baths or curdling or timing a delicate custard. The payoff is a dessert that looks like you spent hours in the kitchen.
The combination of dark chocolate and black cherries is classic for a reason. The tartness of the cherries cuts through the rich cream cheese and chocolate. It balances.
But I did not always trust no-bake cheesecakes. Early attempts were too soft. They did not slice cleanly. The crust fell apart. I learned the tricks the hard way.
This version works because of structure. The cocoa powder in one layer stiffens the filling. The heavy cream, whipped to stiff peaks, holds everything up. The chilling time is non-negotiable.
Surprising fact: The first recorded Black Forest cake recipe appeared in 1934 in a German cookbook. The cherries represent the dark forest, and the cream represents the snow on the trees. This no-bake version pays homage to that imagery, just without the heat.
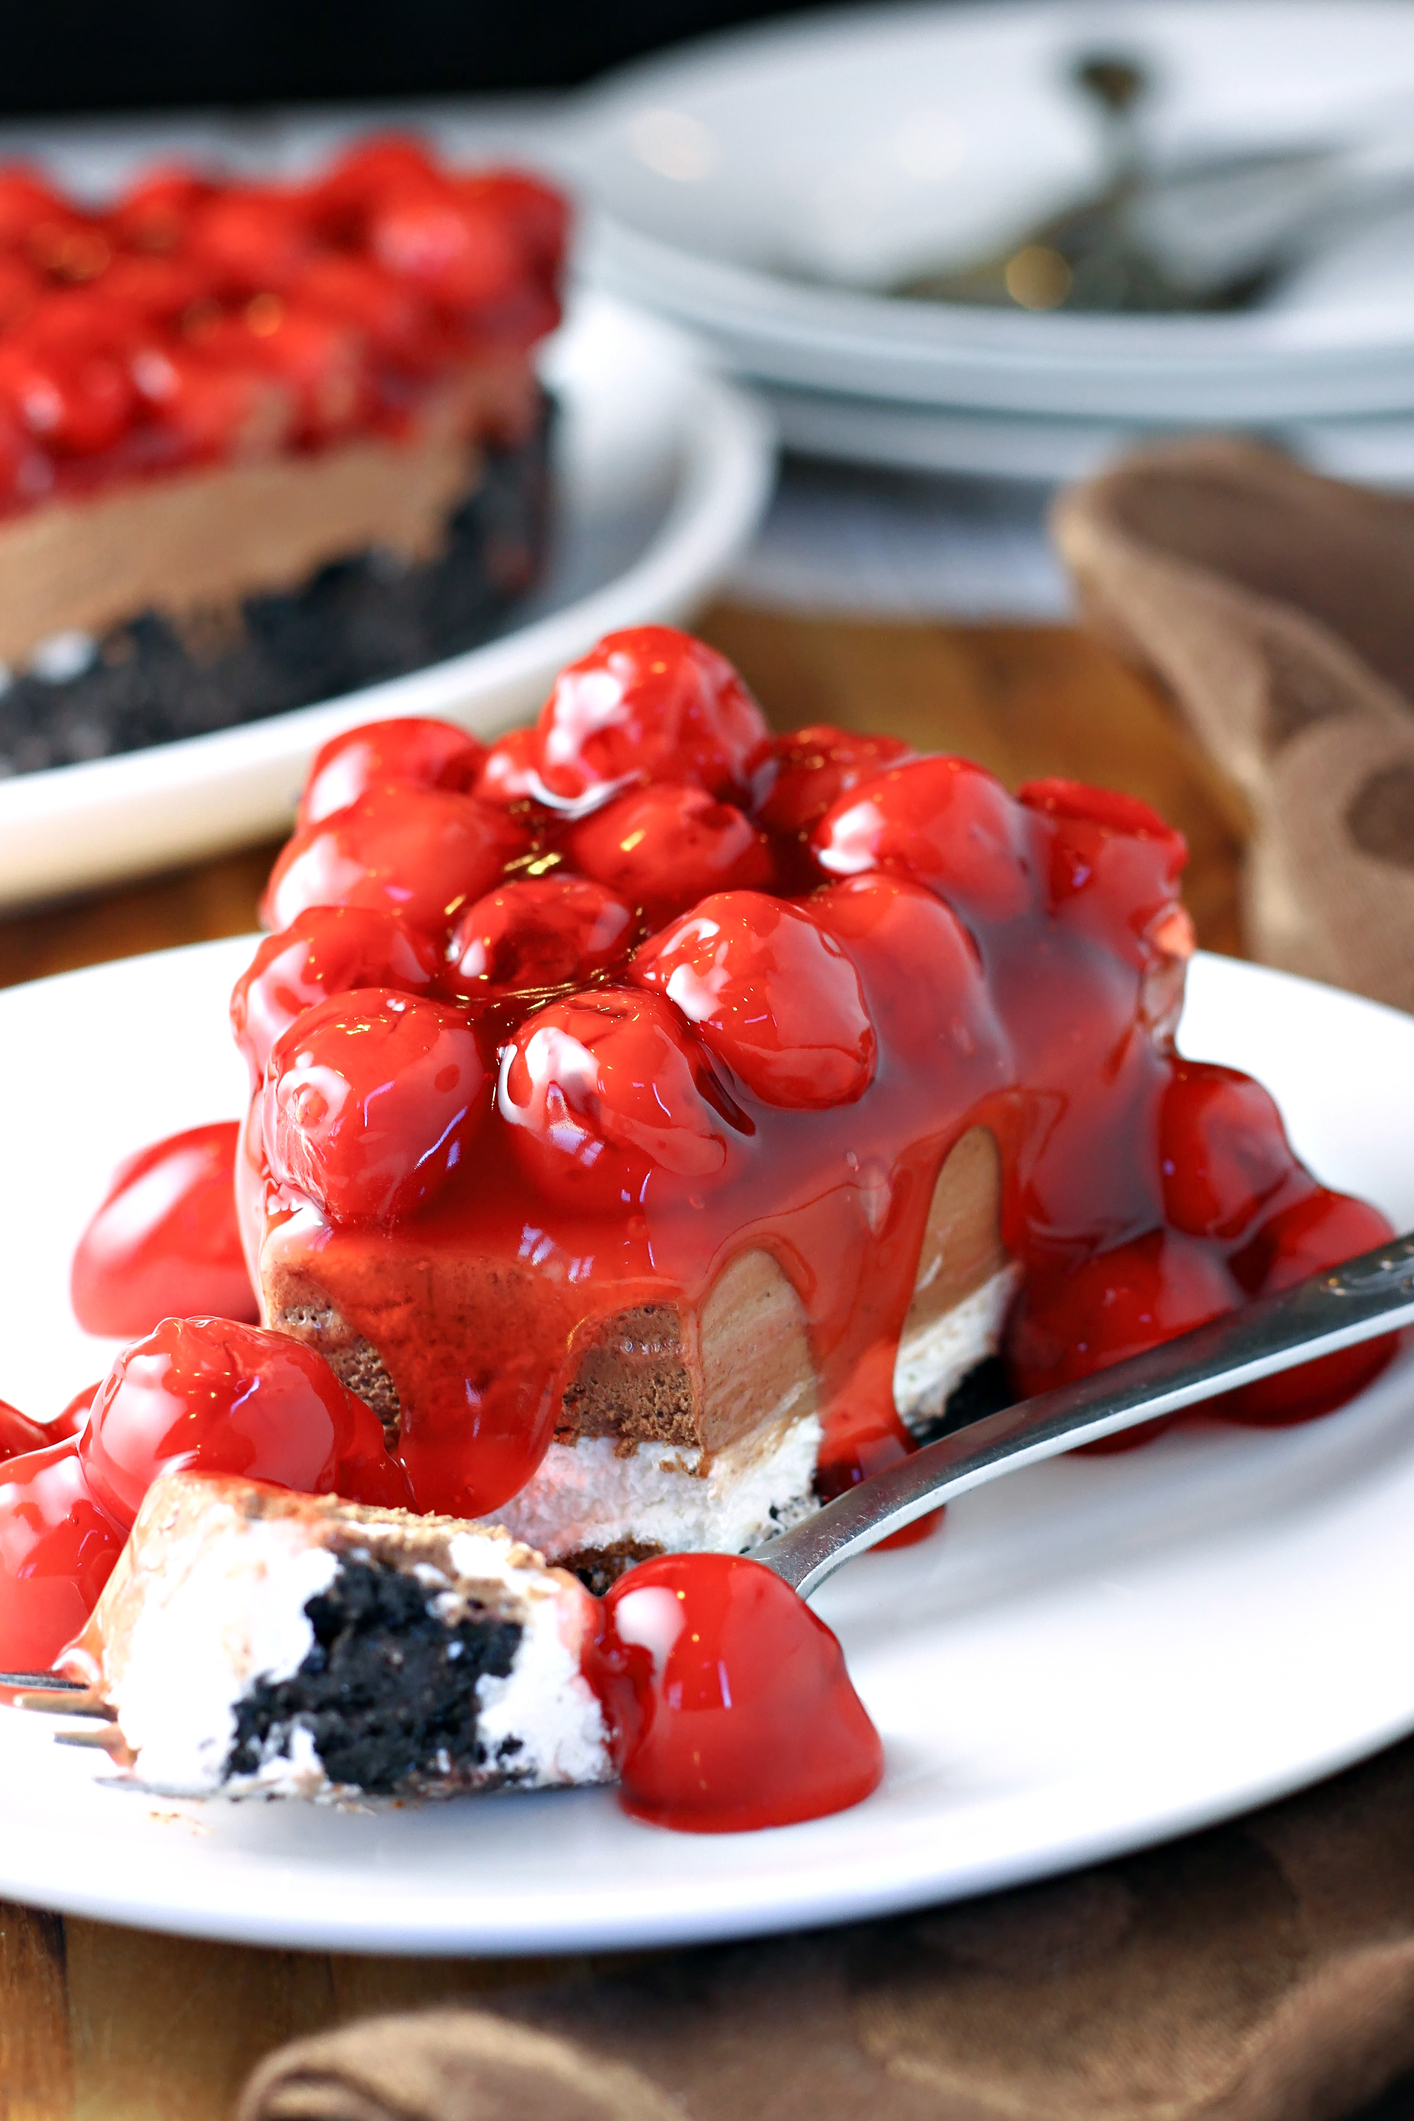
Image: The finished cheesecake, glossy chocolate drizzle pooling over creamy layers.

The Basics: What You Really Need to Know
Before you start measuring ingredients, understand the foundation. No-bake cheesecake is not baked because the cream cheese mixture sets through refrigeration, not heat. Gelatin is optional here. Some recipes use it, but this one relies on stiff whipped cream and patience.
The crust uses digestive biscuits. These are common in the UK and Australia. In the US, graham crackers work fine. Crush them finely—no large chunks. Melted butter binds them. Press firmly. Chill that crust first.
Cream cheese must be softened to room temperature. Cold cream cheese creates lumps that never fully disappear. I set mine out for about an hour before starting. If you forget, microwave it in short bursts, but be careful—melting it ruins the texture.
Heavy cream is key. Not half-and-half. Not milk. Heavy cream with at least 36% fat content whips into stiff peaks. Under-whipped cream means a runny cheesecake. Over-whipped cream turns into butter. Watch carefully.
Canned black cherries are the practical choice. Fresh cherries are seasonal and expensive. The syrup in the can adds moisture and flavor. Drain them well before folding into the mixture. Excess liquid makes the filling watery.
Quick tip: Use a hot, wet knife to slice this cheesecake. Run the blade under hot water, dry it, and cut. Repeat between slices. Your edges will stay clean.
The Main Content: Step-by-Step That Actually Works
Let me walk through this. No shortcuts. No fluff.
Step 1: The Crust
Crush 200g of digestive biscuits into fine crumbs. I use a food processor because it is faster. A rolling pin and a sealed bag work too, but you will have some bigger pieces. Mix the crumbs with 100g of melted butter. Stir until every crumb looks damp.
Press this mixture into a 9-inch springform pan. Use the bottom of a glass or measuring cup to compact it. Even pressure matters. Uneven crust leads to a lopsided cheesecake. Chill for 15 minutes minimum. This sets the butter and prevents the crust from moving when you add filling.
Step 2: The Cream Cheese Base
Beat 500g of softened cream cheese with 100g of powdered sugar. Use an electric mixer. Beat until smooth and no lumps remain. Scrape the bowl halfway through. Add 2 teaspoons of vanilla extract. Mix again.
This base forms the texture of the entire cheesecake. Overmixing at this stage is possible but unlikely. You want airy, not dense. But do not whip it like whipped cream—just until combined and silky.
Step 3: The Whipped Cream
Pour 200ml of heavy cream into a clean bowl. Whip to stiff peaks. This means the cream holds its shape when you lift the whisk. Under-whipped cream will make your cheesecake slump. Over-whipped cream turns into butter and ruins everything. Watch it closely.
Gently fold the whipped cream into the cream cheese mixture. Fold, do not stir. Stirring deflates the air you just created. Use a rubber spatula. Cut through the center, lift, fold over. Repeat until fully combined.
Step 4: Split and Flavor
Divide the mixture into two equal bowls. Into one bowl, sift 30g of cocoa powder. Fold gently until no white streaks remain. Into the same bowl, fold in 400g of drained black cherries. The cherries should be well-drained—excess syrup will make this layer too wet.
The other bowl stays plain. This creates the visual contrast. Dark chocolate cherry layer on the bottom, white cream layer on top. It mimics the classic Black Forest color scheme.
Step 5: Assemble
Spread the cherry-chocolate layer over the chilled crust. Smooth it evenly. Then gently spoon the plain cheesecake mixture on top. Spread carefully—do not press down or you will force the chocolate layer upward. Smooth the top as best you can.
I use an offset spatula for this. It gives better control. If you do not have one, the back of a spoon works. Just be patient.
Image: The layers forming in the springform pan, showing the dark chocolate cherry base and the white top layer.
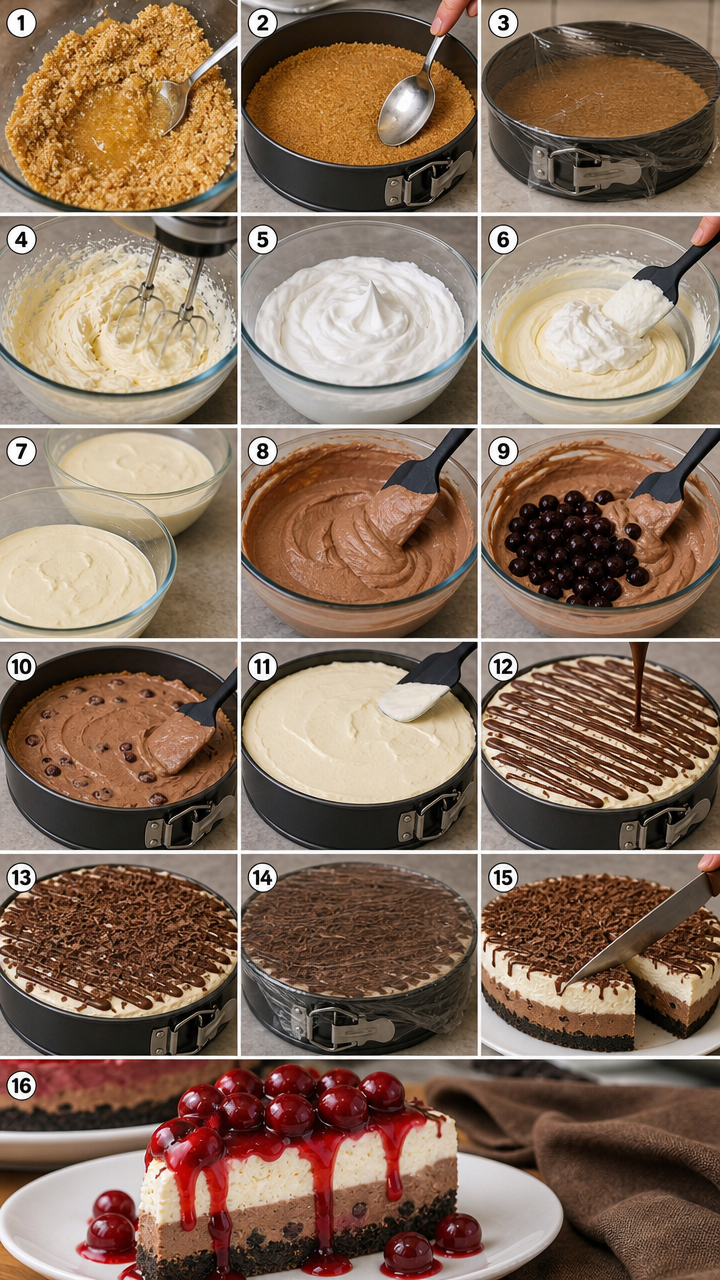
Step 6: The Topping
Melt 100g of dark chocolate. I do this in a microwave-safe bowl in 20-second bursts, stirring each time. Drizzle the melted chocolate over the top of the cheesecake in a decorative pattern. Sprinkle with 50g of chocolate shavings. If you want, garnish with fresh cherries.
The chocolate shavings add texture. They also look impressive. You can make them by running a vegetable peeler along a block of dark chocolate. Use a chilled chocolate bar for cleaner shavings.
Step 7: Chill
Refrigerate for at least 4 hours. Overnight is better. The longer it chills, the firmer it sets. Do not rush this. A wobbly, soft cheesecake will slice messily. Patience pays.
Step 8: Serve
Run a hot, wet knife around the edge of the springform pan. Release the pan. Slice with a clean, hot knife. Wipe between cuts. Serve cold. If garnished with fresh cherries, add them right before serving—otherwise, they will weep moisture and make the top sticky.
Image: A perfectly sliced wedge, showing the two distinct layers and the glossy chocolate on top.
Common Misconceptions People Have About No-Bake Cheesecake
I hear the same myths over and over. Let me clear them up.
Myth: No-bake cheesecake is lighter than baked cheesecake.
Not really. Both use cream cheese and cream. The difference is texture. Baked cheesecake is denser, almost fudge-like. No-bake is mousse-like. But calorie counts are similar. If you want a light dessert, this is not it.
Myth: You can skip chilling longer than 4 hours.
You can, but you will regret it. Under-chilled cheesecake does not hold its shape. The crust crumbles. The layers smear. I have made this mistake. Wait the full time.
Myth: Any chocolate works for drizzling.
Not exactly. Milk chocolate is too soft. White chocolate is too sweet. Dark chocolate (70% cocoa or higher) melts smoothly and firms up nicely. It also contrasts the sweet cherry layer.
Myth: Cherry pie filling is a good substitute for canned cherries.
Pie filling is loaded with cornstarch and sugar. It is thicker and sweeter. It will change the texture of the cheesecake layer. Stick with canned black cherries in syrup, drained well. If you cannot find those, frozen and thawed cherries work, but drain them thoroughly.
Myth: No-bake means no skill involved.
No-bake means no oven, but you still need technique. Whipping cream properly, folding without deflating, layering evenly—these are skills. Respect them.
Practical Application: How to Make This Without Messing Up
Let me give you real-world tips. Things I wish someone told me the first time I made this.
Use a digital scale for the crust. 200g of biscuits is about 2 cups of crushed crumbs. Measuring by volume is less accurate. A scale keeps the butter-to-crumb ratio perfect.
Chill your bowl and beaters for the cream. Cold cream whips faster and fluffier. Stick the bowl and beaters in the freezer for 10 minutes before you start. This is a small step that makes a real difference.
Do not oversoak the cherries. Draining is crucial. I put my 400g can in a fine-mesh strainer and press gently with a spoon. If the cherries are too wet, the chocolate layer will separate or become runny. Dry cherries = stable cheesecake.
Slicing is the hardest part. A hot, wet knife is non-negotiable. I run the knife under hot tap water, wipe it, and make one smooth cut. Then rinse and repeat. This prevents the layers from sticking to the blade and smearing.
Storage matters. This cheesecake keeps in the fridge for up to 4 days. Cover loosely with plastic wrap. Do not freeze it—the texture changes. If you must freeze, slice first and wrap each piece tightly. Thaw in the fridge, not at room temperature.
Serve cold. Room temperature cheesecake gets soft and messy. Pull it from the fridge just before serving. If you are taking it to a gathering, transport it in the springform pan and chill it again at the destination.
Quick tip: If your chocolate layer seems too thick when you spread it, let it warm slightly at room temperature for 5 minutes. Cold cream cheese mixture is stiffer. A little warmth helps it spread without tearing the crust.
Nuance and Debate: What Is Still Up for Discussion
Not everything about this recipe is settled. There are debates, even among experienced bakers.
To use gelatin or not? Some no-bake cheesecake recipes include gelatin to ensure a firm set. This one does not. I prefer the lighter, mousse-like texture. But if you are in a hot climate or transport the cheesecake often, a teaspoon of gelatin dissolved in warm water might help stability. It is a trade-off. Gelatin makes it firmer but slightly less creamy.
Cocoa powder vs. melted chocolate in the filling. Cocoa powder gives a dry, intense chocolate flavor. Melted chocolate makes the filling richer and denser. I tested both. Cocoa powder is easier because you do not risk the chocolate seizing or adding too much fat. But if you want a deeper chocolate hit, try replacing the cocoa powder with 60g of melted dark chocolate. Reduce the heavy cream slightly to compensate.
The crust question: crushed Oreos? Some people substitute crushed Oreos for digestive biscuits. It works. The flavor changes—more chocolate, less neutral base. I have done it. It is good, but then it competes with the chocolate layer. Digestive biscuits or graham crackers let the cherries and cocoa shine.
Fresh cherries vs. canned. I said canned is practical. But fresh cherries, pitted and macerated in sugar, have a superior texture. They are firmer and less syrupy. The downside is seasonality and pit removal. If summer cherry season coincides with your craving, use fresh. Otherwise, canned is fine.
Is this really Black Forest? The purist argument: true Black Forest cake includes kirsch, a cherry brandy. This recipe does not have it. You could add a tablespoon to the cream cheese mixture if you want an adult twist. I do not include it in the main recipe because not everyone wants alcohol. But it is a legitimate addition if you do.
One intentional imperfection: I once forgot to drain the cherries completely. The chocolate layer developed a puddle of pink syrup overnight. The cheesecake still tasted good, but it looked sad. Learn from my mistake. Drain thoroughly.
Closing: One Final Reflection
This no-bake Black Forest cheesecake is not about perfection. It is about getting a satisfying dessert on the table without heat stress. It is about the moment when someone takes a bite and pauses, surprised by how good it is.
The contrast between the dark cherry layer and the creamy white top is not just visual. It is a reminder that opposites can work together. Tart and sweet. Dark and light. No-bake and impressive.
I have made this for birthdays, picnics, and Tuesday nights. It never fails. The hardest part is waiting for it to chill. But that wait is part of the process. Good things take time, even if they skip the oven.
So go ahead. Crush those biscuits. Whip that cream. Fold in the cherries. Put it in the fridge and walk away. When you come back, you will have a dessert that looks like you cheated—but you just followed the steps.
Which part was most useful? The draining tip? The slicing trick? The crust method? Tell me what helped you most.
Was this helpful? If yes, pass it along. Someone else might be looking for a no-bake dessert that actually works.
What do you think about this? Tell me below! Did you try it? Modify it? Have your own cherry disaster story? I want to hear.
—Marina Caldwell
No Bake Black Forest Cheesecake Easy Recipe
Ingredients
Instructions
Notes
See full recipe for nutritional information.


