

I set the oven to 350°F and realized I had no mixer out. My youngest kept asking when it would be ready while I was still measuring flour.
The first time I made this, I used frozen blueberries. They bled purple streaks through the whole loaf and made the bottom soggy.
Fresh berries fixed it.
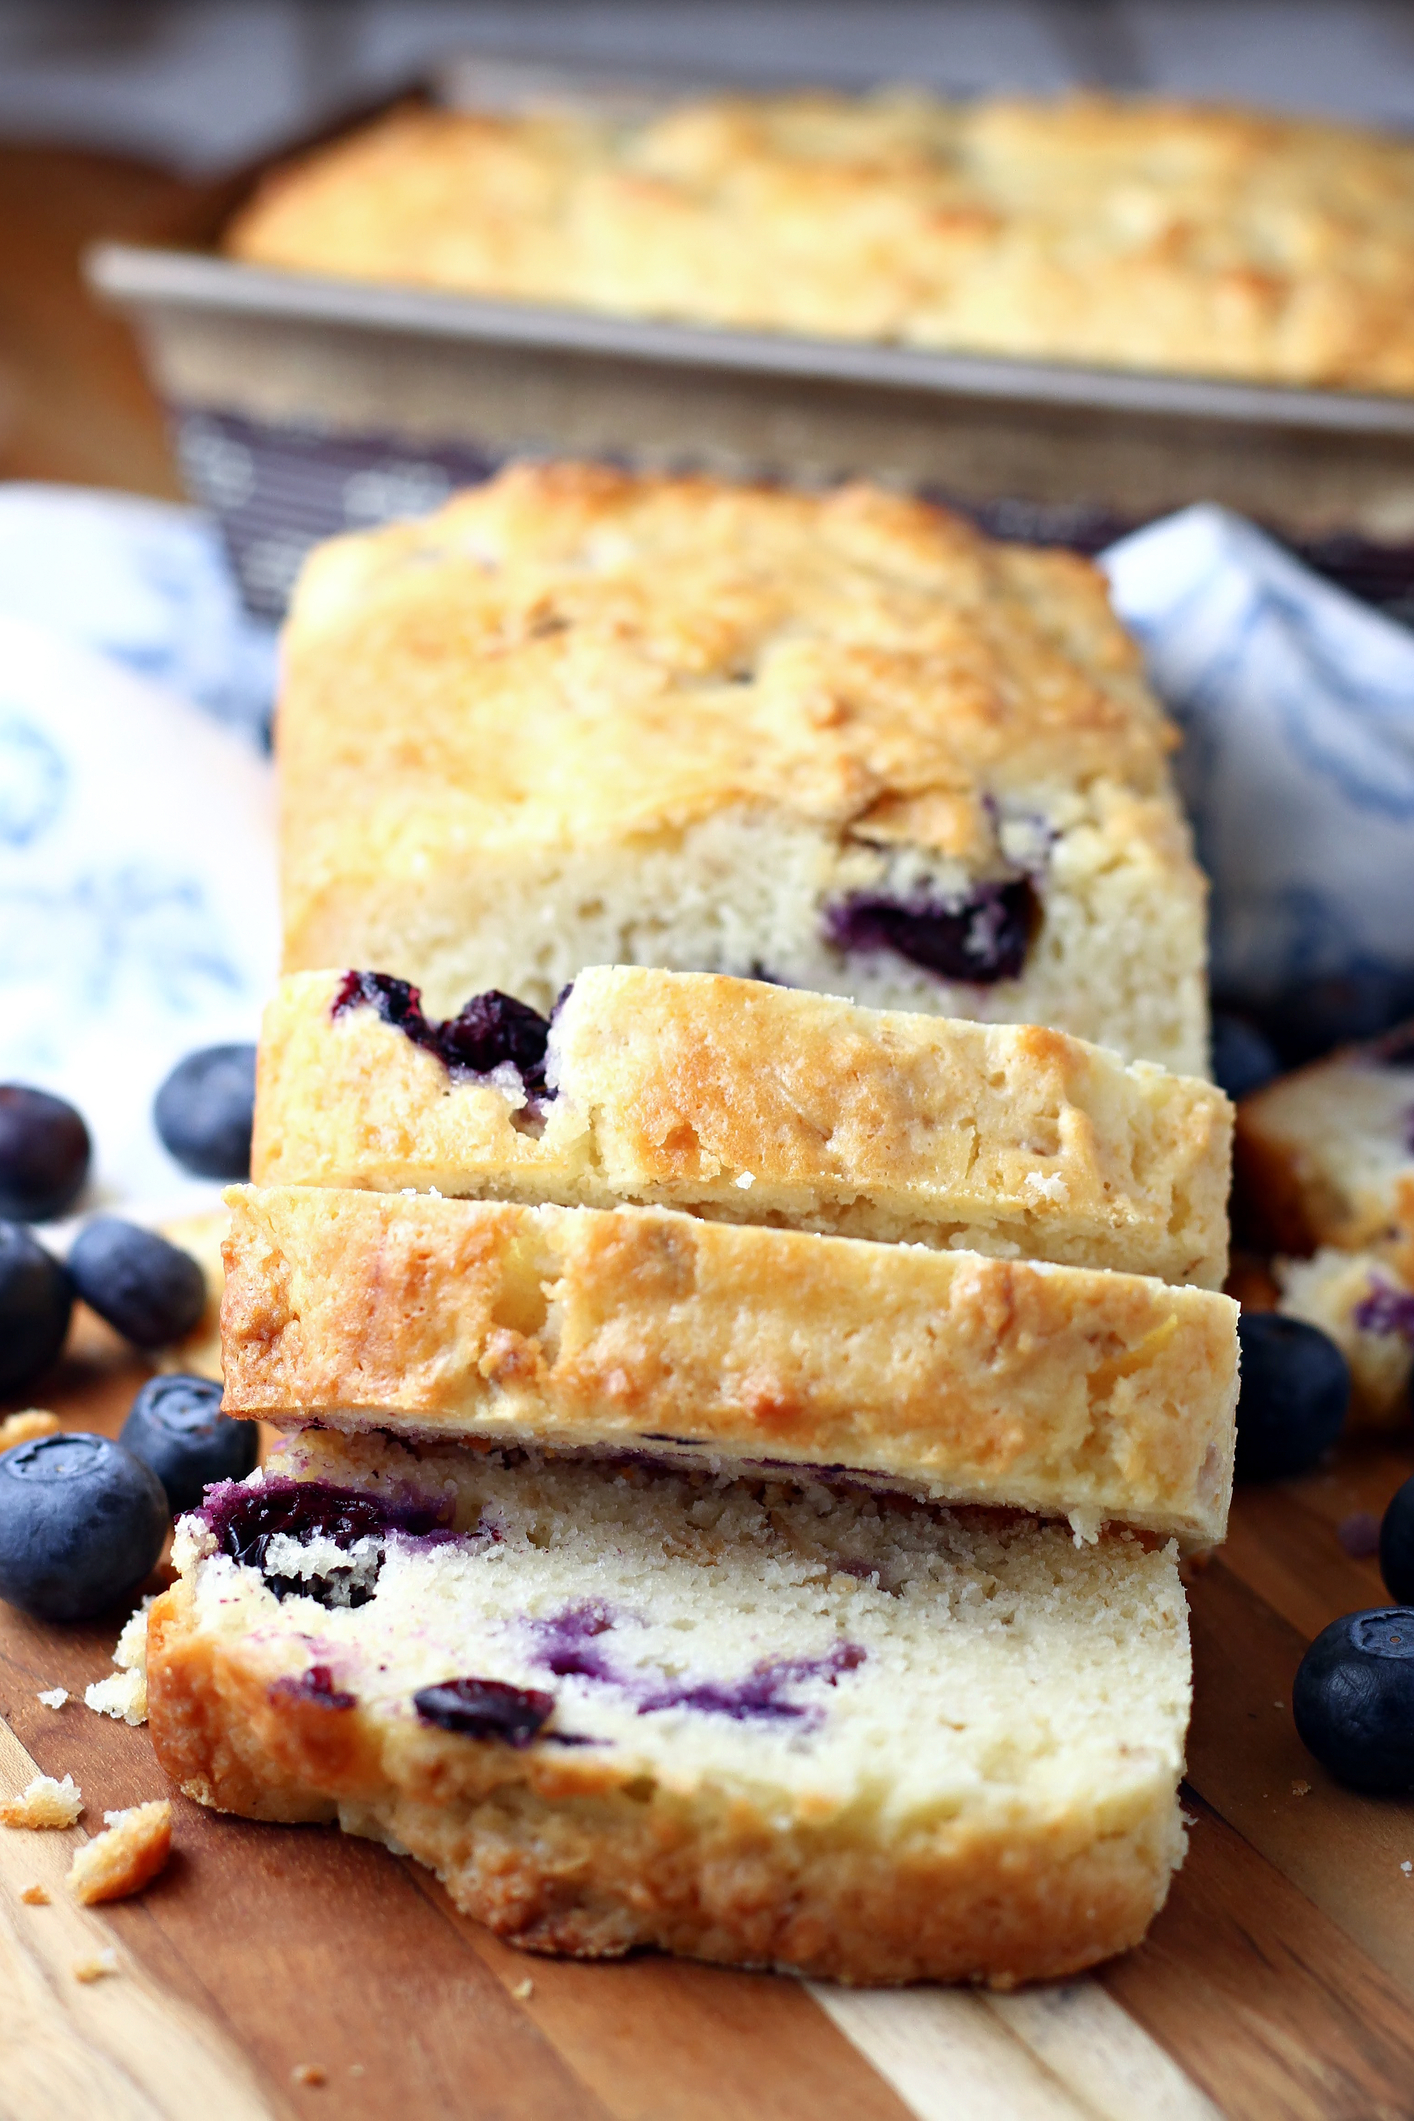
This loaf uses one bowl and doesn’t need a stand mixer or anything fancy. The oats make it dense in a good way—more substantial than regular quick bread. It holds together when you slice it, doesn’t crumble all over the counter.
My sister thought it needed more sugar when she tried it. I didn’t agree. The blueberries are sweet enough if they’re ripe.
The oat situation.
Use rolled oats, not instant. Instant oats turn to mush and the texture gets weird—soft in spots, gummy in others. I learned this the second time I made it because I ran out of the good oats and thought it wouldn’t matter.
It mattered.
The rolled oats stay intact through baking and give you little chewy bits throughout the loaf. They soak up some moisture from the batter but not all of it, so the crumb stays soft without being wet. If you want more oat flavor, toast them in a dry pan for about 4 minutes before adding them to the flour mixture.
I don’t usually bother.
One cup is the right amount. More than that and the loaf gets too heavy, takes longer to bake through the center. Less and you might as well just make regular blueberry bread.
Quick tip: Measure the oats before you measure the flour so any bits that stick to your measuring cup end up in the flour instead of making your oat measurement off.
About the buttermilk.
Most recipes tell you that you can substitute regular milk with vinegar. They’re wrong.
Real buttermilk has thickness and tang that you don’t get from the substitute. It makes the crumb tighter and keeps the loaf from drying out by the second day. The substitute works if you’re desperate, but the texture won’t be quite the same—looser, more like a muffin than bread.
I buy the small cartons and use what’s left for pancakes or biscuits within the week. If you let buttermilk sit in your fridge for three weeks, it separates and smells sour in a bad way, not the good cultured way.
Three-quarters cup is exact. Not a full cup—that makes the batter too loose and it spreads instead of rising. Not half a cup—that makes it dry.
The buttermilk reacts with the baking soda to give you lift without having to beat air into the eggs. That’s why this works in one bowl with just a wooden spoon.
Why the blueberries sink anyway.
Even when you toss them in flour, some of them sink. That’s just how it goes. The batter is thick enough to hold most of them in place, but a few always end up at the bottom forming a dense blue layer.
I’ve tried everything—freezing them first, using smaller berries, adding them in two batches. It doesn’t matter. Some sink.
The two tablespoons of flour help more than nothing. They coat the berries and absorb some of the juice so you don’t get big purple bleeding spots through the whole loaf. Shake off any excess flour before folding them in, or you’ll see white dusty patches on your finished slices.
Fresh berries work better than frozen because they don’t release as much liquid. Frozen berries make the batter wetter and the loaf takes an extra 10 minutes to bake through, and even then the texture around each berry is sort of gummy.
Don’t thaw frozen berries before using them. That makes it worse—they get mushy and break apart when you fold them in, and you end up with blue streaky batter and wet pockets in the finished loaf.
Quick tip: Buy blueberries when they’re on sale and use them within two days. After that they get soft and some start to shrivel, and those ones definitely sink.

It looked wrong when I checked it.
At 45 minutes the top was golden and cracked and looked done, but when I stuck a toothpick in the center it came out with wet batter clinging to it. The edges were pulling away from the pan and everything looked right, but it wasn’t.
This loaf needs the full 50 to 55 minutes. Sometimes longer if your oven runs cool or if you used a glass pan instead of metal. Metal conducts heat better—glass takes about 5 extra minutes and the edges get darker before the center finishes.
The toothpick test is the only reliable way to check. It should come out clean or with just a few dry crumbs stuck to it. If you see any wet batter, put it back for another 5 minutes and test again.
I once pulled it too early because the top looked done and I was impatient, and the whole center collapsed as it cooled. Dense, gummy, undercooked. My husband ate it anyway and said it was fine, but it wasn’t fine. The texture was all wrong.
If the top is browning too fast before the center is done, tent it loosely with foil for the last 10 to 15 minutes.
Don’t skip the cooling step either. Ten minutes in the pan, then turn it out onto a wire rack. If you try to slice it warm, it falls apart. The crumb needs time to set.
One thing about the sugar.
A quarter cup isn’t much. This is not a sweet bread. It’s more breakfast than dessert—just enough sugar to balance the tang from the buttermilk and bring out the berry flavor without making it taste like cake.
If you want it sweeter, add another two tablespoons, but not more than that. Too much sugar and it browns too fast on top before the inside bakes through, and you end up with a dark crust and raw middle.
I thought about cutting the sugar completely once to make it more health-bread-ish. I didn’t. It would taste flat—the small amount of sweetness is what keeps it from being boring.
Brown sugar works instead of white if that’s what you have. It makes the loaf slightly darker and adds a hint of molasses flavor that’s good with the oats. Honey doesn’t work—it’s a liquid and throws off the batter consistency.
Do you usually go for less sweet or more sweet in quick breads?
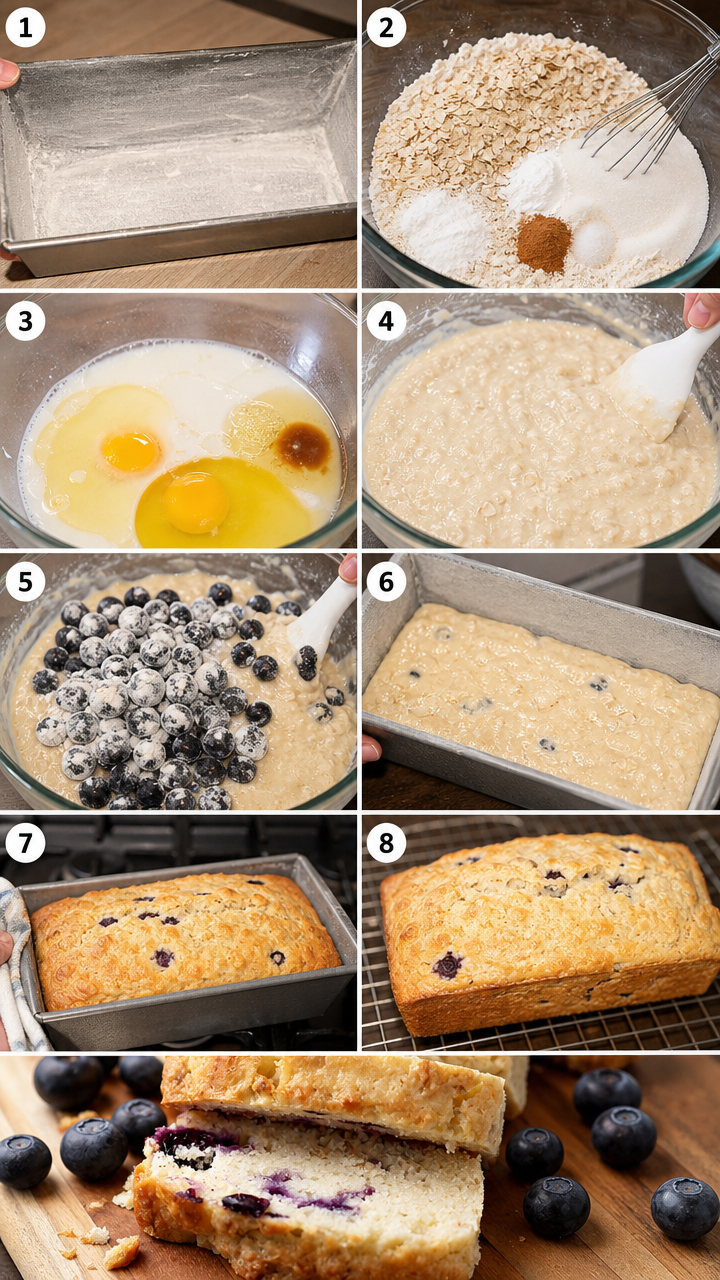
Step 1: Turn your oven to 350°F and let it heat up while you prep the pan. Grease a 9×5 inch loaf pan—I use butter, but oil or cooking spray works fine. Dust it with flour after greasing and tap out the excess. This double layer keeps the loaf from sticking, especially at the corners where it always wants to grab.
Step 2: In your largest bowl, whisk together 2 cups flour, 1 cup rolled oats, 1/4 cup sugar, 2 teaspoons baking powder, 1/2 teaspoon baking soda, 1/2 teaspoon salt, and 1/4 teaspoon cinnamon. Make sure the baking powder and soda are mixed through evenly—clumps mean uneven rising. I use a whisk for this part even though everything else just needs a spoon. (If your baking powder is old and clumpy, it won’t work right. Buy new.)
Step 3: In a smaller bowl, beat 2 eggs with a fork until the yolks break up completely, then add 3/4 cup buttermilk, 1/4 cup vegetable oil, and 1 teaspoon vanilla. Whisk it together until smooth—about 30 seconds. The oil won’t fully blend in and that’s fine. It will once it hits the flour mixture.
Step 4: Pour the wet mixture into the dry ingredients and stir with a wooden spoon or spatula. Stop as soon as you don’t see dry flour anymore. The batter will be thick and lumpy and that’s exactly right—smooth batter means you overmixed, and overmixed batter makes tough, dense bread with tunnels running through it. Have you ever overmixed and ended up with weird texture? Share below!
Step 5: Toss 1.5 cups fresh blueberries with 2 tablespoons flour in a small bowl until coated, then fold them into the batter using a spatula. Be gentle here—you want to distribute them without smashing them. Some will break and that’s unavoidable, but try to keep most of them whole. I always end up with a few crushed ones that turn the batter purple in spots.
Step 6: Scrape the batter into your prepared pan and smooth the top with the back of a spoon. It will be thick enough that it doesn’t self-level, so spread it into the corners and make the surface as even as you can. If you leave it lumpy, those high spots will brown too fast.
Step 7: Bake for 50 to 55 minutes. Check it at 50 minutes by sticking a toothpick into the center—if it comes out with wet batter, give it another 5 minutes. The top will crack down the middle and turn golden brown. If it’s browning too much before the center is done, cover it loosely with foil and keep baking.
Step 8: Let it cool in the pan for 10 minutes, then run a knife around the edges and turn it out onto a wire rack. Let it cool completely before slicing—at least 30 minutes. Warm bread falls apart and makes a mess when you try to cut it.
Ways to Change It Up
Try this: Add 1/2 cup chopped walnuts or pecans to the batter along with the blueberries. Toast them first in a dry pan for about 4 minutes so they don’t taste raw. The nuts add crunch and make each slice more filling.
Try this: Use half blueberries and half raspberries instead of all blueberries. Raspberries break down more during baking and make the loaf slightly more moist with little jammy pockets. Don’t use all raspberries—they’re too soft and wet and make the whole thing soggy.
Try this: Replace the cinnamon with 1/2 teaspoon grated lemon zest and add 1 tablespoon lemon juice to the wet ingredients (reduce buttermilk to just under 3/4 cup). The citrus sharpens everything up and makes the blueberry flavor brighter. My neighbor swears by this version.
Which would you go for? Drop it in the comments.
How to Serve It
Slice it about 3/4 inch thick and serve it at room temperature. It’s good plain, better with butter, and best with butter and a little honey drizzled over. Some people toast it but I don’t—it dries out too much and the blueberries get weirdly hot.
For breakfast I eat it with coffee or plain yogurt on the side. For a snack, just a slice on its own works. It’s substantial enough that one slice actually fills you up, unlike regular quick bread that disappears in three bites and leaves you hungry.
If you’re serving it to people, arrange slices on a plate and put out soft butter. Don’t bother with anything fancier—it doesn’t need it.
What would you pair it with?
Storing It Without Ruining It
Wrap the whole loaf in plastic wrap once it’s completely cool and leave it on the counter. It stays good for about 3 days this way—the crumb stays soft and the top doesn’t dry out. After day three it starts to get a little stale around the edges.
In the fridge it lasts about 5 days but the texture gets denser and drier. The oats soak up more moisture as it sits and the whole thing firms up. Not bad, just not as good as fresh.
To freeze it, wrap the whole loaf tightly in plastic wrap, then again in foil, and freeze for up to 2 months. Thaw it overnight in the fridge still wrapped, then bring it to room temperature before slicing. Or slice it first before freezing and pull out individual slices as you need them—wrap each slice separately in plastic wrap so they don’t stick together.
Don’t try to reheat slices in the microwave. They get rubbery and the blueberries turn scalding hot while the rest stays cold. If you must reheat, use a toaster oven at low heat for about 3 minutes.
Have you ever saved leftovers like this? Tell me below!
Mistakes I Made So You Don’t Have To
I once forgot to grease the pan properly and only buttered the bottom. The whole loaf stuck to the sides when I tried to turn it out and I had to dig it out in chunks with a spatula. Grease the entire inside surface—bottom, sides, corners—every time.
Another time I mixed the batter until it was completely smooth because that’s what looked right to me. The finished loaf was tough and chewy with holes running through it, nothing like it should be. Mix just until the flour disappears and then stop immediately, even if it looks lumpy.
I also tried doubling the recipe and baking it in a 9×13 pan thinking it would save time. It didn’t work—the edges overcooked before the center finished, and the whole thing came out flat instead of risen. This recipe is sized for one loaf pan. If you want more, make two separate loaves.
Did something like this happen to you?
Questions People Keep Asking
Can I use quick oats instead of rolled oats?
No. Quick oats turn to paste when they hit the wet ingredients and you end up with gummy pockets throughout the loaf and a weird slimy texture. I tried this once thinking it wouldn’t matter since they’re both oats. The texture was completely off—soft in a bad way, no structure. Use old-fashioned rolled oats only.
Why did my loaf sink in the middle?
You either pulled it out too early or your oven temperature is off. An undercooked center collapses as it cools because the structure never set. Use an oven thermometer to check your actual temperature—mine runs 15 degrees low and I compensate by setting it higher. And always do the toothpick test at 50 minutes.
Can I add more blueberries?
Not really. More than 1.5 cups and they release too much liquid during baking, and the loaf gets soggy and takes forever to cook through. Plus the batter can’t hold that many berries—they sink and cluster at the bottom in one dense wet layer. If you want more fruit flavor, add lemon zest instead.
Do I really need buttermilk or can I use regular milk?
Buttermilk is better. It reacts with the baking soda for proper rise and adds tang that balances the sweetness. Regular milk works in a pinch but the crumb will be looser and more cake-like, less structured. If you substitute, add 1 tablespoon white vinegar to 3/4 cup regular milk and let it sit 5 minutes before using.
How do I know when it’s actually done?
Insert a toothpick or thin knife into the center. It should come out clean or with a few dry crumbs—no wet batter. The top will be cracked and golden, and the edges will pull slightly away from the pan. If you press the top gently it should spring back. Takes 50 to 55 minutes usually, sometimes up to 60 if your oven runs cool.
Can I make this into muffins instead?
Yes. Fill muffin cups about two-thirds full and bake at 375°F for 18 to 22 minutes. Start checking at 18 minutes with a toothpick. They’ll dome up nicely and the edges will brown. You’ll get about 12 muffins from this batter. But the texture is slightly different in muffin form—more crumbly, less dense.
Which answer helped you most?
Why this works when you follow it.
The buttermilk and baking soda react to give you rise without beating the eggs to foam or creaming butter and sugar. That’s why this stays simple—just mix and pour, no stand mixer needed. The acid in the buttermilk activates the soda and creates air pockets that make the crumb tender instead of dense.
Oats absorb liquid slowly, so they soften during baking but keep some chew. They also add structure so the loaf holds together when you slice it. Without the oats it would be too soft and fall apart, more like muffin bread than actual bread.
The flour coating on the blueberries absorbs some of their juice as they bake and keeps them from turning the whole loaf purple. It also gives them something to cling to so more of them stay suspended instead of sinking. Some still sink anyway.
One bowl works because you don’t need to keep anything separate—no creaming method, no folding in whipped egg whites, no fuss. Wet into dry, stir until combined, fold in berries, bake. The method matches the goal, which is fast breakfast bread that actually tastes good.
I’ve made this maybe twenty times now and it’s consistent. Same results every time as long as you measure correctly and don’t overmix. The oats always soften, the blueberries always burst a little, the top always cracks in the middle. Reliable.
Fun fact: Blueberries contain natural pectin, which is why they sometimes make the batter around them slightly gel-like as they bake—it’s not a mistake, just the pectin setting up with heat.
Will you make this soon?
Happy cooking! —Marina Caldwell
Simple Blueberry Oat Loaf Bakes in One Bowl
Ingredients
Instructions
Notes
See full recipe for nutritional information.


