

The first batch was edible. Barely.
My husband asked for dinner rolls three Sundays in a row before I finally tried making them from scratch, and the first attempt came out dense enough to use as a doorstop. Not metaphorically — they had about the same spring as a hockey puck.
I’d rushed the first rise to about 30 minutes because I was impatient, and the dough just never got where it needed to go.
So the second time, I waited the full hour. Watched it double. Didn’t touch it.
What actually changed on round two.
The milk temperature matters more than any other single thing in this recipe — I’d been using milk straight from the fridge the first time, which essentially put the yeast to sleep before it had a chance to do anything.
It needs to sit between 100°F and 110°F. I use a cheap kitchen thermometer now, which feels fussy until you realize it takes about 4 seconds and saves you an hour of wasted rising time.
The foamy layer after 5 minutes — that’s your confirmation the yeast is alive. No foam, start over.
Okay, the kneading part.
Eight minutes minimum. I thought I could get away with six — actually no, I went back and did the full ten, and the difference in texture was noticeable in the final roll.
You’ll know it’s ready when you press two fingers into the dough and it springs back slowly, not immediately, and not like wet cement.
Slow spring. That’s what you want.
The part nobody warns you about.
When I cut the dough into 12 pieces, my pieces were wildly uneven the first several times — some rolls baked faster than others because of the size difference, and the smaller ones were overbaked while the larger ones needed more time.
A kitchen scale helps here, honestly.
Quick tip: Roll each piece on an unfloured surface — the slight friction against the bare countertop is what creates that tight, smooth ball shape. Flour under the dough and it slides around and stays lumpy.
It looked underdone at 18 minutes. It wasn’t.
The tops went deeply golden — not just pale yellow, actually golden — somewhere around the 20-minute mark in my oven, and I was nervous they were going too far, but pulling them out right then was exactly right.
The second brush of butter — the one you do the moment they come out of the oven — makes the tops go glossy and soft instead of developing a hard crust, and that’s the detail that makes people ask what you did differently.
Have you ever let rolls over-bake because you weren’t sure? I’ve done it more than once.
Why the sea salt on top isn’t optional (for me, anyway).
My neighbor Rosa thought the sea salt was going to make them taste like bread sticks, and she was skeptical when I handed her one fresh off the pan. She asked for two more.
The salt hits before the butter does — just a fraction of a second — and that contrast is what makes these taste like something you’d pay for at a bakery instead of a bag from the grocery store. It’s not a dramatic difference.
Just enough to notice.
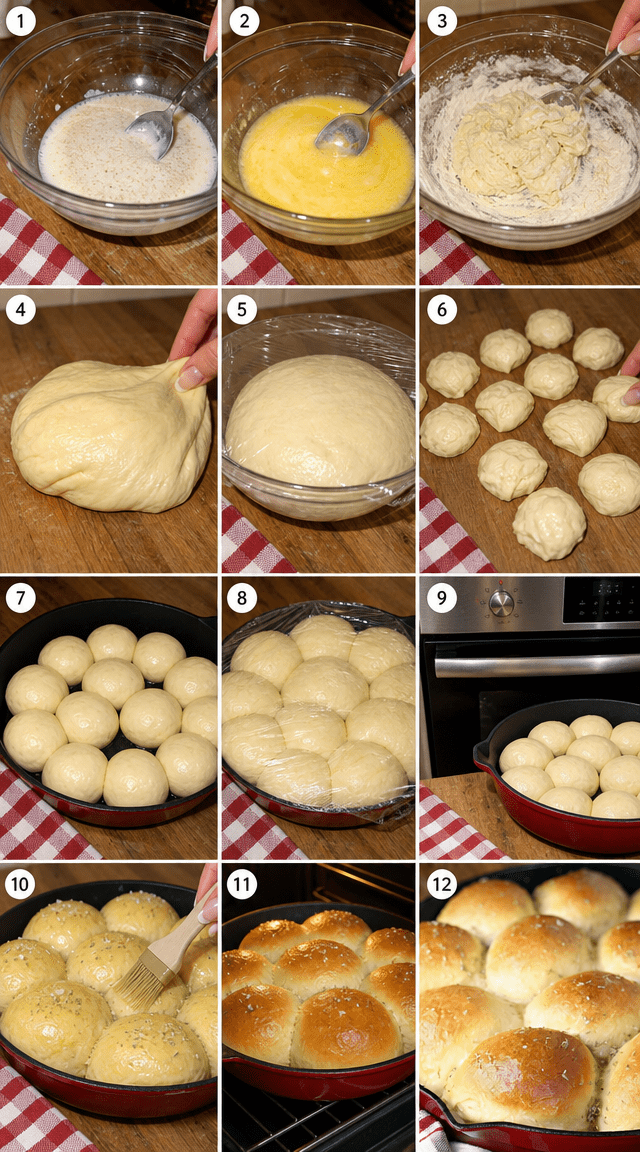
Step by step, the way I actually do it.
Step 1: Warm 1 cup of milk to between 100°F and 110°F, then combine it with 1/4 cup sugar and 2 1/4 teaspoons active dry yeast in a large bowl. Let it sit for 5 minutes undisturbed. (If it doesn’t foam, your yeast is dead or your milk was too hot — either way, don’t continue.)
Step 2: Whisk in 4 tablespoons melted butter, 1 1/2 teaspoons salt, and 1 large egg until everything is fully combined. This goes fast. The mixture smells pretty good at this point, which I always find encouraging.
Step 3: Add 3 1/2 cups all-purpose flour one cup at a time, stirring between each addition until you have a soft, slightly sticky dough. Don’t dump it all in at once — the dough comes together much better when you add gradually and let it hydrate.
Step 4: Turn the dough out onto a lightly floured surface and knead for 8–10 minutes until it’s smooth and springs back slowly when pressed. This is the part that takes actual effort. (If your arms get tired around minute 6, that’s normal — push through.)
Step 5: Place the dough in a lightly oiled bowl, cover it tightly with plastic wrap or a clean towel, and let it rise at room temperature for 1 full hour until it has doubled. Set a timer. Don’t peek at 40 minutes and decide it’s close enough.
Step 6: Punch the dough down gently to deflate it, then cut it into 12 even pieces. Does your dough ever stick to the knife when you’re cutting it? Share below! A bench scraper works better than a knife here if you have one.
Step 7: Roll each piece into a smooth ball on a bare countertop — no flour — using your cupped palm in a circular motion with light downward pressure. Arrange them evenly on a greased baking sheet, leaving a little space between each.
Step 8: Cover the shaped rolls loosely and let them puff up for 45 minutes. They should look noticeably larger and a little pillowy before they go in the oven. While they’re in their second rise, heat your oven to 375°F.
Step 9: Brush each roll generously with 2 tablespoons of melted butter and finish with a pinch of sea salt on top of each one. Then bake for 18–22 minutes until the tops are deeply golden.
Step 10: Pull them out and immediately brush on a second round of butter — this is the step that keeps the tops soft instead of crusty. Rest on the pan for 5 minutes, then serve warm.
Ways to Change It Up
Try this: Swap the sea salt for everything bagel seasoning before baking. The sesame and garlic on top of butter-brushed rolls is hard to argue with.
Try this: Add 1 teaspoon of garlic powder and 2 tablespoons of finely chopped fresh rosemary to the dough when you add the flour. The rolls come out savory enough to serve alongside pasta or soup without needing anything else.
Try this: Shape the rolls the night before, cover the tray tightly with plastic wrap, and refrigerate overnight for the second rise. Bake them straight from the fridge in the morning — add about 5 extra minutes to the bake time.
Which would you go for? Drop it in the comments.
How to Serve It
These go straight onto the table next to a pot of beef stew or a big bowl of tomato soup — the kind of meal where you want something to tear and drag through the broth.
They also work split open and stuffed with sliced turkey and a smear of grainy mustard the next day, which is honestly what I look forward to on day two.
For a holiday table, pile them in a cloth-lined basket and bring them out hot — they stay warm for about 15 minutes once covered, which is usually enough time to get everyone seated.
What would you pair it with?
Storing It Without Ruining It
Room temperature is fine for up to 2 days — keep them in an airtight bag or container, not just covered with a towel, or the tops go stale and papery by morning.
Fridge is fine for up to 4 days, but cold rolls are dense rolls. Give them 20 seconds in the microwave wrapped in a damp paper towel and they come back to something close to fresh.
Freezer works well. Let them cool completely, bag them individually or in pairs, and freeze for up to 2 months. Thaw at room temperature for about an hour, then warm in a 300°F oven for 8 minutes.
A second butter brush before the oven reheat does a lot for them.
Have you ever saved leftovers like this? Tell me below!
Mistakes I Made So You Don’t Have To
I once added all 3 1/2 cups of flour in one go instead of adding it gradually, and the dough seized up into something that looked like stiff clay and felt like it too. Had to add milk back in a tablespoon at a time to salvage it, and even then the rolls were tighter than they should have been.
I skipped the second butter brush — the one right out of the oven — because I was in a hurry getting dinner on the table, and the tops formed a thin hard shell within about 10 minutes. Not inedible. Just not what these are supposed to be.
I also tried covering the rolls with plastic wrap that was too tight during the second rise once, which pressed down on them and prevented them from puffing properly. Loose cover. That’s all it takes.
Did something like this happen to you?
Questions I actually get asked about these rolls.
Can I use instant yeast instead of active dry? Yes, and you can skip the 5-minute proofing step — just mix it directly with the dry ingredients. But I tried this once and found the rise time moved faster than expected, so watch your dough rather than relying on the clock.
My dough didn’t double in an hour — what happened? It depends on how warm your kitchen is. A cold room will slow yeast down significantly. I’ve had the rise take closer to 90 minutes on a cool day with the heat off. And the dough will still work — it just needs more time.
Can I make these without a stand mixer? Completely by hand is how I’ve always done it. Eight to ten minutes of kneading feels like a lot in the moment, but the dough comes together well. No machine needed.
How do I know when they’re done baking? Deeply golden tops — not pale, not tan. About 20 minutes in my oven, but ovens vary. I tried pulling them at 18 minutes once and the bottoms were still a little underdone. Give them the full time.
Can I make the dough the night before? Yes. Shape the rolls, put them on the greased tray, cover tightly with plastic wrap, and refrigerate overnight. Bake them straight from the fridge the next morning — they’ll need about 5 extra minutes. But they come out just as good, maybe better.
What if my rolls come out too dense? Under-proofed, almost always. Either the yeast didn’t activate fully, or the rise was cut short. Dense rolls are salvageable as toast or for dunking in soup. They just won’t be pillowy. Start fresh with fresh yeast next time.
Which answer helped you most?
A few last things before you start.
These take about 2.5 hours start to finish when you count both rises, and most of that is hands-off waiting. The actual work is maybe 25 minutes.
The dough is forgiving. I’ve over-kneaded, under-kneaded, added flour unevenly, and still ended up with rolls worth eating.
My kids ate six of these in one sitting and asked if we were having them again next week. That’s the whole review.
Fun fact: Yeast has been used in bread baking for over 5,000 years — ancient Egyptians are credited with discovering that fermented dough rises, producing the first leavened bread known to history.
Will you make this soon? I genuinely want to know how they turn out — especially if you try the overnight version or add garlic and rosemary to the dough.
Drop a comment if something went sideways, too. That’s how I figured half of this out.
Happy cooking! —Marina Caldwell
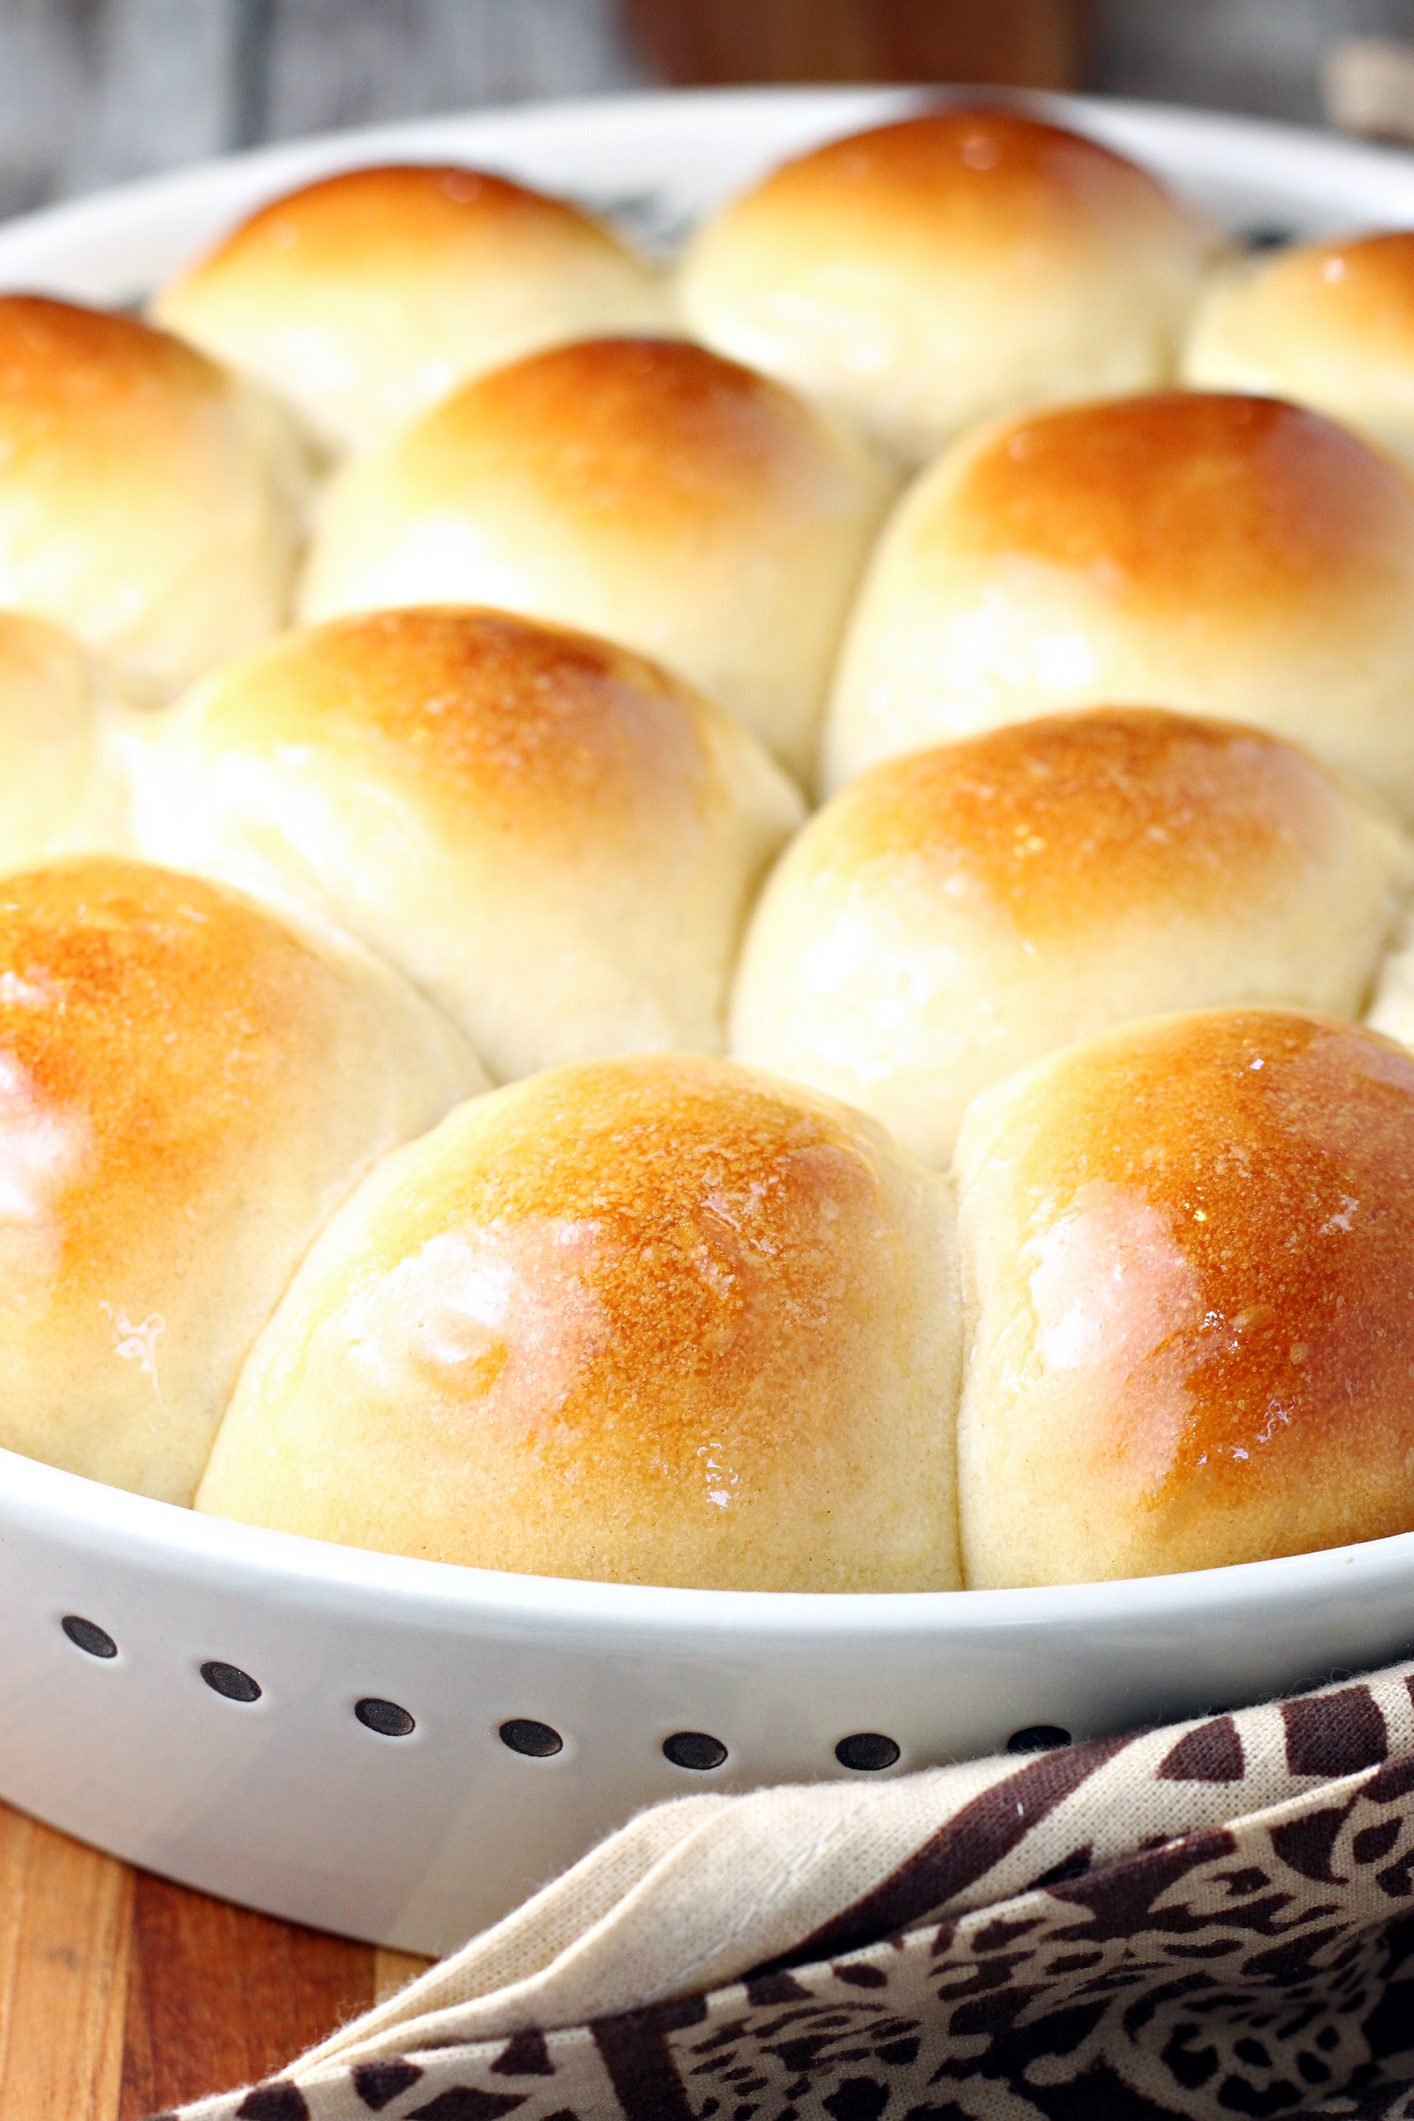
Soft Homemade Dinner Rolls With Buttery Tops
Ingredients
- 3 1/2 cups all-purpose flour
- 2 1/4 teaspoons active dry yeast
- 1 cup warm milk
- 1/4 cup granulated sugar
- 4 tablespoons unsalted butter, melted
- 1 1/2 teaspoons salt
- 1 large egg
- 2 tablespoons butter, melted (for brushing)
- Sea salt for topping
Instructions
- 1Combine warm milk, sugar, and yeast in a large bowl, allowing the mixture to rest for 5 minutes until a foamy layer develops on the surface.
- 2Whisk in the melted butter, salt, and egg until fully incorporated into the yeast mixture.
- 3Add flour one cup at a time, stirring between additions until a cohesive, soft dough comes together.
- 4Transfer dough to a floured surface and knead firmly for 8-10 minutes until the texture becomes smooth and springs back when pressed.
- 5Set dough in a lightly oiled bowl, cover tightly, and allow to rise at room temperature for 1 hour until doubled in size.
- 6Deflate the risen dough and cut into 12 even pieces.
- 7Roll each piece into a smooth ball and arrange evenly on a greased baking sheet.
- 8Loosely cover and let rolls puff up for 45 minutes.
- 9Heat oven to 375°F (190°C).
- 10Generously brush each roll with melted butter and finish with a pinch of sea salt.
- 11Bake 18-22 minutes until deeply golden on top.
- 12Rest on the pan for 5 minutes before serving warm.
Notes
– Milk temperature should sit between 100-110°F — too hot will kill the yeast, too cold will prevent activation. – For extra soft rolls, brush with a second round of butter immediately upon pulling them from the oven. – Rolls can be shaped the night before and refrigerated overnight for the second rise, then baked fresh in the morning.


