

My husband took one bite and didn’t say anything for a full minute.
That should have felt like a win, but I was standing there watching him chew with a completely unreadable expression, convinced I’d done something wrong with the coffee.
He finally said it was the best chocolate cake he’d ever had. I didn’t fully believe him, because he also said that about a batch I made with Dutch-process cocoa when I meant to use natural, and those two things are not interchangeable.
But I’ve made this cake enough times now that I’ve stopped second-guessing the result after it comes out of the oven. You know what it’s going to taste like before it cools. The smell alone tells you.
Still, the first few times I made it, I kept fiddling — less coffee, more vanilla, wondering if I even needed the buttermilk — and every adjustment made it slightly worse. Some recipes just want you to leave them alone.
About the coffee.
Most people see “1 cup strong black coffee” and either panic or skip it entirely, subbing in water or hot milk. Don’t.
You won’t taste coffee in the finished cake — at least not as coffee — but the bitterness pulls the cocoa flavor forward in a way that warm water just doesn’t. I tried the water version once, out of curiosity. The cake tasted flat. Not bad, just flat, like a photograph of the real thing.
Strong matters here too. I use a double-strength brew, not just whatever’s left in the pot from the morning. If your coffee is weak, you might as well use water.
Quick tip: Brew the coffee first, before you do anything else, so it has time to cool slightly while you measure out the dry ingredients. Pouring near-boiling liquid over raw eggs is a whole separate problem you don’t want.
I thought about adding a shot of espresso on top of the brewed coffee — actually no, I skipped it. Too much of a good thing starts working against you.
The buttermilk isn’t optional.
I know people say you can just add a tablespoon of vinegar to regular milk and call it buttermilk. Technically, yes. But it’s not the same texture, and you’ll notice it in the crumb.
Real buttermilk — the kind that’s slightly thick, slightly sour — keeps the inside of this cake from going tight and rubbery. The first time I made it without it, the cake was still fine. But fine isn’t why you make chocolate cake from scratch.
The batter at this stage looks thin. Almost too thin. That’s not a problem.
Every time I make this, there’s a moment around step three where I’m staring at a bowl of what looks like chocolate-colored water with eggs in it and I think I’ve done something wrong. I haven’t. The flour and cocoa absorb a lot during baking, and the oil keeps everything from drying out even after the cake cools completely.
What actually went wrong the first time.
I pulled both pans at 30 minutes because that’s what the recipe said, and the toothpick came out with wet crumbs rather than clean. Not batter — crumbs. I called it done anyway.
The center of one layer was slightly underbaked. I frosted it and served it at my neighbor Greta’s birthday and she was polite about it but I could tell she noticed. Wet center, crumbly edges. Not great.
Now I bake until the toothpick is genuinely clean, which usually takes closer to 34 minutes in my oven. Ovens vary, and that’s not a disclaimer — it’s a real difference that matters by several minutes.
The 10-minute pan rest before turning out is non-negotiable. I skipped it once because I was in a hurry,
and the bottom layer tore clean across the middle when I flipped it. Served it anyway. Covered it in frosting and nobody asked questions.
The dry ingredients, fast.
1¾ cups all-purpose flour. 2 cups sugar. ¾ cup unsweetened cocoa powder. 2 teaspoons baking soda. 1 teaspoon baking powder. 1 teaspoon salt.
Whisk them together in a large bowl before adding anything wet. Sifting is optional but the baking soda clumps if you skip it, and biting into a pocket of baking soda is not something you forget.
Don’t taste the dry mix. Just don’t.
The cocoa you use changes the color of the finished cake noticeably. Natural cocoa gives you a reddish-brown crumb. Dutch-process runs darker, closer to black. Either works in this recipe — unlike some cakes, this one has enough baking soda to handle both. But if you’ve been making it one way and suddenly switch, don’t be surprised when the color is different.
Cooling and what happens if you rush it.
The cake needs to be completely cold before you frost it. Not cool. Cold.
I’ve watched the frosting slide off a warm layer and pool on the plate like a brown river, and it’s one of those kitchen moments that’s not funny until later. About 45 minutes on the wire rack gets you to cool. For fully cold, I’ve been known to put the layers in the fridge for 20 minutes.
Completely cold.
The crumb structure sets as the cake cools, which means a cake you frost at 30 minutes is going to compress under the weight of the frosting in a slightly sad way. The layers hold their shape better when cold, stack cleaner, and slice without dragging.
I still sometimes rush this step. It never goes as well when I do.
How to Make It
Step 1: Preheat your oven to 350°F (175°C). Grease two 9-inch round cake pans, then flour them — tap out the excess or you’ll get a pale crust on the outside of the cake that tastes like nothing. I use softened butter on the sides and parchment circles on the bottoms, which is more effort than just flouring, but the layers have never stuck since I started doing it.
Step 2: Whisk together the flour, sugar, cocoa powder, baking soda, baking powder, and salt in a large bowl. Take your time here — you want the baking soda distributed evenly through the flour before any liquid touches it. (If you’ve ever had a cake with a slightly soapy aftertaste, uneven baking soda distribution is usually the reason.)
Step 3: Add the eggs, coffee, buttermilk, oil, and vanilla extract directly to the dry ingredients. The batter is going to look extremely thin at this point and you’re going to want to add more flour. Don’t add more flour.
Step 4: Beat on medium speed for exactly 2 minutes. Not less, not more. I set a timer because I used to eyeball it and consistently under-mixed, which left small pockets of dry flour at the bottom of the bowl that I only discovered while pouring into the pans. Two full minutes gives the batter a slightly silkier look. Have you ever caught a dry-flour pocket mid-pour? Tell me below!
Step 5: Divide the batter evenly between the prepared pans. I weigh mine — usually around 680–700 grams per pan — because eyeballing it consistently gives me one thick layer and one thin one, and they bake at slightly different rates. A kitchen scale takes 10 seconds and solves the whole problem.
Step 6: Bake for 30 to 35 minutes. Start checking at 30. The toothpick needs to come out clean — not just with a few crumbs, clean. The top of the cake will spring back lightly when touched in the center. If it leaves a dent, give it another 2 minutes.
Step 7: Cool in the pans for 10 minutes, then turn out onto wire racks. Run a thin knife or offset spatula around the edge before you flip them. The layers will want to stick in at least one spot, and finding out after you’ve already inverted the pan is a bad moment.
Step 8: Frost with chocolate frosting once the layers are completely cold. A simple ganache works. A classic American buttercream works. A Swiss meringue buttercream is technically better but significantly more effort, and honestly? It’s not that deep. Pick one and commit.
Ways to Change It Up
Try this: Add ½ teaspoon of espresso powder to the dry ingredients along with the cocoa. It deepens the chocolate flavor without adding coffee taste in any detectable way — it just makes the cake taste more like itself.
Try this: Swap the chocolate frosting for salted caramel buttercream. The salt cuts through the sweetness of the cake in a way that makes you want another slice before you’ve finished the first one. It’s a different cake, but a good one.
Try this: Add ½ cup of mini chocolate chips to the batter before pouring into the pans. They sink a little during baking but create pockets of melted chocolate in the crumb that survive all the way through cooling, which is its own reward.
Which would you go for? Drop it in the comments.
How to Serve It
A slice at room temperature with a scoop of vanilla ice cream alongside — not on top, alongside — so you can alternate between the two without the ice cream melting into the frosting and turning everything soggy.
Cold, straight from the fridge, with a cup of black coffee. The texture firms up overnight and the chocolate flavor actually concentrates slightly. Some people prefer it this way and I understand them completely.
With a thin smear of raspberry jam between the layers instead of — or under — the frosting. It sounds like a lot but it adds something the cocoa alone doesn’t have, which is a sharpness that keeps the whole thing from feeling too heavy.
What would you pair it with?

Storing It Without Ruining It
Frosted cake keeps at room temperature under a cake dome or wrapped loosely in plastic for about 2 days, assuming your kitchen isn’t warm. If your kitchen runs warm — above 72°F or so — the frosting will start to look sad by day two.
In the fridge, it keeps for up to 5 days. Cover it tightly or the cake will absorb fridge smells, which is exactly as unpleasant as it sounds. Cold cake slices cleanly, which is a small upside.
To freeze: wrap individual unfrosted layers tightly in plastic wrap, then in foil, and freeze for up to 3 months. Thaw at room temperature still wrapped — condensation forms on the outside of the wrap instead of the cake surface, and you end up with a layer that frosts just as well as a fresh one.
Frosted and assembled cake can be frozen too, but the frosting texture changes slightly after thawing. Edible. Not as good.
Have you ever saved leftovers like this? Tell me below!
Mistakes I Made So You Don’t Have To
I once added the coffee while it was still near-boiling, poured it straight into the mixed batter with the eggs already in it, and got scrambled egg threads suspended in chocolate batter. I strained it through a fine mesh sieve and baked it anyway. The texture was slightly off and I couldn’t fully explain why to anyone who asked.
I skipped the parchment on the pan bottoms because I’d greased and floured them and thought that would be enough. Both layers stuck at the center bottom. I patched one with frosting. The other I ate over the sink with a spoon at 11pm and nobody knows about it except now you do.
I used oil that had been sitting open in the pantry for too long — not obviously rancid, just slightly off — and the cake had a faint aftertaste I couldn’t identify until I smelled the oil bottle afterward. Use fresh oil. It matters more than people think in a recipe this simple.
Did something like this happen to you?
Questions People Actually Ask
Can I make this as a sheet cake instead of layers? Yes. Use a 9×13-inch pan and start checking at 35 minutes. I tried it once and it took about 38 minutes in my oven. The crumb is slightly denser in a sheet pan — something about the batter depth — but it’s a good dense.
What if I don’t have buttermilk? It depends on how much you care about the final texture. The vinegar-in-milk substitute works in a pinch — 1 tablespoon white vinegar in 1 cup whole milk, let it sit for 5 minutes. But the crumb will be slightly tighter. Not bad. Just different.
Can I use melted butter instead of vegetable oil? Technically yes. But the cake won’t stay as moist after day one. Oil keeps things tender longer because it stays liquid at room temperature; butter solidifies and the crumb firms up faster. I tried butter once out of curiosity. Day-of: excellent. Day-two: noticeably drier.
Does the coffee really make a difference? Yes. Every time I’ve tested without it, the cocoa flavor is flatter — less depth, more one-dimensional sweetness. About 4 days after I first noticed this, I stopped testing it. Just use the coffee.
Can I make this without a stand mixer? A hand mixer works fine at medium speed for the full 2 minutes. But whisking by hand — I’ve tried it — doesn’t build the same structure. The batter looks combined but the crumb ends up uneven. And honestly, 2 minutes by hand is more tiring than you’d expect.
How far ahead can I bake the layers? Up to 2 days ahead if you wrap them tightly at room temperature. Up to 3 months if you freeze them. I usually bake layers the day before and frost the morning of — they’re easier to handle cold and the whole assembly goes faster.
Which answer helped you most?
A few things before you start.
This is not a complicated cake. Fifteen minutes of active prep, two bowls, a mixer. The ingredients are standard pantry items except maybe the buttermilk, which most grocery stores carry near the regular milk.
The part people get wrong most often isn’t a technique — it’s patience. Rushing the cooling, skipping the parchment, pulling the layers early. Every shortcut shows up somewhere.
Fun fact: Cocoa powder contains over 600 flavor compounds, more than red wine — most of which only fully develop when cocoa is combined with fat and heat, which is exactly what’s happening in this batter.
I’ve made this cake for birthdays, for no reason, for a Tuesday. It behaves the same each time as long as I don’t mess with it. The coffee version is better than any version without it, the buttermilk matters, and the 10-minute pan rest is not a suggestion.
Will you make this soon?
I’m currently on my fourth variation of the frosting and haven’t landed on a definitive answer yet about whether ganache or Swiss meringue holds up better on day two. I’ll report back. Probably.
Happy cooking! —Marina Caldwell
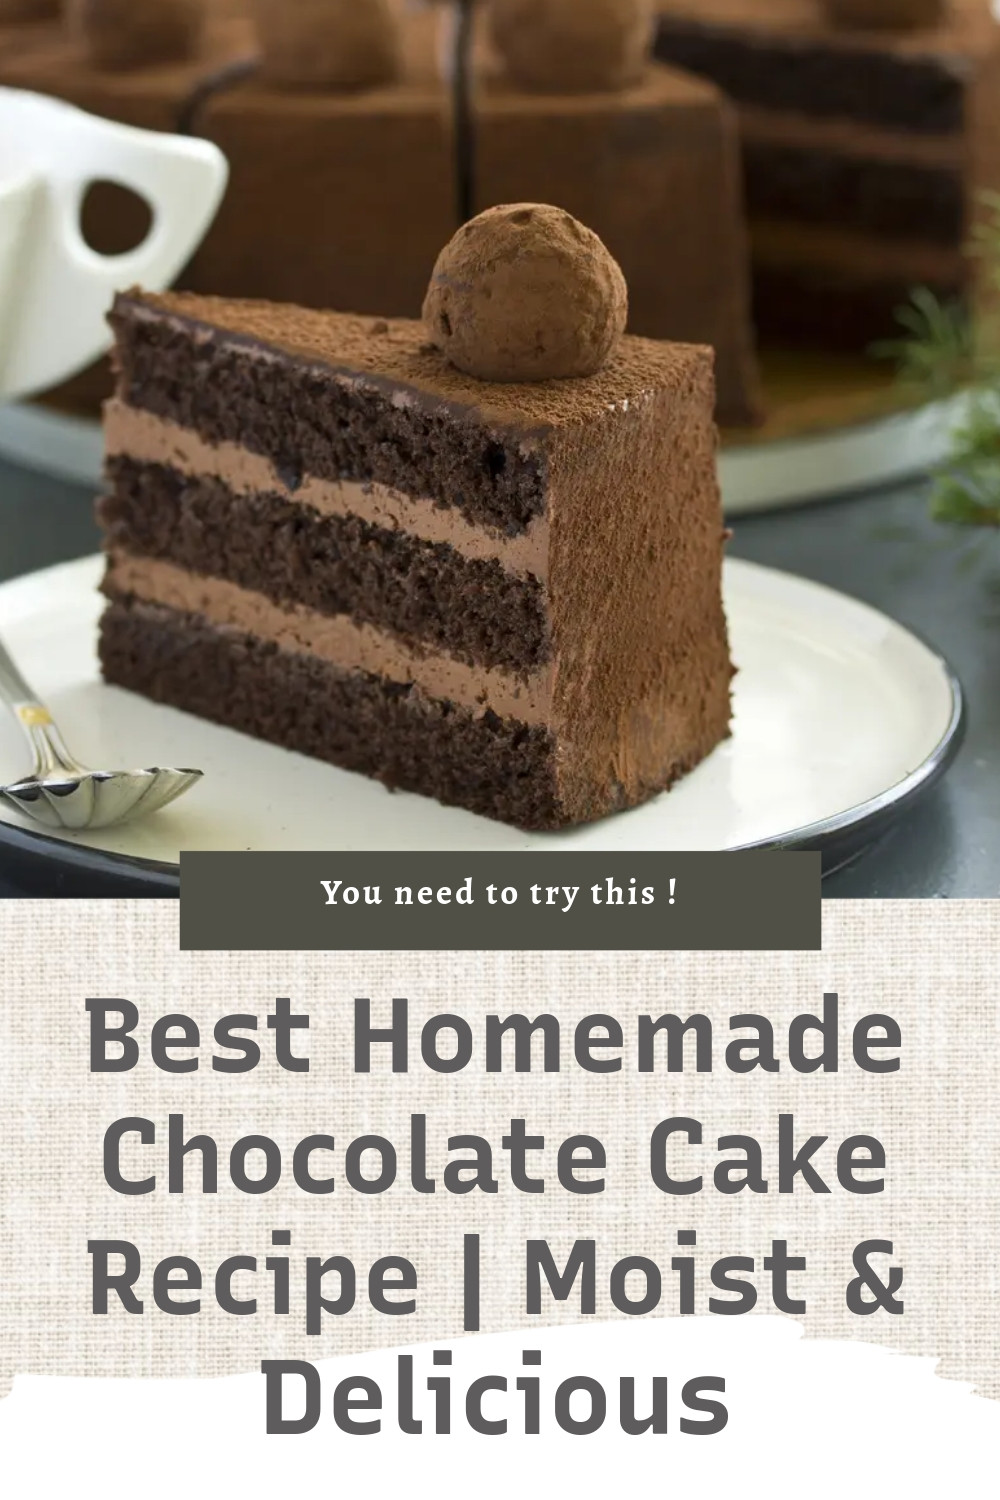
The Ultimate Moist Homemade Chocolate Cake Guide
Ingredients
- 1¾ cups all-purpose flour
- 2 cups sugar
- ¾ cup unsweetened cocoa powder
- 2 teaspoons baking soda
- 1 teaspoon baking powder
- 1 teaspoon salt
- 2 large eggs
- 1 cup strong black coffee
- 1 cup buttermilk
- ½ cup vegetable oil
- 1 teaspoon vanilla extract
Instructions
- 1Preheat oven to 350°F (175°C). Grease and flour two 9-inch round cake pans.
- 2Whisk together flour, sugar, cocoa powder, baking soda, baking powder, and salt in a large bowl.
- 3Add eggs, coffee, buttermilk, oil, and vanilla extract to dry ingredients.
- 4Beat on medium speed for 2 minutes until well combined.
- 5Divide batter evenly between prepared pans.
- 6Bake for 30-35 minutes until a toothpick inserted in the center comes out clean.
- 7Cool in pans for 10 minutes, then turn out onto wire racks to cool completely.
- 8Frost with chocolate frosting once completely cooled.
Notes
See full recipe for nutritional information.


