

The first loaf cracked down the middle wrong.
My neighbor Rosa knocked on my door at 7am holding a Dutch oven she’d borrowed from her mother-in-law, and I had exactly half a teaspoon of instant yeast left in the jar.
I’d already burned one loaf the week before — the crust went dark brown in under 20 minutes because I forgot the lid was supposed to stay on for the first 30.
Why no kneading actually works.
The dough sits for 12 to 18 hours.
That long rest — and I mean a genuinely long rest, not four hours because you got impatient — is what builds the gluten structure your hands would normally create by pushing and folding.
Time does the work. Your arms don’t.
What the dough looks like when it’s ready.
Bubbly on top. Kind of ugly, honestly.
When I first pulled back the plastic wrap after 14 hours, I thought something had gone wrong because the surface looked loose and almost sticky-wet, but that’s exactly what you want — it means fermentation happened and the yeast did its job.
Have you ever second-guessed your dough at this stage and just tossed it? Because I almost did, and I’m glad I didn’t.
Okay, the Dutch oven situation.
You need it screaming hot — 450°F for a full 30 minutes before the dough goes in, not 10, not 20.
The steam trapped inside that covered pot in the first half of baking is what gives you the crackly, blistered crust that actually sounds hollow when you tap the bottom. I thought about skipping the preheat once — actually no, I did skip it once, and the bottom of the loaf came out pale and dense like a hockey puck.
Quick tip: Line the Dutch oven with parchment before lowering the dough in — it saves you from a panicked struggle with a sticky loaf over a 450°F pot.
It looked wrong. It wasn’t.
The loaf was lopsided the first time I shaped it correctly.
I shaped it gently — maybe too gently, I was nervous — and it spread a little to one side when I dropped it into the parchment, so it baked into a slightly oblong shape instead of a round, and I considered starting over,
but it tasted exactly the same as a round one would have.
The part nobody warns you about.
Slicing it too early.
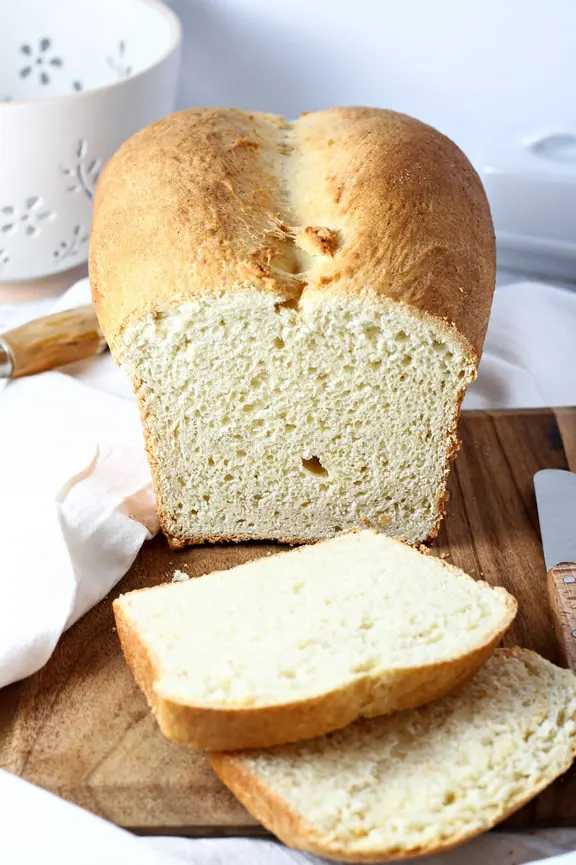
The inside needs at least an hour on the wire rack to fully set — I know 60 minutes feels impossible when the whole kitchen smells like that, but if you cut it at 15 minutes the crumb is gummy and kind of wet, and you’ll think the recipe didn’t work when it actually did.
My husband cut into our second loaf at 20 minutes and declared it undercooked. It wasn’t. It just needed more time to breathe.
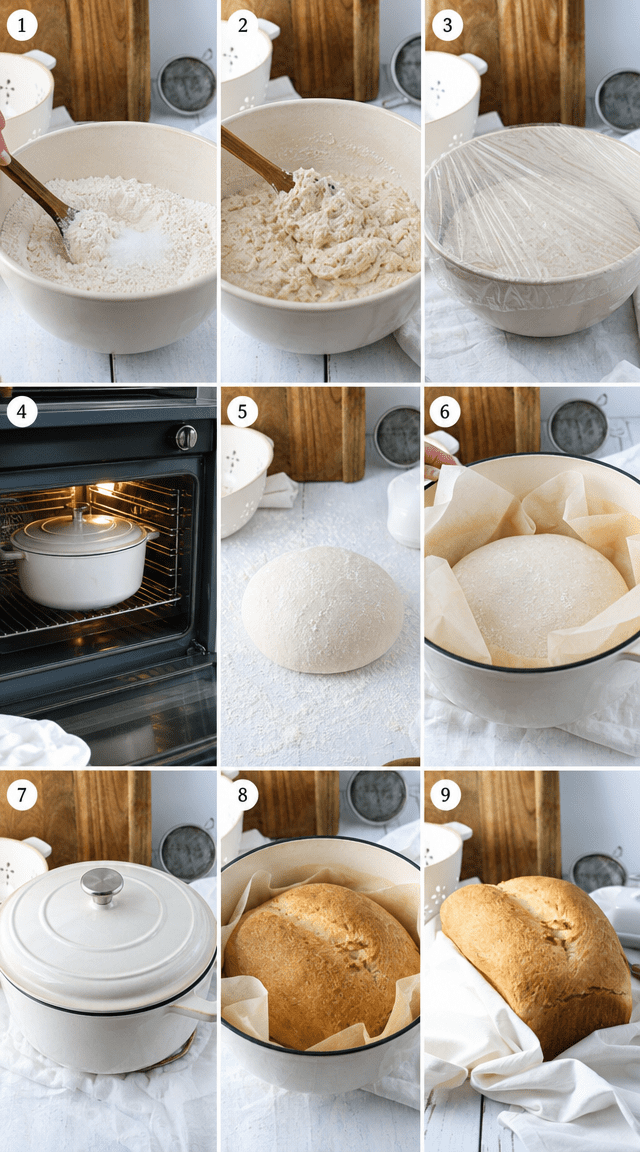
Step 1: Whisk 3 cups of all-purpose flour and 1 teaspoon of salt together in a large bowl until they’re fully combined. This takes maybe 30 seconds but it matters — I once skipped the whisking and the salt clumped near the bottom, and one side of the loaf tasted noticeably bland.
Step 2: Pour in 1½ cups of warm water and sprinkle the ½ teaspoon of instant yeast over the top, then stir until a rough, shaggy dough comes together. It will look messy and uneven — that’s fine. (Don’t add more flour trying to fix it; that dryness evens out during the long rest.)
Step 3: Cover the bowl tightly with plastic wrap and leave it at room temperature for 12 to 18 hours. If you can go closer to 18 hours, do it — the flavor at 18 hours is noticeably deeper and slightly tangy in a way the 12-hour version just isn’t. I usually start the dough before bed and come back to it the next afternoon.
Step 4: About 30 minutes before you’re ready to bake, put your Dutch oven — lid on — into a cold oven, then set it to 450°F and let the whole thing preheat together for that full 30 minutes. Do not rush this step. (The pot needs to be genuinely hot all the way through, not just warm on the surface.)
Step 5: Flour a clean surface lightly and turn the dough out. Gently pull the edges toward the center two or three times and flip it so the smooth side is up — that’s your shaping, and the whole thing takes under two minutes. I was surprised the first time by how little handling it actually needs at this point.
Step 6: Cut a piece of parchment paper to fit your Dutch oven, carefully pull the pot out, and lower the dough in using the parchment as a sling. Put the lid on immediately. Bake covered for 30 minutes — the steam building inside is doing a lot of work, so don’t lift the lid to check.
Step 7: After 30 minutes, remove the lid and continue baking for another 10 to 15 minutes until the crust turns a deep golden brown. Mine usually hits the color I want at about 12 minutes uncovered, but every oven runs a little differently. Does your oven run hot or cool? Share below!
Step 8: Pull the loaf out and transfer it to a wire rack. Leave it alone for at least an hour before slicing. Honestly? It’s not that deep, but this step is the one most people skip and then wonder why the bread tastes off.
Ways to Change It Up
Try this: Swap ½ cup of the all-purpose flour for whole wheat flour. The loaf gets a slightly nuttier flavor and the crust develops a few extra cracks along the top that look like they came from a bakery window.
Try this: Add 1 tablespoon of fresh rosemary and a teaspoon of coarse sea salt on top of the dough just before it goes into the Dutch oven. The rosemary crisps into the crust and smells incredible for the full 45 minutes of baking.
Try this: Stir 3 tablespoons of grated parmesan and ½ teaspoon of garlic powder into the dry flour before adding water. The cheese melts into the crust during the uncovered bake and creates these small crispy patches that my youngest refuses to share.
Which would you go for? Drop it in the comments.
How to Serve It
Tear a chunk off while it’s still just barely warm and spread it with salted butter — not softened, actually cold from the fridge so it drags a little across the crumb.
Slice it thicker and use it to mop up a bowl of tomato soup or any kind of stew with a good broth. The crust holds up instead of going immediately soggy the way sandwich bread does.
Cut thin slices the next day, toast them in a dry pan for about 3 minutes per side, and use them as a base for ricotta and a drizzle of honey. That’s a Tuesday breakfast right there.
What would you pair it with?
Storing It Without Ruining It
Leave it out at room temperature the first day, cut side down on the board or wrapped loosely in a clean kitchen towel — plastic bags trap moisture against the crust and it goes soft and a little rubbery within a few hours.
After day one, slice what’s left and freeze it in a zip-lock bag. Pull slices straight from the freezer and toast them directly — no thawing needed, about 4 minutes in the toaster on medium.
Skip the fridge entirely if you can. Refrigerating bread dries it out faster than leaving it on the counter does, which feels counterintuitive but is genuinely true.
Have you ever saved leftovers like this? Tell me below!
Mistakes I Made So You Don’t Have To
I once used hot tap water instead of warm water because I was in a hurry, and it killed the yeast before fermentation even started — the dough sat for 18 hours and came out completely flat, not a single bubble.
The first time I tried to lower the dough into the Dutch oven without parchment, I burned three fingers and the loaf landed off-center and stuck to the bottom. I served it anyway. It tasted fine but looked like something dropped from a height.
I also got impatient with the shaping and overworked the dough — pressed it too many times trying to make it look neat — and the loaf baked up tight and dense instead of open and chewy inside. Less handling is genuinely better here, even if the shape looks imperfect going into the pot. Did something like this happen to you?
Questions I Actually Get About This Bread
Can I use active dry yeast instead of instant? Yes, but proof it first in the warm water for about 10 minutes until it foams before adding it to the flour. And use the same amount — ½ teaspoon.
What if I don’t have a Dutch oven? It depends on what you have — a heavy oven-safe pot with a tight lid can work, but the steam retention won’t be quite as good. I tried this once with a regular stockpot and the crust came out thinner and less crackly. Not bad, just different.
How long does the bread keep? About 2 days at room temperature before it starts going stale. Frozen slices last up to 3 months without losing much quality — I’ve tested this more than I’d like to admit.
My dough didn’t rise much during the 18 hours — is it ruined? It depends on your kitchen temperature. Cold rooms slow yeast down significantly. But if it’s still completely flat with zero bubbles after 18 hours in a warm-ish room, the yeast was probably dead to begin with. Start over.
Can I add mix-ins like olives or cheese directly to the dough? Yes — fold them in gently right after the initial mixing, before the long rest. I tried adding olives after fermentation and they tore the dough structure instead of incorporating cleanly. Timing matters here.
Why is my crust soft the next day? Humidity. And storing it in a plastic bag seals that humidity right in. Leave it uncovered or wrapped in cloth and the crust firms back up. It won’t be quite as crisp as day one, but it won’t be sad and floppy either.
Which answer helped you most?
Go make the bread, then tell me what happened.
Four ingredients. No stand mixer. No kneading at all.
The hardest part of this whole recipe is the waiting — and even that is mostly just leaving a bowl on your counter and going to bed.
Will you make this soon? I genuinely want to know how yours turns out, especially if you try one of the flavor variations or use a different pot.
My kids ate the parmesan version in under 20 minutes and asked me to make it again the same day. I’ve made worse outcomes from far more complicated recipes.
Fun fact: Flour has been used to make leavened bread for at least 14,000 years — ancient bakers in the Jordan Valley were grinding wild wheat and fermenting dough long before anyone wrote a recipe down.
Happy cooking! —Marina Caldwell
Baking Crusty Artisan Bread Without Any Kneading
Ingredients
- 3 cups all-purpose flour
- 1 teaspoon salt
- 1/2 teaspoon instant yeast
- 1 1/2 cups warm water
Instructions
- 1Combine flour and salt in a large mixing bowl, whisking together thoroughly
- 2Pour in warm water, sprinkle yeast over mixture, and stir until a rough, shaggy dough comes together
- 3Tightly cover bowl with plastic wrap and allow dough to ferment undisturbed at room temperature for 12-18 hours
- 4Place Dutch oven inside your oven and preheat to 450°F for a full 30 minutes
- 5Lightly flour a clean work surface, turn out dough, and gently form into a smooth round ball
- 6Line the scorching hot Dutch oven with parchment paper and carefully lower dough inside
- 7Bake covered for 30 minutes, trapping steam for a chewy interior
- 8Remove lid and continue baking 10-15 minutes until a deep golden crust develops
- 9Transfer loaf to a wire rack and cool completely before slicing
Notes
– Longer fermentation time (closer to 18 hours) develops a richer, more complex flavor – Ensure your Dutch oven is truly preheated before adding dough for maximum oven spring – Resist slicing immediately — cooling allows the interior crumb to fully set properly


