

The batch that almost didn’t happen.
My youngest pulled the butter out of the fridge 20 minutes before I needed it, still cold, still basically a brick. I creamed it anyway, and the dough looked wrong the entire time — grainy, stiff, refusing to come together.
The cookies were fine. Better than fine, honestly.
That was the first time I made these, and I’ve made them at least a dozen times since — same recipe, same pan, same 375°F oven — and I still catch myself holding my breath when the timer hits 10 minutes.
About the butter. Specifically.
Softened butter means something specific here: it should give when you press a finger into it, not slide or melt. An hour on the counter, maybe 45 minutes on a warm day.
I thought about using melted butter — actually no, I tried it once and the cookies spread too thin and went crispy in a way I didn’t want.
Stick with soft. It creams up in about 3 minutes on medium and turns almost pale yellow, which is what you’re going for.
It looked wrong. It wasn’t.
When I pulled the first batch out at 11 minutes, the centers looked underdone — soft, almost raw-looking, not what I expected from a cookie recipe.
I left them on the sheet for the full 2 minutes before moving them, and they set up exactly right — chewy in the middle, just barely crisp at the edge.
That carry-over baking is real. Don’t skip the rest time.
The cold dough thing.
Chilling the dough for 30 minutes before scooping made a noticeable difference — the cookies spread less, puffed slightly more, and the brown sugar flavor came through stronger. I don’t fully understand the science, but I’ve skipped this step and you can taste when I did.
Has that ever happened to you, where you rush a step and somehow the finished thing just tastes a little flat?
Quick tip: Press a few extra chocolate chips onto the tops of the dough balls right before baking — the cookies come out looking like something from a bakery case, not a home kitchen.
The flour moment nobody warns you about.
When you add the flour mixture on low speed, it’s going to look like a dusty mess for about 30 seconds before it comes together, and every instinct says to turn the mixer up.
Don’t.
Overmixing the flour — even by a minute — makes the cookies tough in a way that’s hard to explain until you’ve eaten one and felt that slightly gummy resistance. Low and slow until the dry streaks disappear, then stop.
Keeping them soft the next day.
Store the cooled cookies in an airtight container with a single slice of white bread tucked in. I know it sounds strange,
but the bread gives off moisture and the cookies absorb it, and they stay soft for three days at least.
My sister thought this was a myth until she tried it. Now she texts me about it like she discovered it herself.
How to Make These Chocolate Chip Cookies
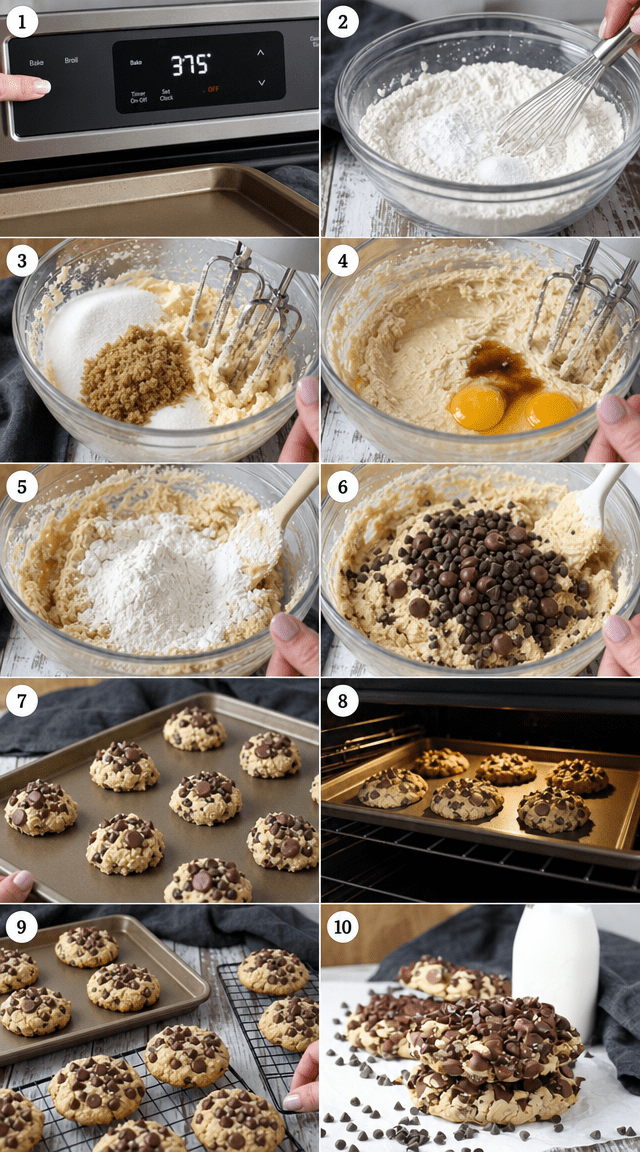
Step 1: Heat your oven to 375°F and line two baking sheets with parchment paper. Don’t skip the parchment — I baked directly on a greased sheet once and the bottoms went dark brown at 9 minutes while the tops were still pale. (Parchment is doing more work than you think.)
Step 2: Whisk together 2¼ cups all-purpose flour, 1 tsp baking soda, and 1 tsp salt in a medium bowl. Set it aside. This only takes about 45 seconds but I always feel like I’m doing something official when I do it.
Step 3: Cream 1 cup softened butter with ¾ cup granulated sugar and ¾ cup packed brown sugar on medium speed for about 3 minutes. You want it light and fluffy — it should look almost whipped, noticeably paler than when you started. (Don’t rush this step; under-creamed butter makes flat cookies.)
Step 4: Beat in 2 large eggs one at a time, then mix in 2 tsp vanilla extract. The batter will look glossy and smooth at this point. Make sure each egg is fully incorporated before you add the next — I’ve tossed both in at once before and the dough took forever to come together evenly.
Step 5: Reduce the mixer to low and slowly add your flour mixture. Mix just until no dry streaks remain — this took me about 45 seconds. Stop the second it looks combined.
Step 6: Fold in 2 cups of chocolate chips using a rubber spatula. Don’t use the mixer here. Two or three folds is all it takes, and you keep more chips whole.
Step 7: If you have time, cover the dough and chill it in the fridge for 30 minutes. Then scoop rounded tablespoons onto your prepared sheets, spacing them about 2 inches apart. Do you chill your cookie dough before baking? Share below!
Step 8: Bake for 10–12 minutes until the edges are golden and the centers still look a little soft. Pull them at 10 if your oven runs hot. Leave them on the baking sheet for 2 full minutes before transferring to a rack.
Ways to Change It Up
Try this: Swap half the chocolate chips for dark chocolate chunks — they melt into pools instead of holding their shape, and the bittersweet contrast against the brown sugar dough is something else entirely.
Try this: Add ½ tsp of espresso powder to the flour mixture. You won’t taste coffee — but it deepens the chocolate flavor noticeably. I was skeptical the first time; now it’s in every batch I make for guests.
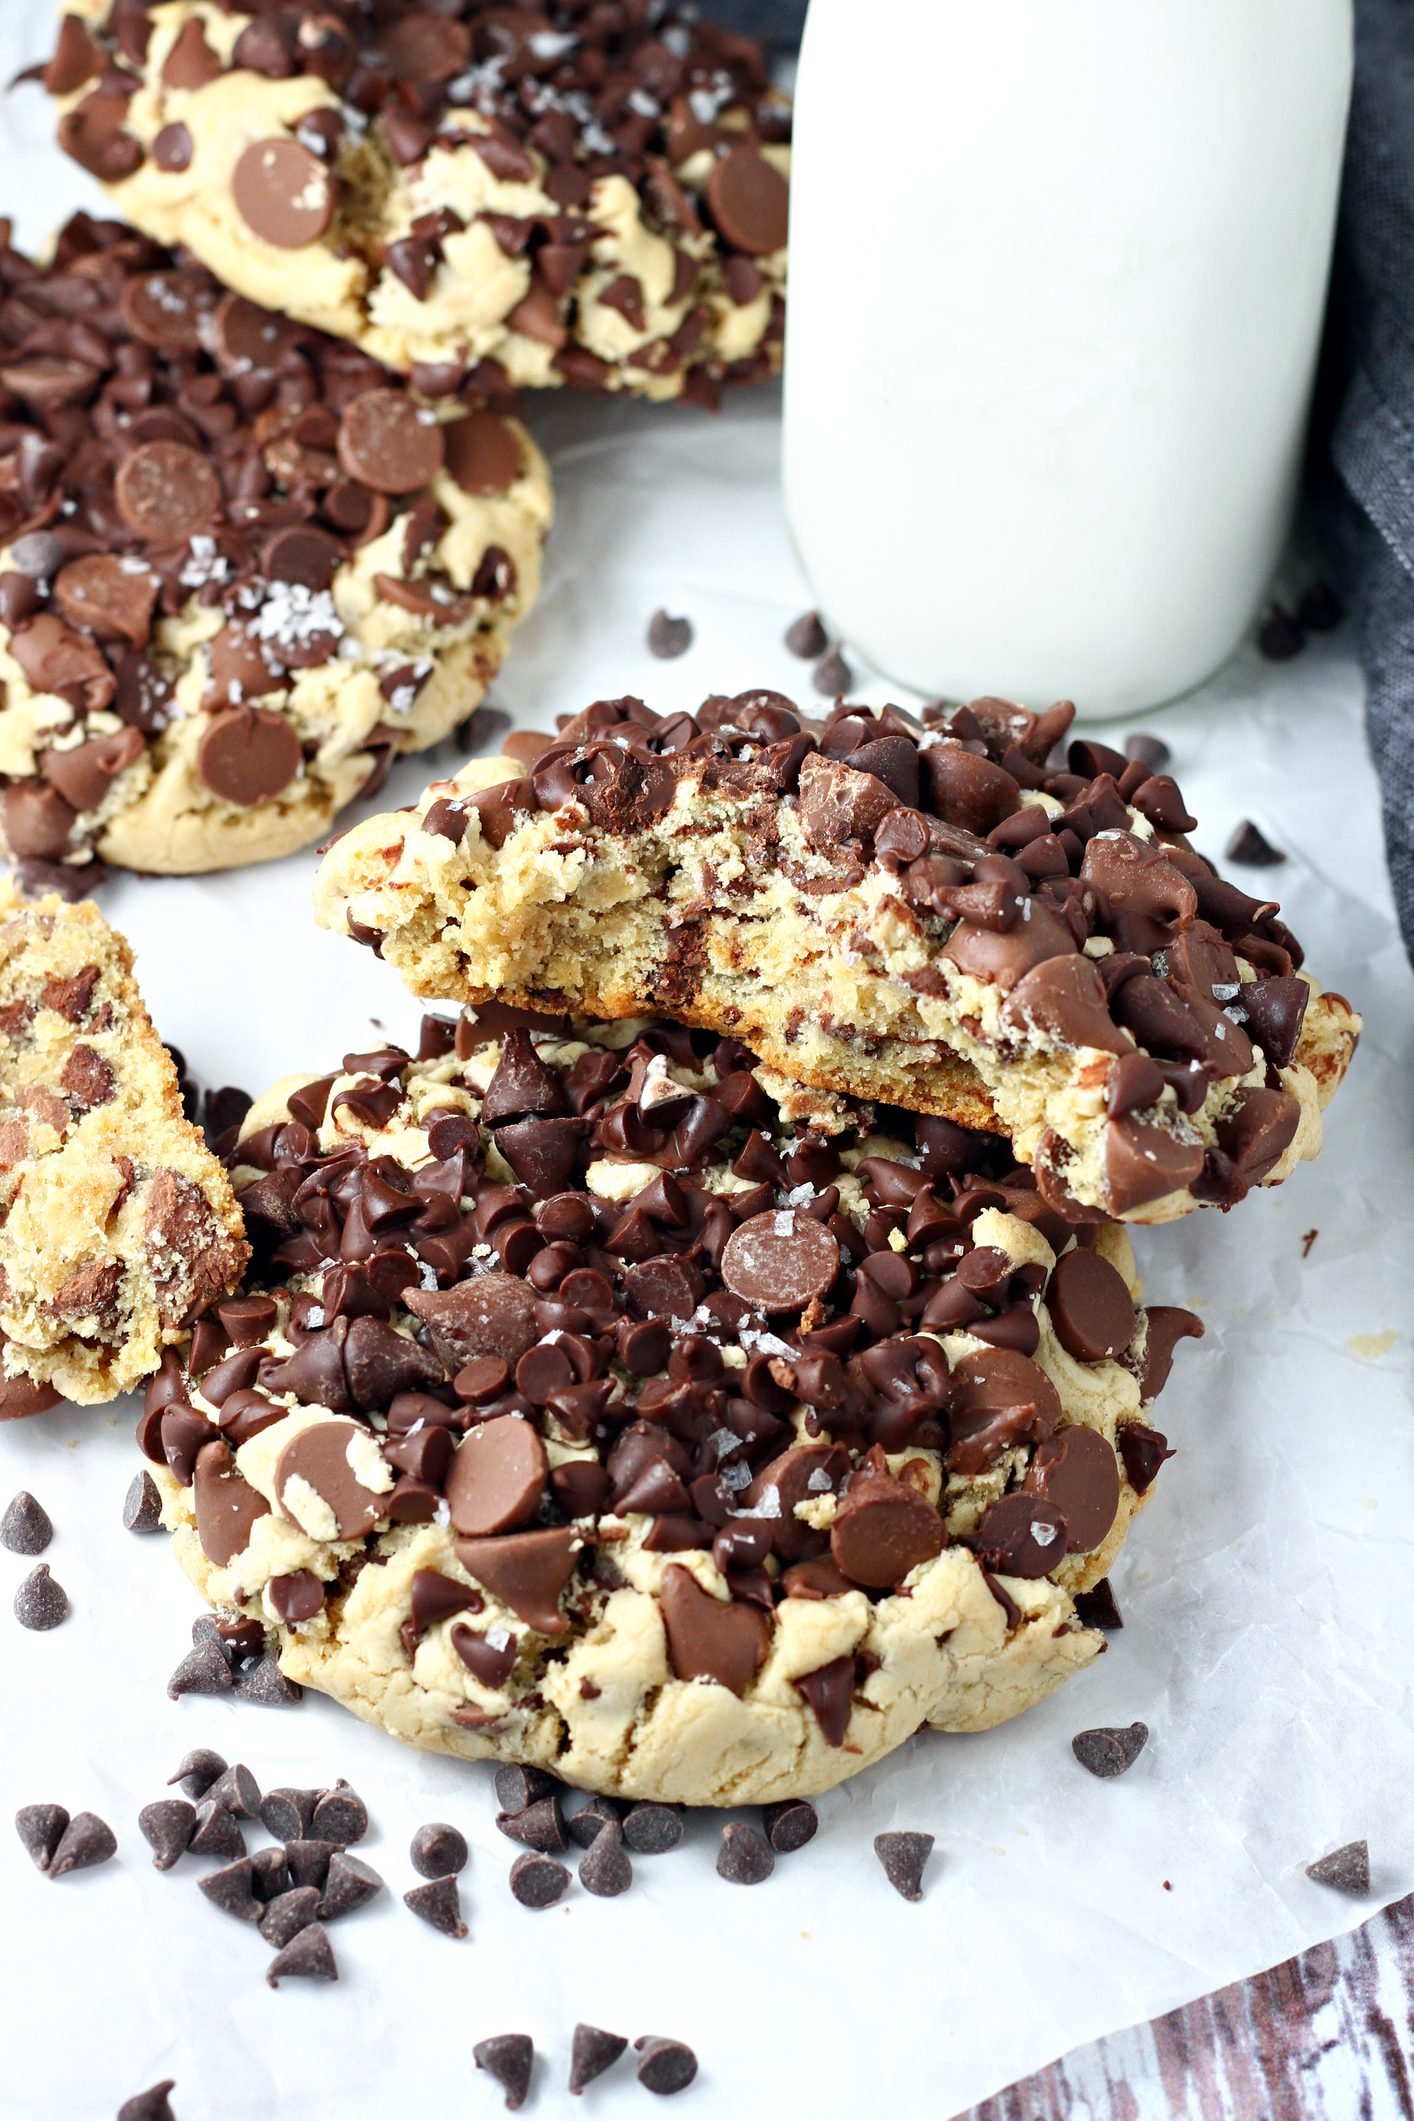
Try this: Finish the dough balls with a pinch of flaky sea salt right before they go in the oven. It sounds like a food blogger cliché and it is, but it actually works and I refuse to apologize for it.
Which would you go for? Drop it in the comments.
How to Serve It
Straight off the cooling rack after 5 minutes, with a glass of cold whole milk. That’s it. The chips are still slightly melted and the edges snap just barely when you bite in.
Sandwich two cookies around a scoop of vanilla bean ice cream and press gently — the warmth from the cookie softens the ice cream edge-to-edge in about 30 seconds.
Crumble two or three over a bowl of plain Greek yogurt with a drizzle of honey if you want breakfast that technically has protein in it.
What would you pair it with?
Storing It Without Ruining It
Room temperature in an airtight container, with that slice of bread I mentioned — they stay soft for up to 3 days. After that they start going a little dry at the edges.
Fridge isn’t great for baked cookies, honestly. They firm up and lose that soft center. I’d skip it.
Freezer works well for the raw dough. Scoop into balls, freeze them on a sheet for an hour, then transfer to a zip bag. Bake from frozen at 375°F for about 13–14 minutes and they come out nearly identical to fresh.
To reheat a baked cookie, 10 seconds in the microwave. That’s all. Anything longer and the chips go weirdly grainy.
Have you ever saved leftovers like this? Tell me below!
Mistakes I Made So You Don’t Have To
I once measured the flour by scooping the measuring cup directly into the bag. Packed it down without realizing, ended up with closer to 2¾ cups, and the cookies came out thick, dry, and kind of cakey. Spoon your flour into the cup and level it off.
I skipped the parchment one night because I ran out, used a greased pan, and the bottoms burned at 10 minutes while the tops were still underdone. I served them anyway. They were not good. The bottoms tasted like regret.
I added both eggs at the same time instead of one at a time, in a hurry, and the dough never fully emulsified — there was a slightly greasy sheen to it that didn’t bake out. The texture was off in a way I couldn’t explain to anyone at the table. Did something like this happen to you?
Questions I actually get asked about these cookies.
Can I use salted butter instead of unsalted?
You can. The cookies will taste slightly saltier, which some people prefer. But you already have 1 tsp of salt in the dough — so if you use salted butter, drop that added salt down to about ½ tsp or skip it. It depends on how salt-sensitive you are.
Do I have to chill the dough?
No. I’ve skipped it plenty of times. The cookies spread a bit more and the flavor is a little less deep, but they’re still completely good. About 30 minutes of chill time makes a difference you can taste. And honestly? Skip it if you’re impatient. I’ve made worse decisions.
Why did my cookies come out flat?
Usually butter. Either it was too warm — close to melted — or you under-creamed it and didn’t get enough air in. I tried using butter that had been sitting out for over 2 hours on a hot day once and the cookies puddled out into thin discs. Room temperature means firm-but-yielding, not soft and shiny.
Can I freeze the baked cookies?
Yes. Wrap individually in plastic wrap, then into a zip bag. They’ll keep about 2 months. Thaw at room temp for about 20 minutes or microwave for 10 seconds. But frozen raw dough gives better results when you’re after fresh-baked texture.
What kind of chocolate chips work best?
Semisweet is what the recipe was built around and it’s what I use. But I tried bittersweet 60% once and preferred it — less sweet overall, which balanced the brown sugar better. It depends on how sweet you like your cookies. Milk chocolate chips exist and I won’t judge you.
Can I double the recipe?
Yes, straight math — double everything. One thing to know: if you’re creaming double the butter, give it a full extra minute or two on the mixer. A bigger mass takes longer to get fluffy. And bake one sheet at a time if you can; rotating halfway works but the bottom sheet always gets slightly more heat.
Which answer helped you most?
Okay, go make them.
These take about 25 minutes start to finish if you skip the chill, under an hour if you don’t. That’s a weeknight cookie. That’s a Tuesday.
The ingredients are probably in your pantry right now. Flour, butter, two sugars, eggs, vanilla, chocolate chips. Nothing weird.
Chocolate chips were invented by Ruth Wakefield in 1938 when she chopped a Nestlé semi-sweet chocolate bar into her cookie dough, expecting it to melt — it held its shape instead, and that “mistake” became the most copied cookie in American baking history.
The one thing I’d ask you to actually follow: pull them at 10–11 minutes even when they look underdone. That’s not a mistake. That’s the whole point.
Will you make this soon? Drop a comment and let me know how they turned out — or what you changed. I love hearing when someone swaps in dark chocolate or adds a little sea salt and acts like they invented something.
Happy cooking! —Marina Caldwell
Baking the Ultimate Timeless Chocolate Chip Cookie
Ingredients
- 2 1/4 cups all-purpose flour
- 1 tsp baking soda
- 1 tsp salt
- 1 cup softened butter
- 3/4 cup granulated sugar
- 3/4 cup packed brown sugar
- 2 large eggs
- 2 tsp vanilla extract
- 2 cups chocolate chips
Instructions
- 1Heat oven to 375°F (190°C) and line baking sheets with parchment paper.
- 2Whisk together flour, baking soda, and salt in a medium bowl and set aside.
- 3Using a stand or hand mixer, cream butter with both sugars on medium speed until light and fluffy, about 3 minutes.
- 4Beat in eggs one at a time, then mix in vanilla extract until fully incorporated.
- 5Reduce mixer speed to low and slowly add the flour mixture, mixing until no dry streaks remain.
- 6Gently fold in chocolate chips using a rubber spatula.
- 7Scoop rounded tablespoons of dough onto prepared sheets, spacing 2 inches apart.
- 8Bake 10-12 minutes until edges are golden but centers appear slightly underdone.
- 9Rest cookies on the sheet for 2 minutes before moving to a cooling rack.
Notes
– Slightly underbaking creates a chewier center, as cookies continue setting while cooling – Chilling dough for 30 minutes before baking enhances flavor and reduces spreading – Store cooled cookies in an airtight container with a slice of bread to maintain softness


