

The first time I made this, I set the oven to 350°F instead of 325°F.
My husband walked into the kitchen 40 minutes later and asked why it smelled like burnt sugar. It didn’t burn, exactly. The top cracked straight down the middle like someone drew a canyon on it with a ruler.
I covered it with cherry topping and pretended that was the plan all along.
Nobody said anything about the crack. My youngest asked for seconds. I’ve been making this cheesecake every June since then, and I haven’t cracked one in three years — though honestly, the cherry topping hides a lot of sins if you do.
Why the water bath actually matters
I skipped the water bath the second time I made this.
I thought wrapping the pan in foil was enough of a hassle, and adding a roasting pan full of hot water felt like something only people with granite countertops and matching dish towels would bother with. The cheesecake came out fine, sort of. The edges were drier than the center, and when I cut into it two days later, the texture felt more like dense cake than cheesecake.
The water keeps the temperature steady.
Without it, the oven’s dry heat hits the pan directly, and the edges cook faster than the middle. You end up with that ring of overcooked filling around the outside and a center that takes forever to set. My neighbor Rosa told me she never uses a water bath and her cheesecakes turn out great, but when I tried hers, it had that same dry-edge problem.
The foil wrap isn’t optional either.
Springform pans leak. Not always, but enough that you’ll be sorry if you skip this step. I wrap mine twice now — once around the bottom, then again halfway up the sides. It takes an extra 30 seconds and saves you from having a soggy crust.
Quick tip: Use a kettle to boil the water, then pour it into the roasting pan after you’ve placed both pans in the oven. Way easier than carrying a full roasting pan of scalding water across your kitchen.
The crust I almost ruined
I pressed the crust too thin the first time.
It looked fine going into the oven, but after I poured the filling in, I could see the graham cracker layer was barely there — more like a suggestion of a crust than an actual base. When I sliced the cheesecake later, the bottom pieces fell apart. My husband ate his slice with a spoon.
Now I use the bottom of a measuring cup to press it down.
Not my hands. The measuring cup gives you even pressure, and you can really lean into it without worrying about the butter warming up from your palms. I go over it twice — once to spread it evenly, once to compact it. You want it firm enough that it doesn’t crumble when you cut through it later.
The 8-minute bake matters more than I thought it would.
I skipped it once because I was running late, and the crust turned out soggy underneath the filling. That short bake sets the butter and gives the crumbs a chance to toast slightly. It also creates a barrier so the filling doesn’t soak straight through. Don’t skip it.
Cream cheese straight from the fridge
I did this once because I forgot to take it out early enough.
Cold cream cheese doesn’t beat smooth. You end up with lumps, and no amount of mixing gets rid of them because the chunks just bounce around the bowl instead of breaking down. I tried microwaving the blocks for 10 seconds each, which helped a little, but some spots got too soft while others stayed cold.
Room temperature takes about 45 minutes.
I set mine out when I start gathering ingredients. By the time I’ve measured everything else and prepped the crust, the cream cheese is soft enough to dent with my finger. That’s the texture you want. If it’s still firm in the center, wait another 10 minutes.
Beat it alone first, for a full two minutes.
This was the trick that fixed my lumpy filling problem. I used to add the sugar right away, but beating the cream cheese by itself breaks down any remaining lumps and makes the whole mixture fluffier. Then when you add the sugar-cornstarch blend, it incorporates without clumping.
Have you ever tried to salvage lumpy cheesecake batter? What did you do?
The eggs I added wrong
I cracked all four eggs into the batter at once the first time.
The mixer was on medium speed, and I just dumped them in like I was making brownies. The filling looked fine until I poured it into the pan — then I noticed all these tiny air bubbles on the surface. After baking, the top had this weird texture, almost like foam that had deflated.
One egg at a time, on low speed, fixes this.
I add one, let it mix in completely — about 20 seconds — then add the next. It feels slow, but it keeps air out of the batter. Too much air means the cheesecake puffs up in the oven, then sinks and cracks as it cools. Every single crack I’ve had came from either overbeating the eggs or baking at too high a temperature.
The sour cream and heavy cream go in last.
Just fold them in until you can’t see streaks anymore. Overmixing at this stage doesn’t help anything. The batter should look thick but pourable — not fluffy, not stiff. If it’s too thick, you didn’t beat the cream cheese enough at the beginning.
That jiggle in the center
The first time I made this, I baked it until the whole thing looked set.
No jiggle anywhere. I thought that meant it was done. When I cut into it the next day, the texture was dense and kind of rubbery. My husband said it reminded him of the cheesecake from a grocery store bakery — which wasn’t exactly a compliment.
The center should still jiggle when you take it out.
Not liquid, but wobbly — like Jell-O that’s almost set but not quite. The edges should look firm and slightly puffed. If the whole surface looks solid, you’ve overbaked it. The cheesecake keeps cooking as it cools, so pulling it early is the only way to get that creamy texture.
I check it at 50 minutes now.
Sometimes it needs the full 55, sometimes it’s done at 52. Ovens vary. Mine runs a little hot on the bottom rack, so I always use the center rack and start checking early. Jiggle the pan gently — if the center moves like a wave but doesn’t slosh, it’s done.
Quick tip: Don’t open the oven door before 50 minutes, or the temperature drop can cause cracks. Just wait.
And don’t skip the oven rest.
Turn the oven off, crack the door about four inches, and leave the cheesecake inside for an hour. This gradual cooldown keeps the top from cracking. The first time I pulled it straight out of the oven and set it on the counter, the surface split in three places within 10 minutes.
The overnight wait I tried to skip
I wanted to serve this the same day once.
I let it chill for three hours — longer than the two-hour minimum — and figured that was close enough. When I sliced it, the center was still slightly soft and the slices didn’t hold their shape. They tasted fine, but they looked sloppy on the plate.
Overnight is different.
The texture firms up completely, and the flavors settle. The cream cheese flavor gets less sharp, the vanilla comes through more, and the whole thing tastes more balanced. I always make this the night before now. Sometimes I make it two nights before if I know I’ll be busy the day of.
It keeps for five days in the fridge.
I cover mine with plastic wrap pressed directly against the surface, then wrap the whole pan in foil. The less air that gets to it, the longer it stays creamy. After three days, the crust starts to soften a little where it meets the filling, but it’s still good.
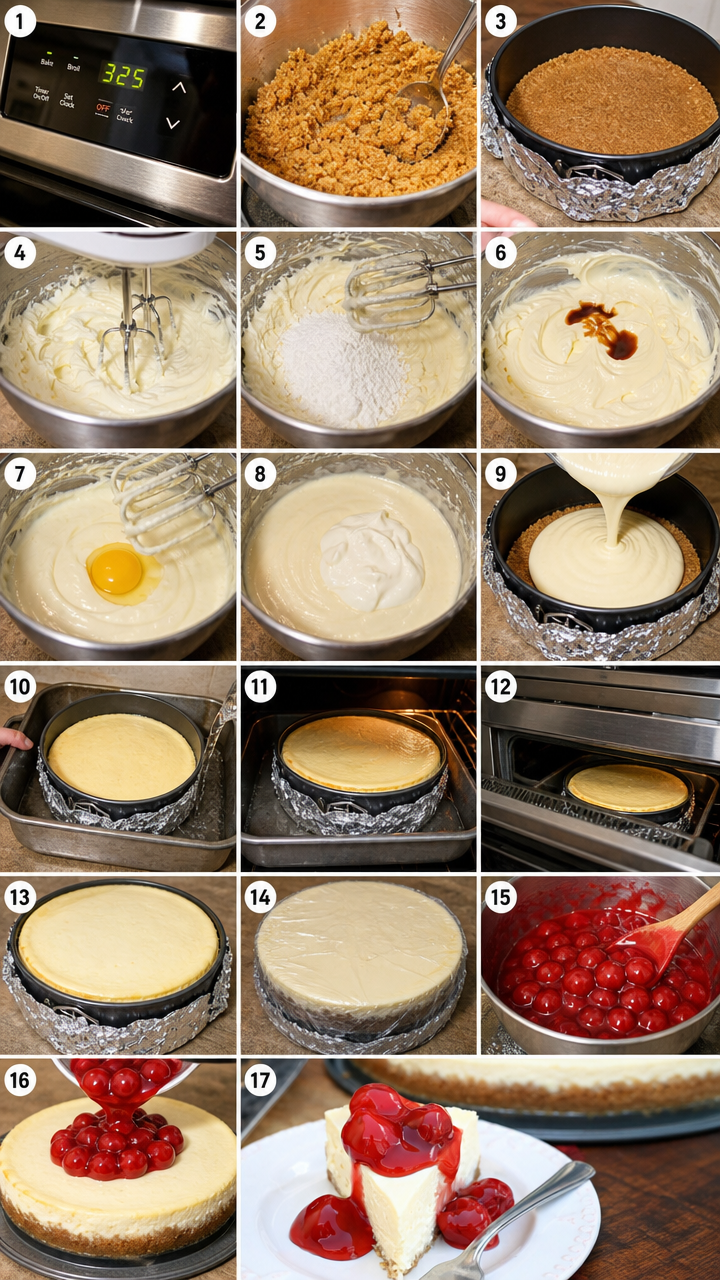
Step 1: Preheat your oven to 325°F and wrap the outside of a 9-inch springform pan with aluminum foil — two layers if your pan tends to leak, which most of them do. In a medium bowl, mix 2 cups of graham cracker crumbs with 1/2 cup of melted butter and 1/4 cup of granulated sugar until it looks like wet sand. Press this into the bottom of the pan using the flat bottom of a measuring cup, really pressing down to compact it. Bake for 8 minutes, then take it out and let it cool while you make the filling. I once skipped this step because I was in a hurry, and the crust turned soggy underneath. Don’t be me.
Step 2: Beat 32 ounces (four 8-ounce blocks) of room-temperature cream cheese in a large bowl for about 2 minutes, until it’s smooth and fluffy with no lumps. This is important — if the cream cheese is cold or you rush this step, you’ll have lumps you can’t get rid of later. In a separate bowl, whisk together 1 cup of granulated sugar and 1/4 cup of cornstarch, then add this to the cream cheese and beat until combined. The cornstarch helps the cheesecake set without overbaking, which took me three tries to figure out.
Step 3: Mix in 1 teaspoon of vanilla extract, then add 4 large eggs one at a time, beating on low speed after each one just until it’s incorporated — about 20 seconds each. Don’t overmix here or you’ll whip air into the batter, which causes cracks later. My neighbor told me she always adds all the eggs at once and her cheesecakes turn out fine, but when I tried it her way, mine cracked every time. (Pro tip: If you see a lot of air bubbles on the surface of your batter, you’ve beaten it too much.)
Step 4: Add 1/2 cup of sour cream and 1/4 cup of heavy cream, mixing just until you can’t see any white streaks. Pour this over your cooled crust — the batter will be thick but still pourable. Set your springform pan inside a larger roasting pan, then place both pans in the oven. Now pour hot water (I use a kettle) into the roasting pan until it comes about halfway up the sides of the springform pan. This water bath keeps the temperature even and prevents cracks.
Step 5: Bake for 55 minutes, but start checking at 50 because ovens vary and mine runs hot. The edges should look set and slightly puffed, but the center should still jiggle when you gently shake the pan — like Jell-O that hasn’t quite set. If it looks completely firm, you’ve overbaked it and the texture will be dense instead of creamy. Turn off the oven, crack the door open about 4 inches, and leave the cheesecake inside for 1 hour. This slow cooldown is what keeps the top from cracking.
Step 6: Take the cheesecake out of the oven and the water bath (carefully — that water is still hot), remove the foil, and let it cool on the counter for another hour. Then cover it and refrigerate for at least 2 hours, but overnight is way better if you have the time. The texture firms up completely overnight, and the flavors settle in a way they don’t after just a few hours. I’ve served this after three hours of chilling and it tasted fine but looked sloppy when I sliced it.
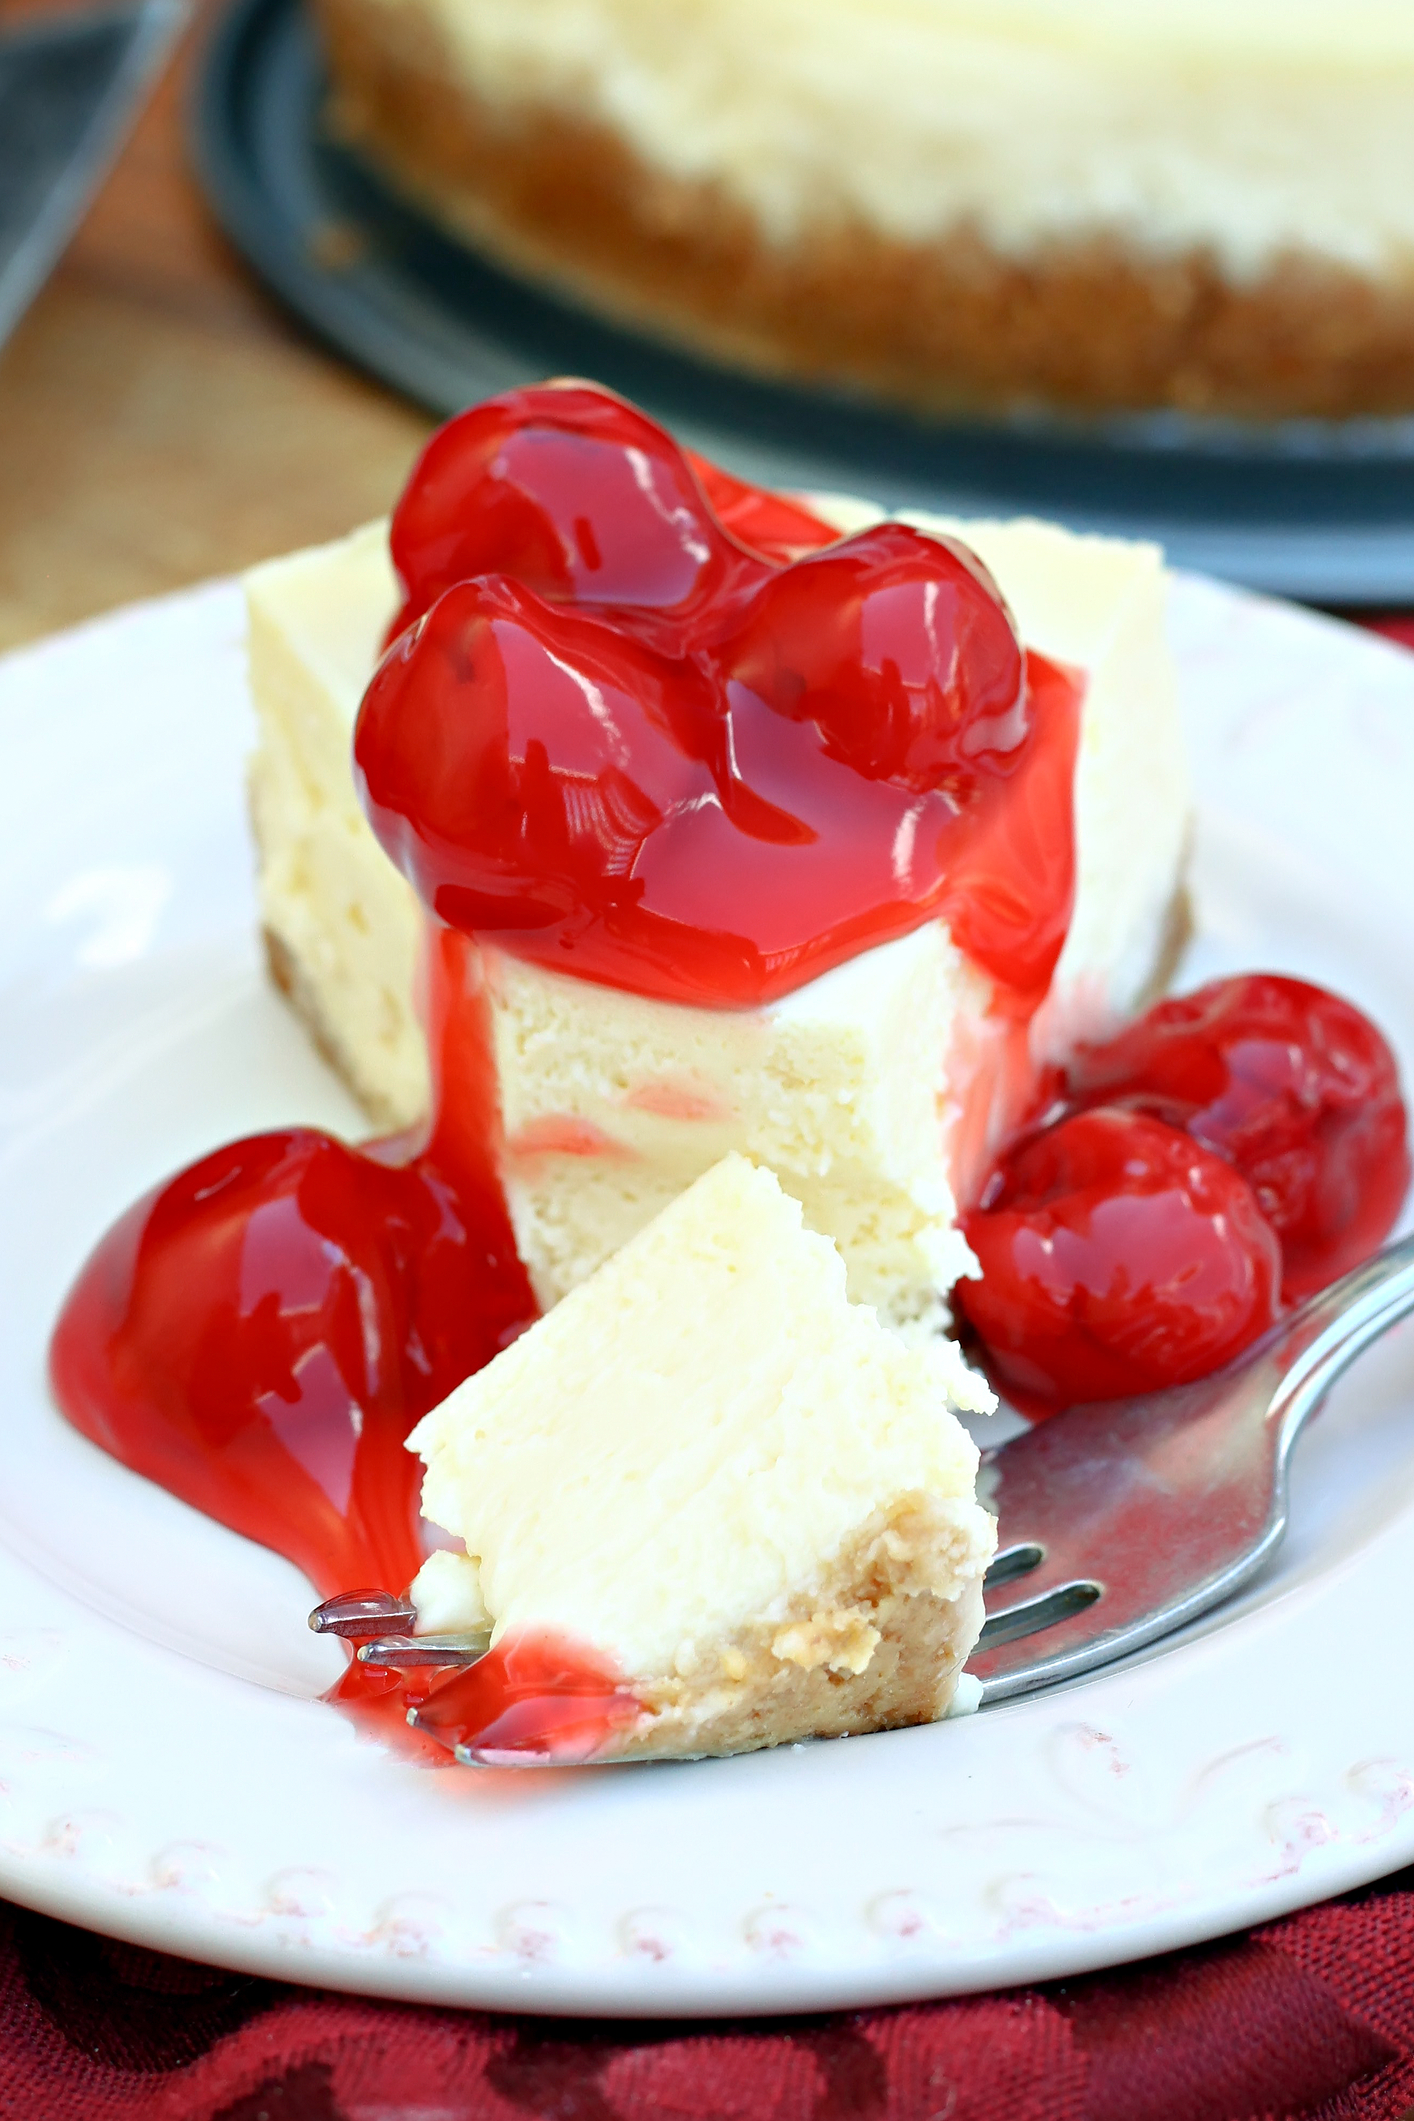
Step 7: Right before serving — and I mean right before, not an hour before — heat 2 cans (21 ounces each) of cherry pie filling in a small saucepan with 2 tablespoons of lemon juice and 1 tablespoon of cherry liqueur if you have it. I skip the liqueur half the time and it’s still good. Heat this until it’s just warmed through, about 3 minutes, then spoon it over the top of your chilled cheesecake. If you add the topping too early, it’ll make the surface wet and the cherries will bleed into the cheesecake. Have you ever added fruit topping too early and regretted it? Share below!
Ways to Change It Up
Try this: Swap the cherry topping for blueberry pie filling mixed with a little orange zest. I did this for my husband’s birthday last year because he’s not big on cherries. It tasted lighter, almost summery in a different way. You could also use strawberry, but add a tablespoon of balsamic vinegar to cut the sweetness — I tried it without and it was too much.
Try this: Use chocolate graham crackers for the crust instead of regular. This makes it taste like a black forest cheesecake, especially if you add a tablespoon of cocoa powder to the crumb mixture. My youngest said it tasted like the fancy desserts at the restaurant we went to for our anniversary, which I took as a win.
Try this: Skip the fruit topping entirely and serve it plain with a drizzle of caramel or hot fudge. This is what I do when I’m making it in the fall or winter and fresh cherries aren’t around. The caramel version is my husband’s favorite, though he’d eat cardboard if I put caramel on it.
Which would you go for? Drop it in the comments.
How to Serve It
I slice this with a long knife that I dip in hot water between each cut.
Wipe the blade after every slice too. If you don’t, the filling smears and your slices look messy. The hot water keeps the knife from dragging through the dense filling. It takes an extra two minutes, but your slices will actually look like the ones in photos instead of like you hacked at them with a butter knife.
Serve it with whipped cream on the side if you want, though honestly the cherry topping is rich enough on its own.
I made fresh whipped cream once — heavy cream, powdered sugar, vanilla — and it was good but not necessary. My neighbor Rosa always serves hers with a scoop of vanilla ice cream, which my kids loved but felt like overkill to me. A cup of black coffee on the side is all I need.
What would you pair it with?

Storing It Without Ruining It
I keep mine in the springform pan, covered with plastic wrap pressed directly onto the surface, then wrapped again with foil over the top.
It lasts about 5 days in the fridge this way. After three days, the crust starts to soften where it touches the filling, but it’s still perfectly edible. The cherry topping holds up fine too, though the color bleeds a little into the cream cheese if you wait too long.
You can freeze this, but only without the cherry topping.
Wrap individual slices in plastic wrap, then foil, then put them in a freezer bag. They’ll keep for about two months. Thaw them in the fridge overnight — don’t microwave them or the texture goes weird and grainy. Add the cherry topping after they’ve thawed completely.
I tried freezing a whole cheesecake once, topping and all.
The cherries turned icy and the liquid separated when it thawed. I scooped off the topping, heated fresh cherry filling, and used that instead. Saved the cheesecake but learned my lesson. Have you ever saved leftovers like this? Tell me below!
Mistakes I Made So You Don’t Have To
I once forgot to wrap the pan in foil and the water seeped in through the bottom.
The crust turned to mush. I couldn’t even slice it — the whole bottom layer just disintegrated when I tried to get a piece out. My husband ate it with a spoon straight from the pan and said it was fine, but I was annoyed for days. Now I wrap the pan twice and check that the foil comes up the sides before I pour any water.
I overbaked it once because I didn’t trust the jiggle.
It looked too loose in the center at 55 minutes, so I left it in for another 10. Big mistake. The texture came out dense and dry, more like baked cream cheese than cheesecake. There’s no fixing this once it’s done — you just have to start over. Now I pull it when the center still jiggles and trust that it’ll set as it cools.
I added the cherry topping four hours before serving once.
The liquid from the cherries seeped into the cheesecake and made the top layer pink and wet. It didn’t taste bad, but it looked like I’d melted Jell-O on top of it. Did something like this happen to you? Now I keep the topping separate until right before I’m ready to serve, and I drain off any excess liquid first if the filling looks too soupy.
What people ask me about this
Can I use low-fat cream cheese?
I tried it once. The texture came out softer and kind of gummy, not creamy. It also tasted less rich, which I guess is the point of low-fat, but it wasn’t worth it. Full-fat cream cheese is what makes this work — the fat content is what gives you that smooth, dense texture.
Do I have to use a springform pan?
Not technically, but getting it out of a regular pan is a nightmare. I tried using a 9-inch round cake pan once and had to scoop it out with a spatula because there was no way to lift the whole thing. It tasted fine but looked like I’d attacked it. If you don’t have a springform pan, line your pan with parchment paper with long overhanging edges so you can lift the whole cheesecake out.
Why did my cheesecake crack?
Three reasons, usually. One: your oven was too hot. Two: you skipped the water bath or the gradual cooldown. Three: you overbeat the eggs and whipped too much air into the batter. I’ve cracked at least five cheesecakes, and it was always one of those three things. The good news is the cherry topping covers cracks completely.
Can I make this without the crust?
Sure. Pour the filling straight into a greased pan and bake it the same way. It’ll be more like a crustless custard than a cheesecake, but some people prefer it. My husband’s aunt makes it this way because she doesn’t like graham crackers. Just grease your pan well or it’ll stick.
How do I know when it’s done if the center is supposed to jiggle?
Jiggle the pan gently at 50 minutes. The edges should look firm and dry, maybe even slightly puffed. The center should move like a wave — not liquid, not solid. Think of Jell-O that’s mostly set but not quite there yet. If the whole thing looks firm and doesn’t move at all, you’ve already overbaked it.
Can I use fresh cherries instead of canned pie filling?
You can, but you’ll need to make your own sauce. Pit about 3 cups of fresh cherries, cook them with 1/2 cup of sugar, 2 tablespoons of cornstarch, and a little lemon juice until the mixture thickens. It takes about 15 minutes and makes more work, but it tastes fresher. I did this once in July when cherries were cheap at the farmer’s market. Worth it if you have the time, but the canned filling is good enough most days. Which answer helped you most?
Why I keep making this
My husband asks for this every June.
Not because it’s his favorite dessert — he’d pick chocolate cake over cheesecake any day — but because it’s the one I make when people are coming over and I want to look like I tried. It’s the dessert I bring to barbecues. The one I make for his coworkers when they come for dinner.
It looks fancy. That’s the truth of it.
Cherry Swirl Cheesecake A Classic Summer Dessert
Ingredients
Instructions
Notes
See full recipe for nutritional information.


