

My husband took one bite and didn’t say anything for a full minute.
That’s usually not a good sign in our house, but this time he was just chewing slowly, which I’ve come to understand means he’s actually paying attention to what he’s eating.
I’d been impatient with the whole thing, honestly. Cherries in a muffin felt fussy to me — like something a bakery would charge six dollars for and I’d eat standing over the sink.
I almost left them out.
I thought about using dried cherries instead — actually no, I went with fresh because that’s what I had, and the juice bled into the batter in a way that dried ones never would.
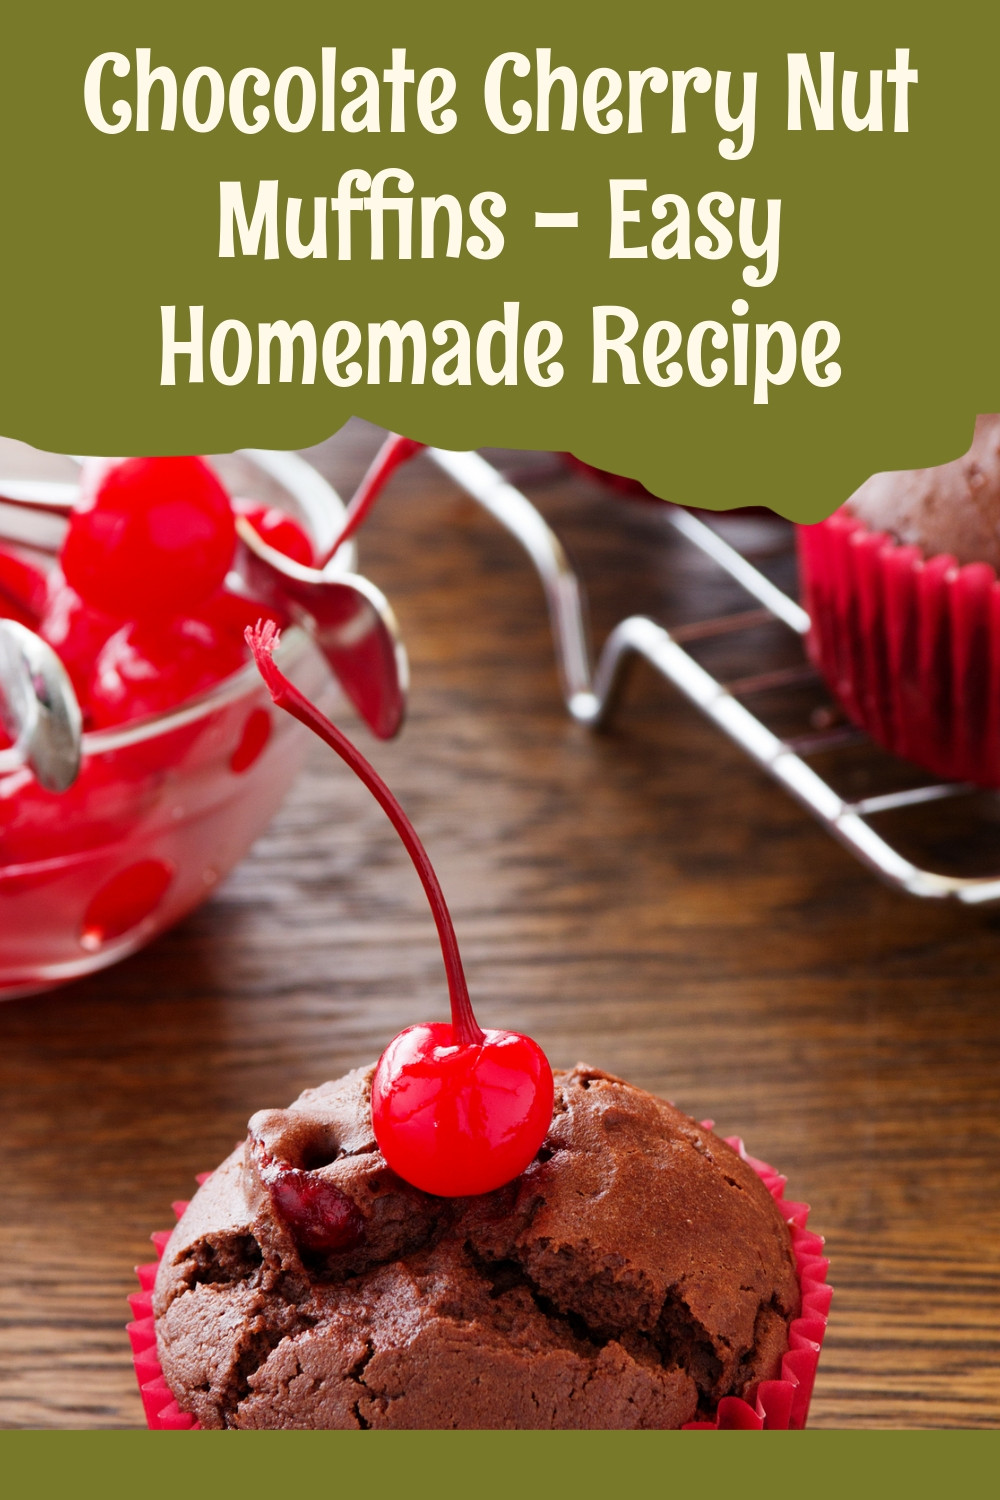
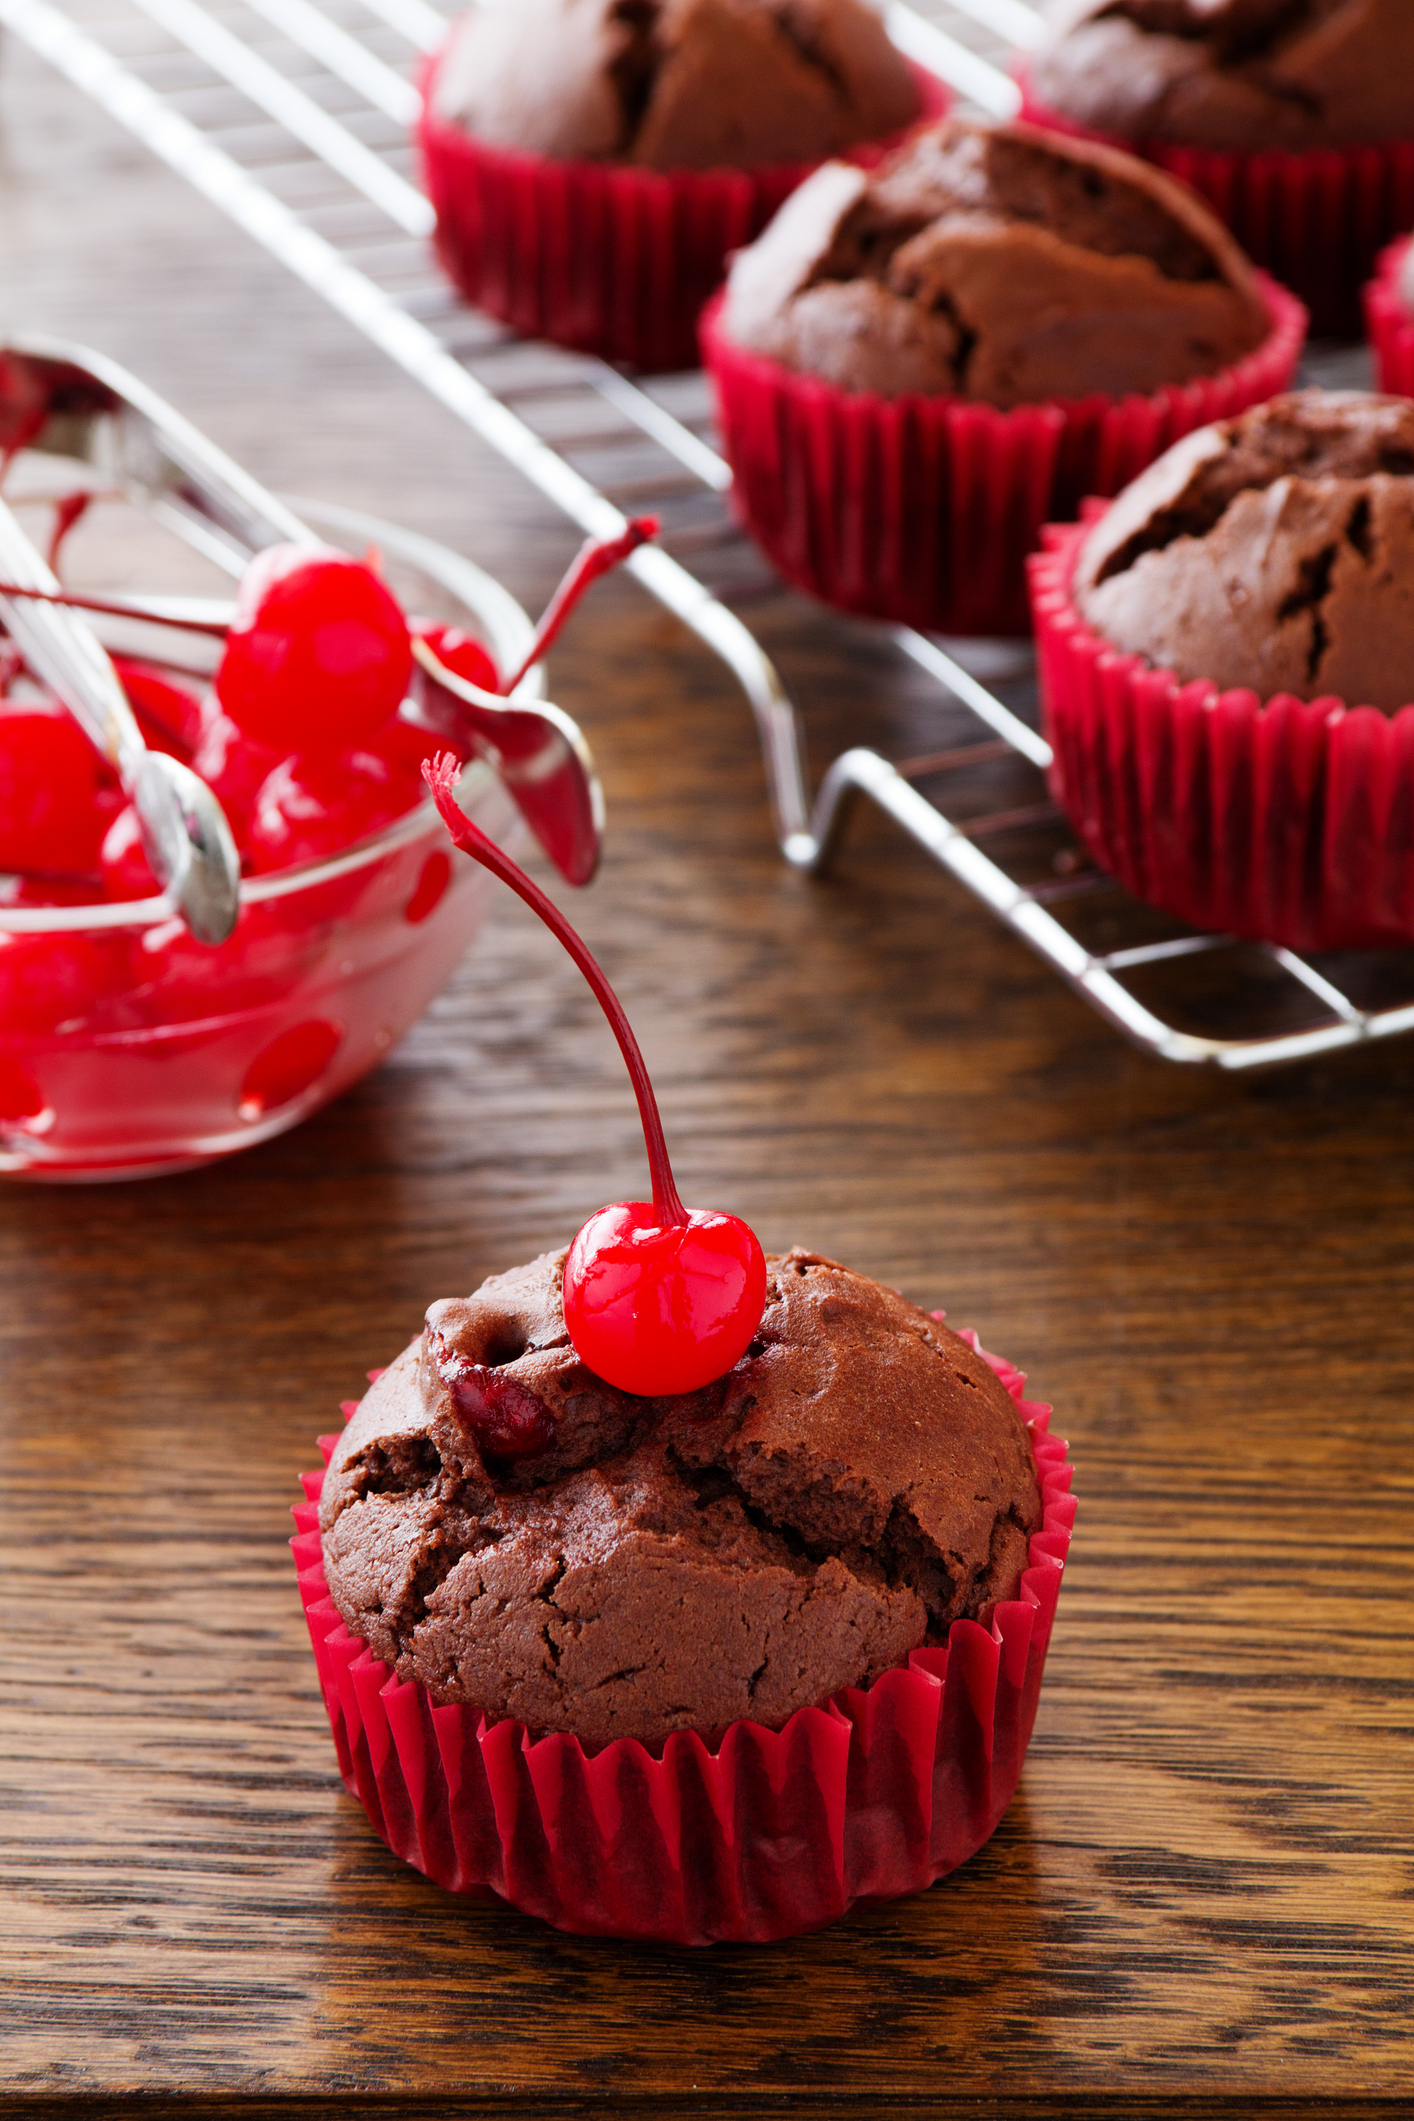
The batter looked almost too dark before it went in. Deep brown, nearly black from the cocoa, with little red-purple patches where the cherries sat. It smelled like something between a brownie and a Black Forest cake, which made me nervous because muffins aren’t supposed to smell like that.
They came out in about 20 minutes. Not 22. Twenty.
About the cherries — and why I almost skipped them twice.
Fresh cherries are annoying to prep. You have to pit them, halve them, and then they stain everything within a two-foot radius.
I did it anyway. The first batch I made, I used frozen ones without thawing them, and they released so much water mid-bake that the centers of the muffins came out gummy. I served them anyway.
Gummy centers.
If you’re using frozen, thaw them first and pat them dry. That’s not a preference — the gummy batch was genuinely unpleasant and nobody mentioned it except my neighbor Diane, who said “these are interesting” in the way that means she didn’t want another one.
Fresh cherries hold their shape better through the bake. They get slightly jammy at the edges but stay distinct in the muffin, which gives you something to bite into. That matters more than it sounds.
Quick tip: Toss the halved cherries in about a teaspoon of the dry flour mixture before folding them in — it keeps them from sinking straight to the bottom during baking.
The nuts are not optional. I’m saying it.
Most recipes that include nuts treat them as a casual suggestion. Fine, leave them out, whatever you like. I’m not doing that here.
The nuts are load-bearing.
Without them, you have a chocolate cherry muffin, which is good but soft all the way through. With them — especially with some pressed into the top before baking — you get that slightly rough, roasted crunch on the outside that keeps the whole thing from feeling like a cupcake that lost its frosting.
I used a mix of walnuts and pecans. Walnuts have a bitterness that cuts through the sugar. Pecans are buttery and a little softer. Together, in about a 50/50 split, they work better than either one alone. Almonds are fine if that’s what you have, but they don’t toast the same way inside a muffin — they stay a little harder than you’d want.
The 1/4 cup pressed on top browns noticeably in the last few minutes of baking. Watch for that — it’s how you know the muffins are close to done even before you reach for the toothpick.
The hot water step — I skipped it once.
The batter without the hot water is thick. Stiff, actually — closer to a cookie dough than something you’d pour into a muffin cup.
I skipped the hot water the first time I made these because I thought it would make the batter too thin and I’d lose the dome. I was wrong. The hot water blooms the cocoa — you can see it happen, the batter shifts from dark brown to almost black and loosens enough to fall off a spoon in a slow ribbon.
It also keeps the crumb from going dry.
Without it, the muffins came out dense in a bad way — not fudgy, just tight and a little chalky on the back of the throat. With it, the texture is closer to a bakery muffin than anything I expected from a home recipe this straightforward. Add the water slowly, stir once or twice, stop when the batter coats a spoon and falls off in one clean pour.
Don’t skip it.
What I noticed that recipes never mention.
The batter looks broken right before you add the wet ingredients to dry. There’s a stage where the egg-buttermilk-oil mixture sits on top of the flour and looks completely wrong — lumpy, separated, like it’s not going to come together.
Keep going.
Also: do not overmix. I know every muffin recipe says this and it starts to feel meaningless, but with a cocoa batter it’s even more true because overmixing makes these go flat across the top — not a lot, just enough that they look deflated when they come out of the oven. Stir until the flour disappears. A few streaks of cocoa are fine. Stop there.
The muffins will have a slight crack across the top when done. That’s right. That’s what you want. If the top is completely smooth and glassy, they probably needed two more minutes.
Let them sit in the tin for exactly 5 minutes before moving them. Less than that and the bottoms are still setting. More than that and they steam themselves soft in the liner. Five minutes is not approximate here — I’ve tested both sides of it more times than I care to admit.
I’d make them again. Probably this weekend, actually.
There’s still half a bag of frozen cherries in my freezer from the first failed batch, and now that I know to thaw and dry them first, they’re not going to waste.
My husband asked if I’d put espresso powder in them. I hadn’t. That’s something I might try — actually, I’m not sure. The cocoa flavor is already deep enough without it, and I don’t want to push these into mocha territory when the cherry is the whole point.
Impatient as I was making them, they delivered.
I’m still not sure the fresh-versus-frozen question is fully settled for me. Fresh gives better texture. Frozen is easier. I’ve made it both ways and I genuinely can’t decide which I’d recommend to someone else without knowing their kitchen situation.
That’s probably not a satisfying note to end on, but it’s the honest one.
—Step 1: Preheat your oven to 375°F (190°C) and line a 12-cup muffin tin with paper liners. Set it aside while you work — having the tin ready before the batter is mixed matters more than it sounds, because this batter moves fast once the hot water goes in and you don’t want to be hunting for liners with wet hands.
Step 2: In a large bowl, whisk together the flour, cocoa powder, sugar, baking powder, baking soda, and salt. Spend a full 30 seconds on this — cocoa has a tendency to clump, and undissolved pockets of it bake into bitter, chalky spots. (Hard-learned: sift the cocoa if your bag has been open a while.)
Step 3: In a separate bowl, beat the two eggs briefly, then add the buttermilk, vegetable oil, and vanilla extract. Mix until it’s combined — not fluffy, just uniform. This mixture is going to look slightly loose and a little oily on top. That’s fine.
Step 4: Pour the wet ingredients into the dry and stir until just combined. The moment the last streak of flour disappears, stop. I always want to keep going because the batter looks slightly uneven at this stage, and every single time I’ve pushed it further the tops have come out flat.
Step 5: Gently fold in the cherries and 1/2 cup of the nuts. Use a spatula and move slowly — you want the cherries distributed without breaking them apart, because broken cherry pieces bleed purple into the whole batter and you lose those distinct jammy pockets when it bakes.
Step 6: Stir in the hot water slowly. The batter will loosen noticeably and darken. Stop stirring when it falls off the spatula in one slow pour. Did yours loosen up the way you expected? Share below!
Step 7: Divide the batter evenly among the 12 muffin cups, filling each about 2/3 full. An ice cream scoop makes this easier and gives you more consistent muffin sizes, which means they’ll all finish at the same time.
Step 8: Scatter the remaining 1/4 cup of nuts across the tops of the muffins, pressing them in lightly so they don’t just roll off during baking. Don’t skip this step — those toasted nuts on top are doing real work for the texture.
Step 9: Bake for 18–22 minutes. Start checking at 18. The tops will crack slightly down the center and the nuts on top will be visibly toasted. A toothpick inserted into the center should come out with maybe one or two moist crumbs, not wet batter.
Step 10: Cool in the tin for 5 minutes exactly, then move to a wire rack. They’re fragile right out of the oven — the crumb needs those first minutes to set before you handle them.
Ways to Change It Up
Try this: Swap the cherries for raspberries and use all walnuts. The raspberries break down more than cherries and create little jammy pockets that spread further through the crumb.
Try this: Add 1/2 teaspoon of almond extract along with the vanilla. It amplifies the cherry flavor in a way that’s noticeable but not fake-sweet — more like marzipan than cherry candy.
Try this: Fold in 1/3 cup of dark chocolate chips with the nuts. The chips don’t fully melt — they hold their shape and give you a second layer of chocolate texture against the soft crumb.
Which would you go for? Drop it in the comments.
How to Serve It
Warm, about 10 minutes off the rack, with nothing on them. At that point the crumb is still soft and the cherry pockets are slightly melty at the edges.
The next morning, split one open and spread a thin layer of almond butter across both halves. The nuttiness doubles up with the walnuts already inside and it makes a better breakfast than it has any right to be.
If you’re putting these out for guests, a small bowl of lightly whipped cream on the side works — unsweetened, or barely sweetened — so people can decide how dessert-adjacent they want to go with it.
What would you pair it with?
—Storing It Without Ruining It
Room temperature, in an airtight container, these last about 3 days before the crumb starts to tighten. After that they’re still edible but noticeably drier.
Fridge extends them to about 5 days. Wrap each one individually in plastic wrap first or the liners will stick and peel in a way that takes half the muffin with them. I learned that the annoying way.
Freezer works well. Wrap individually, freeze on a tray first so they don’t stick together, then move to a bag. They’ll hold for up to 2 months without flavor loss.
To reheat: 20 seconds in the microwave from room temperature, or 30 from frozen. More than that and the nuts go soft. I’ve gone over by 10 seconds and immediately regretted it — the nut topping on the muffin crown is the first thing to suffer.
Have you ever saved leftovers like this? Tell me below!
Mistakes I Made So You Don’t Have To
I once filled the muffin cups almost to the top because the batter looked like it needed the room. Every single one overflowed and fused to the tin in a way that took 20 minutes of soaking to fix. Two-thirds full is actually two-thirds full.
I added the cherries before the batter was fully mixed — mid-stir, while there was still dry flour in the bowl. The continued stirring to incorporate the flour broke apart most of the cherry halves. The muffins were pink and strange-looking.
I forgot to let the muffins rest in the tin and moved them at the two-minute mark. Three of them split cleanly in half at the base when I lifted them. They came out of the liner and just… separated. Don’t rush the 5 minutes.
Did something like this happen to you?
Questions I Actually Get About These
Can I use Dutch-process cocoa instead of natural unsweetened?
You can, but the baking soda in this recipe relies on the acidity of natural cocoa to do part of its work. Dutch-process is neutralized. The muffins will still rise but about 10–15% less, and the tops will be flatter. I tried it once when that’s all I had — the flavor was deeper but the dome was basically gone.
What if I don’t have buttermilk?
Add one tablespoon of white vinegar or lemon juice to a cup of regular milk and let it sit for about 5 minutes. It won’t be identical but it’s close enough that I’ve done it at least four times without noticing a meaningful difference in the final muffin.
Can I make these gluten-free?
It depends on the flour blend. A 1:1 gluten-free flour with xanthan gum works reasonably well here — the batter will be slightly thicker and the crumb a little more crumbly at the edges. But the cocoa and cherry flavors still come through. I haven’t tested it with almond flour and I wouldn’t guess at those ratios.
How do I know they’re done without cutting one open?
The top crack is the first sign. After that, press the center lightly — it should spring back immediately, not leave an indent. A toothpick with a dry crumb or one wet crumb is done. Two wet crumbs is two more minutes. And the nuts on top will smell toasted, not raw.
Can I make the batter ahead of time?
Not really. Once the hot water goes in, the leavening starts activating. If you let the batter sit more than about 20 minutes before baking, you’ll lose lift. Mix dry ingredients the night before if you want a head start, then do the wet ingredients and hot water right before baking.
Can I reduce the sugar?
About 1 1/2 cups works fine — I’ve done it. Below that the muffins lose moisture as well as sweetness, because sugar holds water in a batter. At 1 cup, they came out noticeably drier and the cocoa tasted slightly harsh without the sweetness to balance it. But at 1 1/2 cups? Honestly, you probably won’t miss the difference.
Which answer helped you most?
A Few Last Things Before You Bake
These muffins are not difficult. The ingredient list is longer than it looks — dry, wet, fruit, nuts, hot water — but each step takes maybe 3 minutes and the total active time is genuinely close to 15.
The cocoa quantity is not a misprint. Three-quarters of a cup sounds like a lot and it is a lot. That’s the recipe. Don’t second-guess it or you’ll end up with something that tastes like a mildly chocolatey breakfast muffin instead of what these are supposed to be.
Will you make this soon?
Fun fact: Cocoa powder is made from cacao beans that have been fermented, dried, roasted, and pressed — the pressing removes most of the fat (cocoa butter), leaving behind the dry powder. That fermentation step is part of what gives dark chocolate its complex, slightly fruity undertones.
My husband is still asking about the espresso powder. I still haven’t added it. I might this weekend, or I might leave it exactly as it is and see if I can get the cherry to come through even more clearly with a slightly smaller nut portion.
I haven’t decided yet.
Happy cooking! —Marina Caldwell
Chocolate Cherry Nut Muffins Recipe Easy Homemade
Ingredients
- 2 cups all-purpose flour
- 3/4 cup unsweetened cocoa powder
- 1 3/4 cups granulated sugar
- 2 teaspoons baking powder
- 1/2 teaspoon baking soda
- 1/2 teaspoon salt
- 2 large eggs
- 1 cup buttermilk
- 1/2 cup vegetable oil
- 2 teaspoons vanilla extract
- 1 cup fresh or frozen cherries, halved
- 3/4 cup chopped mixed nuts (almonds, walnuts, or pecans)
- 1/2 cup hot water
Instructions
- 1Preheat oven to 375°F (190°C). Line a 12-cup muffin tin with paper liners.
- 2In a large bowl, whisk together flour, cocoa powder, sugar, baking powder, baking soda, and salt.
- 3In another bowl, beat eggs, then add buttermilk, oil, and vanilla extract. Mix until combined.
- 4Pour wet ingredients into dry ingredients and stir until just combined. Do not overmix.
- 5Gently fold in cherries and 1/2 cup of nuts into the batter.
- 6Slowly stir in hot water until batter reaches a pourable consistency.
- 7Divide batter evenly among muffin cups, filling each about 2/3 full.
- 8Sprinkle remaining 1/4 cup nuts on top of each muffin.
- 9Bake for 18-22 minutes until a toothpick inserted in the center comes out clean.
- 10Cool muffins in the tin for 5 minutes, then transfer to a wire rack to cool completely.
Notes
See full recipe for nutritional information.


