

The first loaf cracked wrong. This one didn’t.
My husband pulled the first attempt out of the Dutch oven and we both stared at it — dense, pale, seeds barely clinging to the sides.
The crust hadn’t formed the way I wanted, and the inside was gummy enough that I almost didn’t try again.
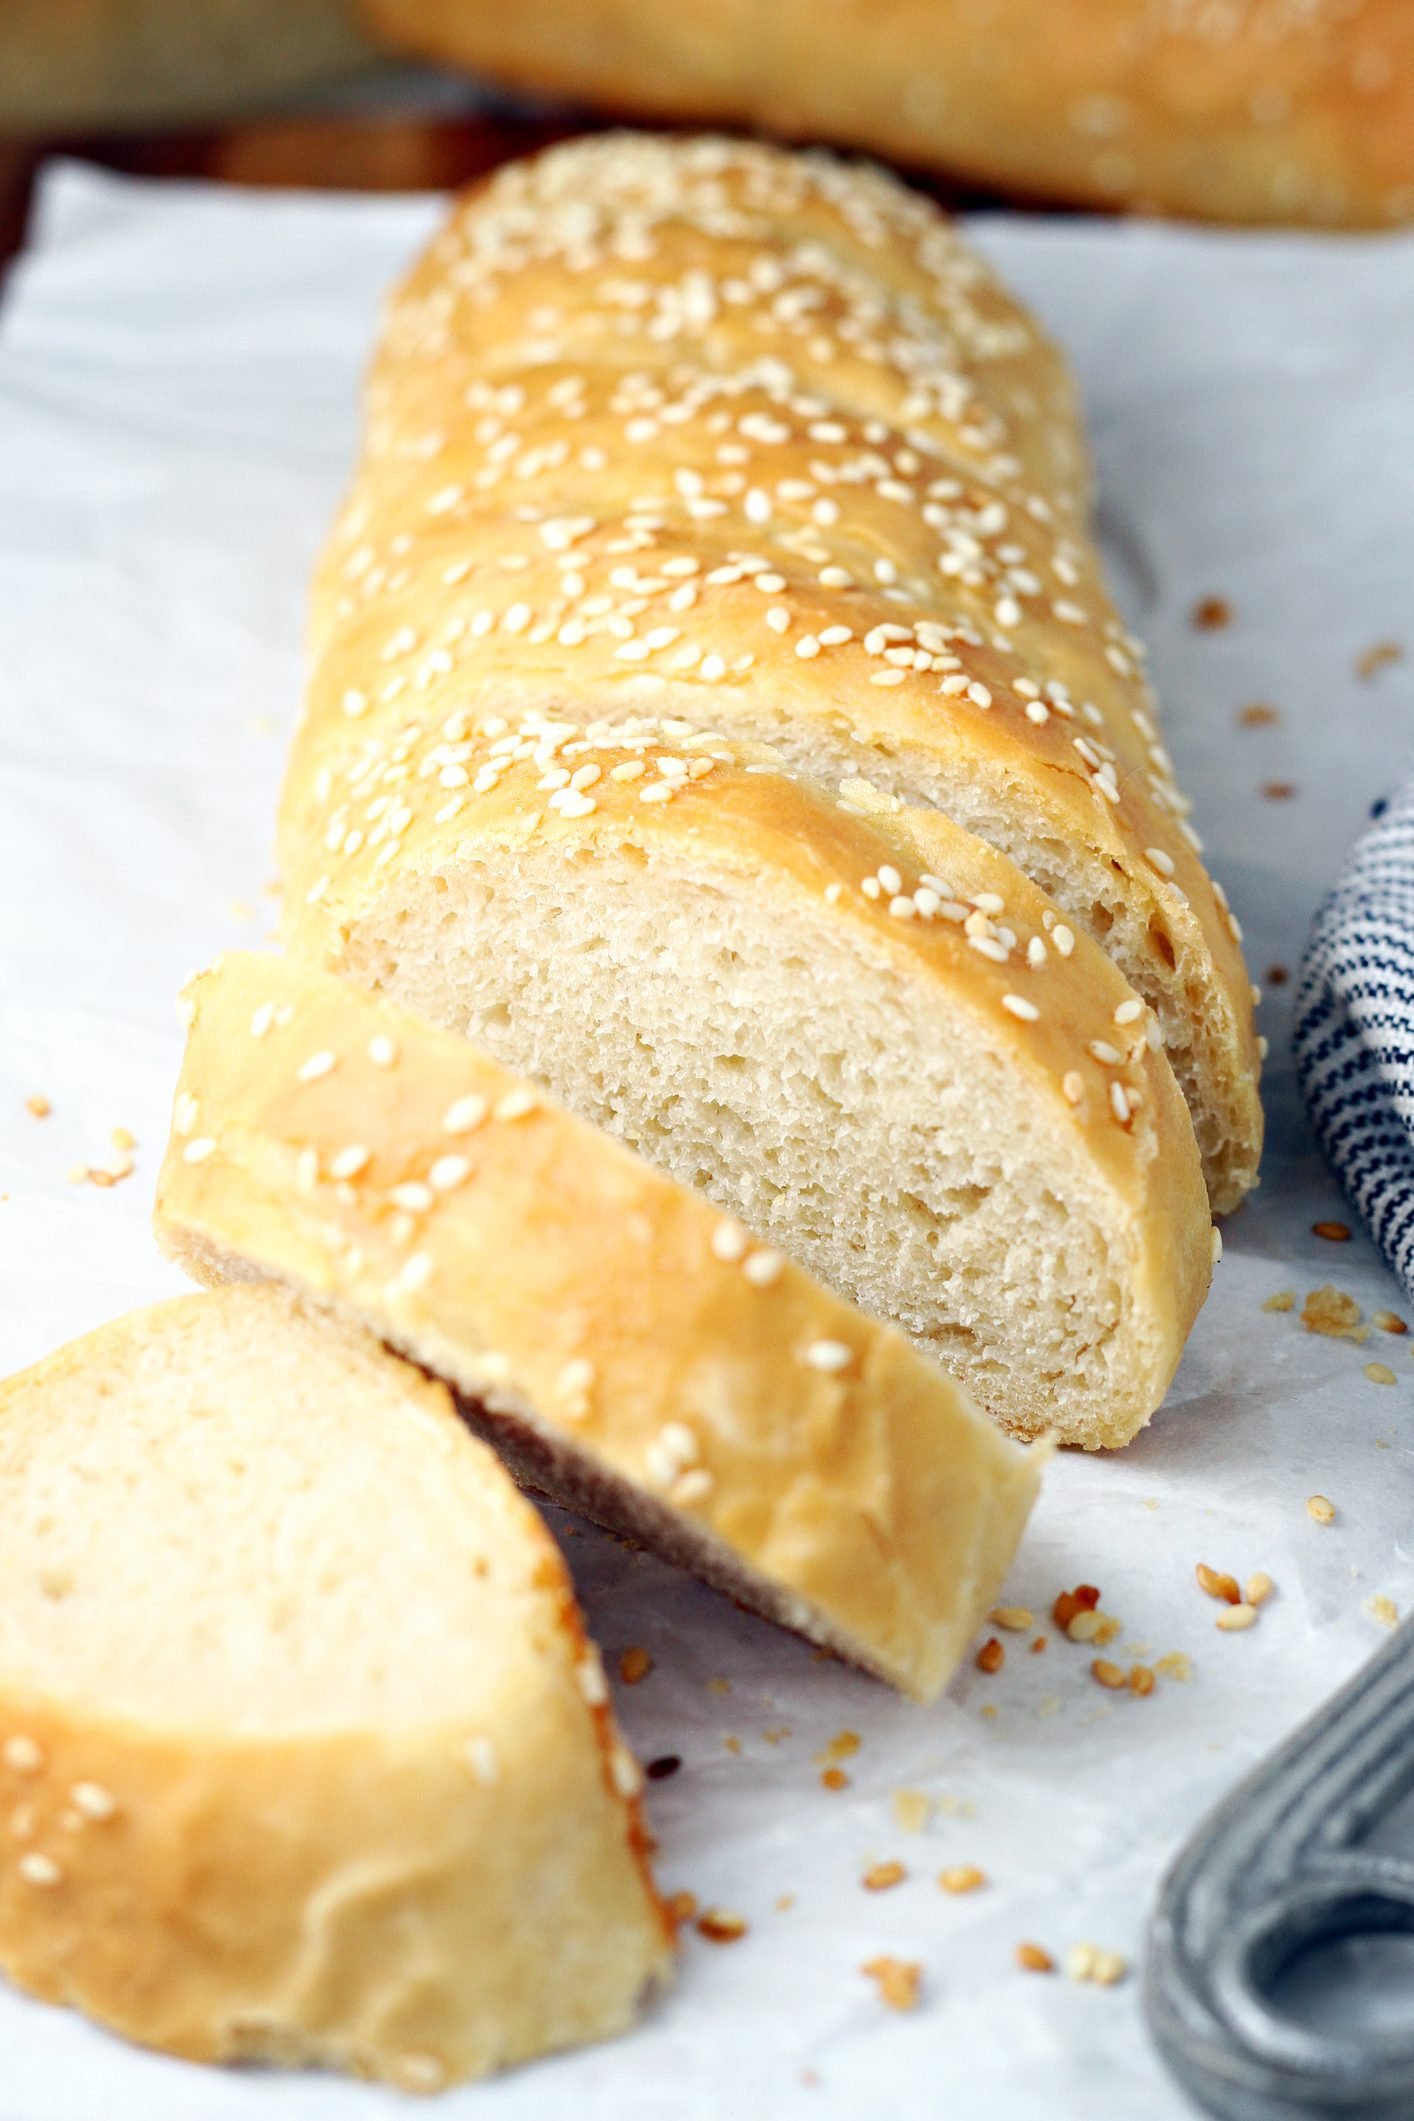
But I did. And the second time, with a few changes, the loaf came out with a crust so loud you could hear it crackle on the cooling rack from the next room.
About the seeds — all of them.
Sesame, sunflower, fennel, anise, poppy.
I thought about skipping the anise seeds — actually no, I kept them, and they’re the ones that make people ask what’s in the bread.
The fennel and anise together give this loaf a faint licorice warmth that isn’t sweet, just present, like background music you don’t notice until it stops. Have you ever baked bread with anise before?
What I noticed that surprised me.
Toasting the seeds first — maybe 3 minutes in a dry skillet over medium heat — makes a difference you can smell before you even taste it.
The sunflower seeds go from mildly nutty to something deeper, almost buttery, and the sesame seeds turn golden and start to pop slightly in the pan.
Quick tip: Don’t walk away from the skillet. Fennel seeds go from toasted to scorched in under a minute, and burnt fennel smells exactly as bad as it sounds.
The dough is wetter than you think it should be.
When you first fold in the 1¼ cups of warm water, the dough looks like a mess — shaggy, sticky, nothing like the smooth ball in every bread photo you’ve ever seen.
Keep going.
After 10 minutes of kneading it becomes silky and elastic, and you’ll feel the shift — it stops sticking to your hands and starts pulling away cleanly from the surface, which is honestly the most satisfying thing about making bread by hand.
The rise that actually matters.
Two hours at room temperature gets the job done, but if you have time — and a free shelf in your fridge — try leaving the dough overnight.
The cold slows everything down and the flavor that develops is noticeably more tangy, more interesting, with a depth that the 2-hour version just doesn’t have.
I made both versions back to back once, and my neighbor Rosa preferred the overnight loaf without knowing which was which.
It looked wrong. It wasn’t.
When you lower the seeded loaf into the scorching Dutch oven — and I mean 450°F scorching, preheated for a full 30 minutes — the seeds pressed into the egg wash look almost too thick.
Crowded, uneven, borderline chaotic.
After 35 minutes of baking, those same seeds are toasted into the crust in a way that looks intentional and rustic, like you meant every single one to land exactly where it did, which you did not, but nobody needs to know that.
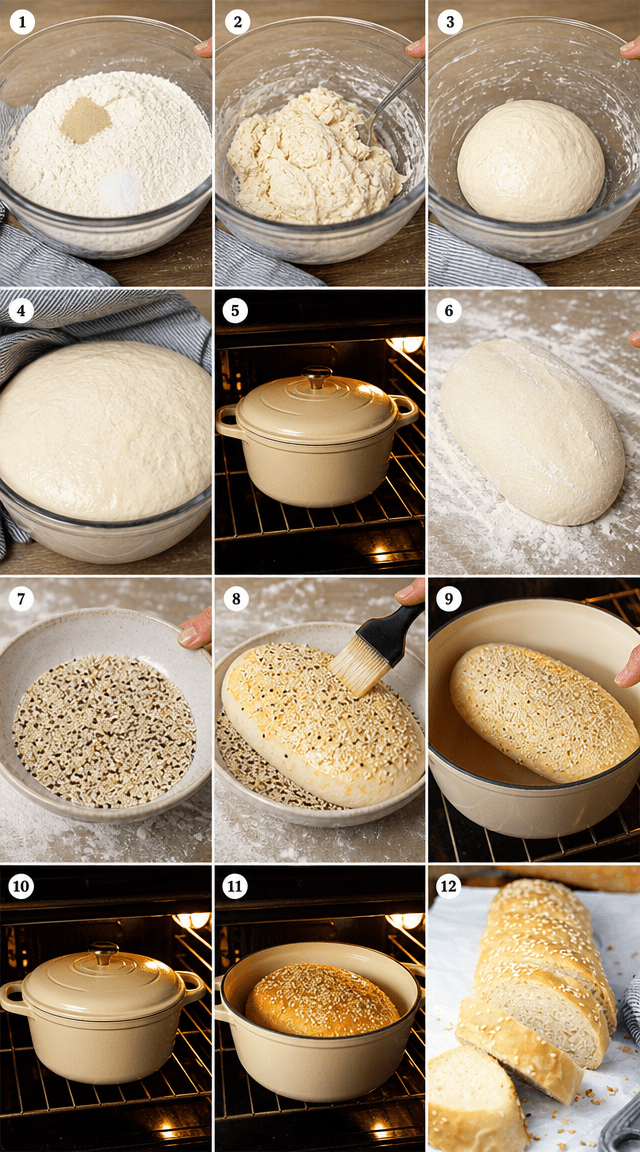
Rustic Seeded Italian Artisan Loaf — Step by Step
Step 1: Whisk together 3 cups all-purpose flour, 1½ tsp salt, and ½ tsp instant yeast in a large mixing bowl until evenly combined. I usually do this longer than I think is necessary — maybe 45 seconds — because I’ve had pockets of salt sitting against the yeast and I swear it affected the rise. (Make sure the yeast and salt aren’t touching in the bowl before you whisk.)
Step 2: Pour in 1¼ cups warm water and fold the mixture together until a rough, shaggy dough develops. It will look nothing like dough yet. That’s correct. Don’t add more flour — the stickiness is what you want at this stage.
Step 3: Turn dough onto a clean surface and knead firmly for 10 minutes until silky and elastic. This is real kneading — push, fold, quarter turn, repeat. At around the 7-minute mark the dough will feel like it’s fighting you, and then suddenly around minute 9 it gives in and smooths out completely.
Step 4: Return dough to the bowl, cover with a damp cloth, and allow to rise at room temperature for 2 hours until doubled in size. I mark the side of the bowl with a piece of tape so I can actually see when it’s doubled. (Don’t skip the damp cloth — a dry one lets the surface of the dough form a skin, which affects how it rises.)
Step 5: Place your Dutch oven on the center rack and preheat the oven to 450°F for a full 30 minutes. This is non-negotiable. The first time I gave it only 15 minutes, the crust was soft and the bottom never browned properly. Did your oven take longer to heat than expected? Share below!
Step 6: Gently punch down the dough and shape it into a smooth oval on a lightly floured surface. Tuck the edges underneath as you shape — this creates tension on the surface that helps the loaf hold its structure in the oven.
Step 7: Combine all seeds — 2 tbsp sesame, 2 tbsp sunflower, 1 tbsp fennel, 1 tbsp anise, 1 tbsp poppy — in a wide, shallow dish. A pie plate works well here. Mix them so each press of the dough picks up a little of everything.
Step 8: Whisk together one egg white and 1 tbsp water, then brush generously all over the shaped loaf. Firmly press all sides of the loaf into the seed mixture. Don’t be shy — press down and hold for a second so the seeds actually stick. (Egg wash, not whole egg — the yolk makes the crust too dark before the inside is done.)
Step 9: Carefully lower the seeded loaf into the hot Dutch oven. Use parchment to lift it if you’re worried — I burned my wrist the first time reaching in without it. Cover and bake for 20 minutes.
Step 10: Uncover and continue baking for 15 minutes until deeply golden. The seeds should be toasted and fragrant, and the internal temperature should read around 200°F if you have an instant-read thermometer. The crust will be very firm — that’s right.
Step 11: Transfer the loaf to a wire rack and rest for at least 30 minutes before slicing. I know this is hard. The bread will sound hollow when you tap the bottom, which is how you know it’s done. Cutting too early makes the inside gummy, and I’ve learned this the hard way more than once.
Ways to Change It Up
Try this: Swap the anise and fennel seeds entirely for 2 tablespoons of caraway seeds and 1 tablespoon of dried rosemary pressed into the crust — it shifts the whole flavor profile toward something more savory and herby, almost like a rye-adjacent loaf without changing the dough at all.
Try this: Add 2 tablespoons of olive oil to the dough in step 2 for a slightly softer crumb that stays less chewy on day two. The crust won’t be quite as shatteringly crisp, but the inside becomes more tender and works better for sandwiches.
Try this: Do the overnight cold rise and then score the top with a sharp blade in one long slash before baking — the loaf opens up along that line beautifully, and the seed crust around the score cracks in a way that looks intentional.
Which would you go for? Drop it in the comments.
How to Serve It
Cut thick slices and serve alongside a bowl of minestrone or ribollita — the seeded crust holds up to dunking without getting soggy in under a minute the way softer bread does.
Toast a slice, spread it with ricotta and drizzle a little honey over the top, and the fennel and anise seeds suddenly taste like a deliberate flavor pairing rather than an Italian bread thing.
This loaf also works as a cheese board anchor — set it out whole, let people tear pieces, and put out some sharp provolone and a bowl of olives alongside it.
What would you pair it with?
Storing It Without Ruining It
Room temperature, wrapped in a clean kitchen towel, is the move for the first two days. A plastic bag traps moisture and the crust goes soft and slightly rubbery by the next morning.
After day two, slice what’s left and freeze the slices flat on a baking sheet for about an hour, then transfer to a zip-lock bag.
To reheat from frozen, put the slices directly on the oven rack at 375°F for about 8 minutes — they come back remarkably close to fresh, crust and all. The microwave works in a pinch but the seeds go a little chewy and it’s not the same.
Don’t refrigerate a whole unsliced loaf. The fridge dries out the crumb faster than leaving it out does, which I found out by accident and genuinely annoyed me.
Have you ever saved leftovers like this? Tell me below!
Mistakes I Made So You Don’t Have To
I once skipped preheating the Dutch oven because I was in a hurry and figured a few minutes difference couldn’t matter that much. The bottom of the loaf was pale and dense, the crust had almost no color, and the whole thing took an extra 10 minutes that it didn’t fully recover from.
I pressed the seeds on too lightly the first time — just a gentle roll — and half of them fell off in the Dutch oven, leaving patches of bare crust scattered around the loaf that looked like the bread had a skin condition.
I also cut into the loaf at 15 minutes because it smelled done and I was impatient. The inside was still hot-gummy and the crumb hadn’t set. I ate it anyway, and it was fine, but it would have been better with another 15 minutes of patience. Did something like this happen to you?
Questions I Actually Get About This Bread
Can I use active dry yeast instead of instant? Yes, but proof it first in the warm water for about 10 minutes before adding the flour. And add a pinch of sugar to help it activate. The rise time might stretch to closer to 2.5 hours depending on your kitchen temperature.
Does the Dutch oven size matter? It depends on how big your shaped loaf is. A 5-quart works well for this recipe. Too small and the loaf touches the sides and can’t expand properly. I tried a 4-quart once and the bread came out taller but slightly misshapen on one edge.
Can I make this without all the seeds? Sure. Use just sesame and poppy if that’s what you have. But the fennel is worth buying specifically for this — it’s the seed that makes people stop mid-bite and ask what they’re tasting.
What if my dough didn’t double in 2 hours? Check your kitchen temperature. Below 68°F and instant yeast slows down significantly. I tried rising dough on my kitchen counter in November and it took nearly 3.5 hours. Give it time rather than flour.
Can I score the top before baking? Yes, and you should. A single long slash with a sharp blade — a lame if you have one, a serrated knife if you don’t — lets the loaf expand upward instead of cracking sideways. Do it right before you lower it into the Dutch oven, not before the final rest.
How long does this bread actually keep? About 4 days at room temperature if wrapped in a towel. After that the crumb dries out and it’s really only good for toast. But frozen slices will last about 3 months and honestly hold up better than you’d expect.
Which answer helped you most?
Go make this on a weekend when you have time to fuss.
This bread isn’t difficult. But it does ask for your attention in specific moments — the knead, the full preheat, the rest before slicing.
Miss one of those and the loaf is still fine. Bread is forgiving like that. My kids ate the gummy first attempt without complaint, which tells you something.
But when you don’t miss them — when the Dutch oven is scorching hot and the seeds are toasted and you actually wait the 30 minutes — the crust comes out crackling and deep brown, the seeds are embedded like they were always meant to be there,
and the whole kitchen smells like a bakery that’s been open since 5am.
Fun fact: Fennel seeds have been used in Italian bread baking for centuries — ancient Romans chewed them as a digestive aid, and they found their way into bread partly because bakers kept them on hand constantly.
Will you make this soon? I’d love to know how it goes — drop a comment and tell me whether you did the overnight rise or the same-day version.
Happy cooking! —Marina Caldwell
Crafting a Hearty Seeded Italian Bread From Scratch
Ingredients
- 3 cups all-purpose flour
- 1½ tsp salt
- ½ tsp instant yeast
- 1¼ cups warm water
- 2 tbsp sesame seeds
- 2 tbsp sunflower seeds
- 1 tbsp fennel seeds
- 1 tbsp anise seeds
- 1 tbsp poppy seeds
- 1 egg white + 1 tbsp water (egg wash)
Instructions
- 1Whisk together flour, salt, and instant yeast in a large mixing bowl until evenly combined
- 2Pour in warm water and fold mixture together until a rough, shaggy dough develops
- 3Turn dough onto a clean surface and knead firmly for 10 minutes until silky and elastic
- 4Return dough to bowl, cover with a damp cloth, and allow to rise at room temperature for 2 hours until doubled in size
- 5Place Dutch oven on center rack and preheat oven to 450°F for 30 minutes
- 6Gently punch down dough and shape into a smooth oval on a lightly floured surface
- 7Combine all seeds together in a wide, shallow dish
- 8Generously coat dough with egg wash, then firmly press all sides into seed mixture
- 9Lower seeded loaf carefully into the scorching Dutch oven
- 10Bake covered for 20 minutes to trap steam and develop structure
- 11Uncover and continue baking 15 minutes until deeply golden
- 12Transfer to a wire rack and rest at least 30 minutes before slicing
Notes
– For maximum flavor, lightly toast seeds in a dry skillet before pressing onto the dough – A longer cold rise overnight in the refrigerator develops a more complex, tangy flavor – Scoring the top with a sharp blade before baking allows the loaf to expand more evenly


