

Decadent Dark Chocolate Nut Brownies Worth Savoring
There are brownies, and then there are these brownies. Rich, fudgy, deeply chocolatey, and loaded with toasted nuts, these Decadent Dark Chocolate Nut Brownies are the kind of treat that stops conversation the moment someone takes a bite. Whether you are baking for a special occasion, a holiday gathering, or simply because you deserve something extraordinary on an ordinary Tuesday, this recipe delivers every single time.
What makes this recipe truly stand apart is the commitment to quality ingredients and technique. Using high-quality dark chocolate — not just cocoa powder — produces a brownie with an almost truffle-like interior. The nuts add a satisfying crunch and a nutty depth that perfectly balances the bittersweet chocolate. Once you make these, boxed brownie mix will never feel like enough again.
Why You Will Fall in Love With These Brownies
Brownies are beloved by nearly everyone, but the difference between a good brownie and a truly great one comes down to texture, flavor, and that magical balance between sweet and bitter. These dark chocolate nut brownies hit every note perfectly. The dark chocolate provides a sophisticated, slightly bitter backbone that keeps these from being cloyingly sweet. The toasted walnuts or pecans — your choice — bring an earthy, buttery crunch that makes every bite more interesting.
The texture here is unabashedly fudgy. There is no cakey, dry brownie situation happening. The center stays soft and dense while the top develops that iconic shiny, crinkly crust that signals a perfectly baked brownie. These are the brownies that get requested again and again. They travel well, they cut cleanly when properly cooled, and they taste even better the next day — if they last that long.
Ingredients You Will Need
Before you begin, gather your ingredients and make sure everything is at room temperature. This small step makes a significant difference in how smoothly your batter comes together and how evenly your brownies bake. Here is everything you will need to make one pan of these extraordinary brownies:
- 225g (8 oz) dark chocolate (70% cacao or higher) — chopped into small pieces for even melting
- 115g (½ cup) unsalted butter — cut into cubes
- 200g (1 cup) granulated sugar
- 100g (½ cup packed) light brown sugar — adds moisture and a subtle caramel note
- 3 large eggs — room temperature
- 2 teaspoons pure vanilla extract
- 120g (1 cup) all-purpose flour
- 30g (¼ cup) Dutch-process cocoa powder — for extra chocolate depth
- ½ teaspoon fine sea salt
- ½ teaspoon baking powder
- 150g (1 cup) roughly chopped walnuts or pecans — lightly toasted
- Optional: flaky sea salt for finishing
A quick note on the chocolate: this is not the place to cut corners. The chocolate you use is the soul of this recipe. Opt for a bar of good-quality dark chocolate with at least 70% cacao content. Brands like Valrhona, Lindt Excellence, or Guittard are excellent choices. The higher cacao content means more intense flavor and a better fat-to-sugar ratio for achieving that perfect fudgy texture.
How to Toast Your Nuts for Maximum Flavor
Toasting the nuts before adding them to your brownie batter is a step that many recipes skip, but it makes a noticeable difference. Raw nuts have moisture and a slightly flat flavor. Toasting them in a dry skillet over medium heat for 5 to 7 minutes — or in a 175°C (350°F) oven for 8 to 10 minutes — removes that moisture and activates the natural oils within, producing a much deeper, richer, nuttier flavor.
Once your nuts are toasted, spread them on a cutting board and let them cool completely before roughly chopping them. You want a mix of sizes here — some finer pieces that get distributed throughout the batter and some larger chunks that give you those satisfying crunchy pockets in each bite. Avoid chopping them too finely, or you will lose that delightful textural contrast.
Step-by-Step Instructions
Follow these steps carefully and you will end up with the most decadent brownies you have ever made. The process is straightforward, but each step has a purpose, so try not to rush through it.
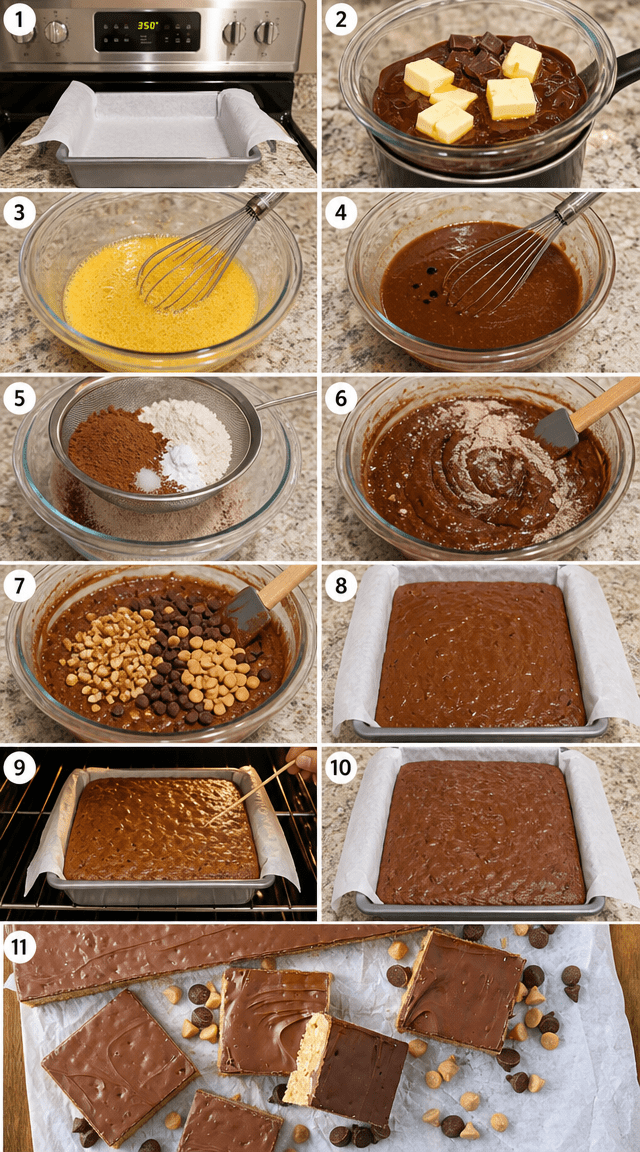
Step 1: Preheat and Prepare Your Pan
Preheat your oven to 175°C (350°F). Line a 23x33cm (9×13 inch) baking pan with parchment paper, leaving some overhang on the sides so you can lift the brownies out easily after baking. Lightly grease the parchment with butter or nonstick spray. If you prefer thicker brownies, use a 23x23cm (9×9 inch) pan and increase your baking time slightly.
Step 2: Melt the Chocolate and Butter
Combine the chopped dark chocolate and cubed butter in a heatproof bowl. Melt them together using a double boiler — set the bowl over a saucepan of barely simmering water, making sure the bottom of the bowl does not touch the water. Stir gently and consistently until both are fully melted and the mixture is smooth and glossy. Alternatively, you can melt them in the microwave in 30-second intervals, stirring well between each burst. Remove from heat and let the mixture cool for about 5 minutes.
Step 3: Add the Sugars
Whisk both the granulated sugar and the brown sugar into the warm chocolate mixture until fully incorporated. The mixture will look slightly grainy at this stage, which is perfectly normal. This step helps dissolve the sugar gradually, which contributes to that beautiful shiny top crust as the brownies bake.
Step 4: Add the Eggs and Vanilla
Add the eggs one at a time, whisking vigorously after each addition. This step is important — beating the eggs in well creates tiny air pockets that give the brownies their structure and that coveted crinkly top. After all three eggs are incorporated, add the vanilla extract and whisk for another 30 seconds until the batter looks thick, smooth, and slightly ribbony.
Step 5: Fold in the Dry Ingredients
Sift the flour, cocoa powder, salt, and baking powder directly into the chocolate mixture. Using a rubber spatula, fold the dry ingredients in gently with broad, sweeping strokes. Stop folding as soon as you no longer see streaks of flour — overmixing at this stage develops gluten, which can make your brownies tough rather than fudgy.
Step 6: Add the Nuts
Fold in the toasted, chopped nuts, distributing them evenly throughout the batter. Reserve a small handful to press on top of the batter just before it goes into the oven, which gives the finished brownies a beautiful, professional appearance and ensures nuts in every bite from the very top layer.
Step 7: Bake
Pour the batter into your prepared pan and spread it evenly with your spatula. Scatter the reserved nuts over the top and gently press them in. If you are using flaky sea salt, sprinkle a small pinch over the surface now. Bake in the preheated oven for 25 to 30 minutes for a 9×13 pan, or 30 to 35 minutes for a 9×9 pan.
The brownies are done when the edges look set and slightly pulled away from the sides of the pan, and the center has just a slight jiggle when you gently shake the pan. A toothpick inserted into the center should come out with moist crumbs attached — not wet batter, but definitely not clean. If it comes out clean, the brownies are overbaked.
Step 8: Cool Before Cutting
This is the hardest part of the entire recipe: patience. Let the brownies cool completely in the pan on a wire rack before lifting them out and slicing. At minimum, give them one full hour at room temperature. For the cleanest cuts and the most fudgy interior texture, wrap the cooled pan in plastic wrap and refrigerate for at least two hours or overnight before slicing. Use a sharp knife and wipe the blade clean between cuts for those picture-perfect squares.

Tips for Perfect Brownies Every Time
Even a recipe this straightforward benefits from a few insider tricks. Here are the tips that separate good brownies from truly exceptional ones:
- Use a kitchen scale. Baking is a science, and measuring by weight rather than volume ensures consistent results every time. A little too much flour can turn fudgy brownies into something much more cakey.
- Do not skip the double boiler technique if you are new to melting chocolate. Direct heat can scorch chocolate very quickly, and burned chocolate cannot be saved.
- Room temperature eggs matter. Cold eggs can cause the warm chocolate mixture to seize or cool too quickly, making the batter difficult to work with. If you forgot to take your eggs out ahead of time, place them in a bowl of warm water for 5 minutes.
- Know your oven. Oven temperatures can vary significantly. If your brownies tend to bake unevenly or faster than expected, consider an oven thermometer to ensure accuracy.
- Underbake slightly rather than overbake. The brownies continue to cook from residual heat even after they leave the oven. Pulling them out when the center still has a faint jiggle produces the most gloriously fudgy texture.
- Flaky salt is not optional — it is a revelation. The contrast of salt against deep dark chocolate is one of the most satisfying flavor combinations in all of baking. Do not skip it.
Variations to Try
Once you have mastered the base recipe, the possibilities for variation are genuinely exciting. These brownies serve as a wonderful canvas for creativity. Here are a few directions worth exploring:
Espresso Dark Chocolate Nut Brownies: Add 1 to 2 teaspoons of instant espresso powder to the dry ingredients. Coffee does not add a coffee flavor so much as it amplifies and deepens the chocolate notes dramatically. This is one of the most transformative small additions you can make to any chocolate baked good.
Salted Caramel Swirl: Drop tablespoons of thick salted caramel sauce over the brownie batter just before baking, then use a skewer or knife to swirl it gently through the batter. The caramel creates gorgeous ribbons of buttery sweetness running through the dark chocolate base.
Mixed Nut and Dried Cherry: Replace half the nuts with roughly chopped dried cherries or tart dried cranberries. The fruit brings a pleasant tartness and chewiness that complements the richness of the chocolate beautifully.
Hazelnut and Dark Chocolate: Swap walnuts or pecans for toasted hazelnuts and stir a generous tablespoon of hazelnut spread into the batter along with the sugars. The result tastes remarkably like a luxurious Ferrero Rocher in brownie form.
Spiced Mexican Chocolate: Add ½ teaspoon of ground cinnamon and a tiny pinch of cayenne pepper to the dry ingredients. The warmth of the spice develops slowly on the palate and creates a hauntingly complex brownie that feels completely unique.
How to Store These Brownies
Proper storage keeps these brownies tasting their best for several days — though in most households, they disappear long before storage becomes an issue. Once fully cooled and cut, store brownies in an airtight container at room temperature for up to four days. Layer them between sheets of parchment or wax paper to prevent sticking.
For longer storage, brownies freeze exceptionally well. Wrap individual squares tightly in plastic wrap, then place them in a freezer-safe zip-lock bag or container. They will keep in the freezer for up to three months. Thaw at room temperature for one to two hours, or briefly warm in a low oven (150°C/300°F) for 5 to 8 minutes to revive that fresh-from-the-oven quality.
One important storage note: if you have refrigerated your brownies for clean cutting, bring them back to room temperature before serving. Cold brownies can taste dense and waxy rather than fudgy and luscious. A brief rest at room temperature makes all the difference in texture and flavor experience.
Serving Suggestions
These brownies are magnificent on their own, full stop. But if you are serving them for a special occasion or simply want to elevate the experience further, there are some truly wonderful ways to present them:
- Serve warm with a generous scoop of vanilla bean ice cream and a drizzle of warm chocolate sauce for a plated dessert that rivals anything from a restaurant.
- Dust with powdered sugar just before serving for a simple, elegant presentation that photographs beautifully.
- Cut into smaller bite-sized pieces and arrange on a dessert platter alongside fresh strawberries and raspberries for a crowd-pleasing party spread.
- Pair with a strong espresso or a glass of good red wine — the tannins in the wine echo the bitterness of the dark chocolate in a surprisingly sophisticated way.
- Crumble over yogurt or oatmeal the next morning for a breakfast that is admittedly indulgent but absolutely delightful.
Frequently Asked Questions
Can I use milk chocolate instead of dark chocolate?
You can, but the result will be significantly sweeter and less complex in flavor. If you prefer a milder chocolate flavor, try using a mix of 50% dark chocolate and 50% milk chocolate. Keep in mind that milk chocolate has more sugar and less fat than dark chocolate, which may slightly affect the texture.
Can I make these gluten-free?
Yes! Substitute the all-purpose flour with a high-quality gluten-free 1:1 baking flour blend. The results are very close to the original. Make sure your other ingredients — particularly your chocolate and cocoa powder — are also certified gluten-free if cross-contamination is a concern.
My brownies came out cakey rather than fudgy. What happened?
A few things can cause cakey brownies: too much flour, too many eggs, overmixing the batter once the flour is added, or baking too long. Make sure you are measuring flour by weight, not scooping it directly from the bag (which compacts it). Also ensure you are pulling the brownies from the oven before the center is completely set.
Can I double this recipe?
Absolutely. Double all ingredients and bake in two pans simultaneously. Resist the temptation to bake in one very deep pan — the extended baking time required to set the center will overbake the edges.
Why did my brownies not get the shiny crinkly top?
The shiny top forms when sugar crystals migrate to the surface during baking, which happens when the sugar is well dissolved in the chocolate-butter mixture and when the eggs are beaten in thoroughly. Make sure you are whisking the sugar into the warm chocolate vigorously, and that you are beating the eggs in well before adding the flour.
A Final Word on These Brownies
There is something deeply satisfying about making brownies from scratch — the smell of dark chocolate melting on the stove, the silky batter coming together, the moment the pan comes out of the oven filling your kitchen with that irresistible aroma. These Decadent Dark Chocolate Nut Brownies are worth every bit of effort, though it must be said that the effort is genuinely minimal for the extraordinary result you achieve.
Whether you share them with people you love or keep them all for yourself (no judgment whatsoever), these brownies represent everything a homemade baked good should be: made with care, built on quality ingredients, and designed to bring genuine pleasure to whoever is lucky enough to eat one. Bake them once and they will become a permanent fixture in your recipe repertoire. Some things are simply too good not to make again and again.
Decadent Dark Chocolate Nut Brownies Worth Savoring
Ingredients
- 1/2 cup unsalted butter
- 4 oz dark chocolate, roughly chopped
- 1 cup granulated sugar
- 2 large eggs
- 1 tsp vanilla extract
- 3/4 cup all-purpose flour
- 1/4 cup unsweetened cocoa powder
- 1/2 tsp salt
- 1/4 tsp baking powder
- 3/4 cup walnuts or pecans, chopped
- 1/2 cup raisins
Instructions
- 1Heat oven to 350°F and line an 8×8 inch pan with parchment, leaving overhang on the sides.
- 2Combine butter and chopped chocolate in a microwave-safe bowl, heating in 30-second intervals and stirring until completely smooth.
- 3Whisk eggs and sugar together vigorously in a large bowl for about 2 minutes until pale and slightly thickened.
- 4Pour the chocolate mixture and vanilla into the egg mixture, stirring until fully incorporated.
- 5Sift flour, cocoa powder, baking powder, and salt directly into the wet ingredients.
- 6Gently fold everything together until just combined, being careful not to overmix.
- 7Stir in the nuts and raisins, distributing them evenly throughout the batter.
- 8Transfer batter to the prepared pan and smooth the top with a spatula.
- 9Bake 28-32 minutes until a toothpick pulled from the center shows only moist crumbs.
- 10Allow brownies to cool completely in the pan for a minimum of one hour before lifting out and slicing into 12 squares.
Notes
– For ultra-fudgy results, pull brownies from the oven on the earlier side and resist cutting until fully cooled. – Toast the walnuts or pecans in a dry skillet for 3-4 minutes beforehand to deepen their flavor significantly. – Soaking raisins in warm water for 10 minutes before adding them keeps them plump and juicy throughout baking.


