

The pan was still warm when I cut into it too early.
The pan was still warm when I cut into it too early, and the whole filling just slid sideways like it had somewhere to be. I had not waited the full 3 hours and I paid for it in front of my neighbor Rosa, who was standing right there expecting a clean slice.
So. Learn from that.
This pie — dark chocolate pudding filling, whipped cream piled on top, fresh raspberries tucked in — is the kind of thing that looks like you spent a lot of money at a bakery. You didn’t. Most of it comes together in one saucepan in about 20 minutes of active time.
What actually happens in that saucepan.
You’re making a cooked pudding filling, which sounds intimidating but is mostly just stirring. The cornstarch and cocoa go in dry first, then the milk gets whisked in slowly — this is the part that matters — because if you pour too fast you’ll get lumps that no amount of stirring will fix later.
About 8 to 10 minutes over medium heat and it thickens up noticeably. You’ll feel the resistance in the whisk change.
Then the chocolate and butter go in off the heat. That glossy, almost lacquer-like surface? That’s how you know it’s ready.
Okay, the raspberry situation.
Pat them dry. I mean it. Wet raspberries will weep into the whipped cream within about 45 minutes and you’ll end up with pink streaks and sad, deflated cream. I thought about skipping this step once — actually no, I did skip it, and the top looked fine for about an hour before it didn’t.
Have you ever had a dessert look perfect in photos and then completely different by the time guests got to it? That’s what we’re avoiding.
Quick tip: Add the raspberries and chocolate shavings no more than 30 minutes before you plan to serve. The filling can sit in the fridge overnight — toppings go on last.
The chocolate you use does change things.
Semi-sweet is what the recipe calls for, and it works well — it’s a little sweeter, a little more crowd-friendly. But when I switched to 70% dark chocolate, the filling got noticeably more intense, almost bitter in a way that made the raspberries taste sharper and brighter next to it. My husband said the dark version tasted “serious,” which I took as a compliment.
Either way, chop it small so it melts fast off the heat without seizing.
It looked wrong. It wasn’t.
When you first pour the filling into the crust, it looks very liquid and a little alarming. There’s a moment — right around the time you’re pressing the plastic wrap against the surface — where it genuinely seems like it’s not going to set.
It sets.
Three hours minimum in the fridge. Four is better. I once tried to rush it at two and a half hours and the center was still soft. Not disastrously so, but soft. Just wait.
About the whipped cream.
Cold bowl, cold cream. This is not a fussy thing, it just goes faster and holds longer when everything is cold going in. Two tablespoons of powdered sugar is enough — I thought about adding more,
and then I remembered the filling is already sweet and the raspberries are tart, and the balance was already there.
Beat to stiff peaks, not just soft. Soft peaks will slump and look tired by the time you serve. You want it to hold its shape when you spread it.
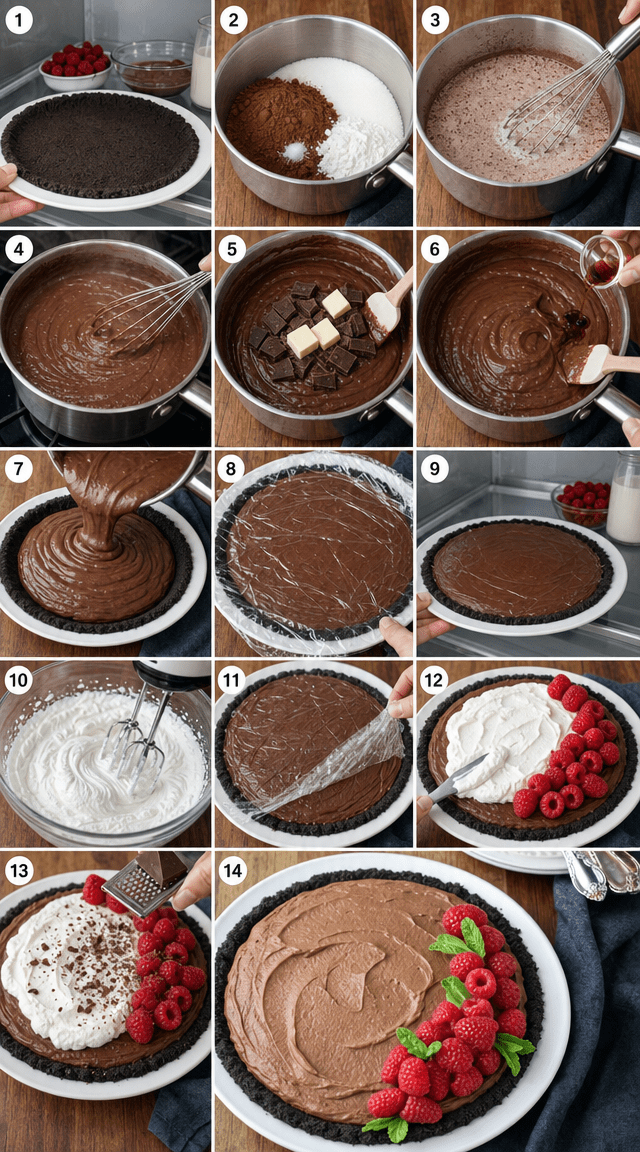
Step 1: Put your graham cracker crust in the fridge while you get everything else together. A cold crust helps the filling set faster at the edges once you pour it in. It also means the crust stays firm instead of going soft under the warm filling. This part takes zero effort — just put it in and leave it.
Step 2: In a medium saucepan, whisk together the cornstarch, cocoa powder, sugar, and salt until the mixture looks even with no streaks of cornstarch visible. This dry-whisk step matters. (Skipping it and adding the milk right away leads to clumps that survive all the way to the finished pie — I learned this the second time I made it, not the first.)
Step 3: Pour the milk in slowly, a little at a time at first, whisking constantly. Once you’ve added about half the milk and the mixture is smooth, you can pour the rest in more steadily. Go slow at the start — this is what keeps the texture silky rather than grainy.
Step 4: Set the saucepan over medium heat and stir continuously. At around the 8-minute mark, you’ll notice the mixture start to thicken and then it’ll come to a gentle boil. Keep stirring. This is the part where you can’t walk away — even 30 seconds of leaving it alone and the bottom can scorch.
Step 5: Pull the pan off the heat and add the chopped chocolate and butter all at once. Stir until everything is completely melted and the surface looks glossy. Then stir in the vanilla. I always feel a small amount of satisfaction at this step because it goes from looking okay to looking genuinely good very fast.
Step 6: Get the crust out of the fridge and pour the filling in carefully. It’ll be quite liquid — that’s normal. Lay a piece of plastic wrap directly against the surface of the filling, pressing it gently so there’s no air between the wrap and the pudding. (Any gap left there will form a skin. Not dangerous, just unpleasant to bite into.)
Step 7: Refrigerate for at least 3 hours. Four is better if you have the time. Do you have a trick for being patient with chill times? Share below!
Step 8: When the pie is fully set, beat the heavy cream and powdered sugar in a cold bowl until stiff peaks form. Spread the whipped cream over the top of the pie generously. Arrange the raspberries across the top and scatter chocolate shavings over everything. Slice and serve right away.
Ways to Change It Up
Try this: Swap the graham cracker crust for an Oreo crust. Crush about 24 Oreos, mix with 5 tablespoons of melted butter, press into the pan, and chill. The extra chocolate in the crust makes the whole thing taste darker and more intense.
Try this: Add a thin layer of raspberry jam between the crust and the chocolate filling. About 3 tablespoons, spread carefully so it doesn’t mix into the filling when you pour. The jam layer concentrates the raspberry flavor and holds up well after chilling.
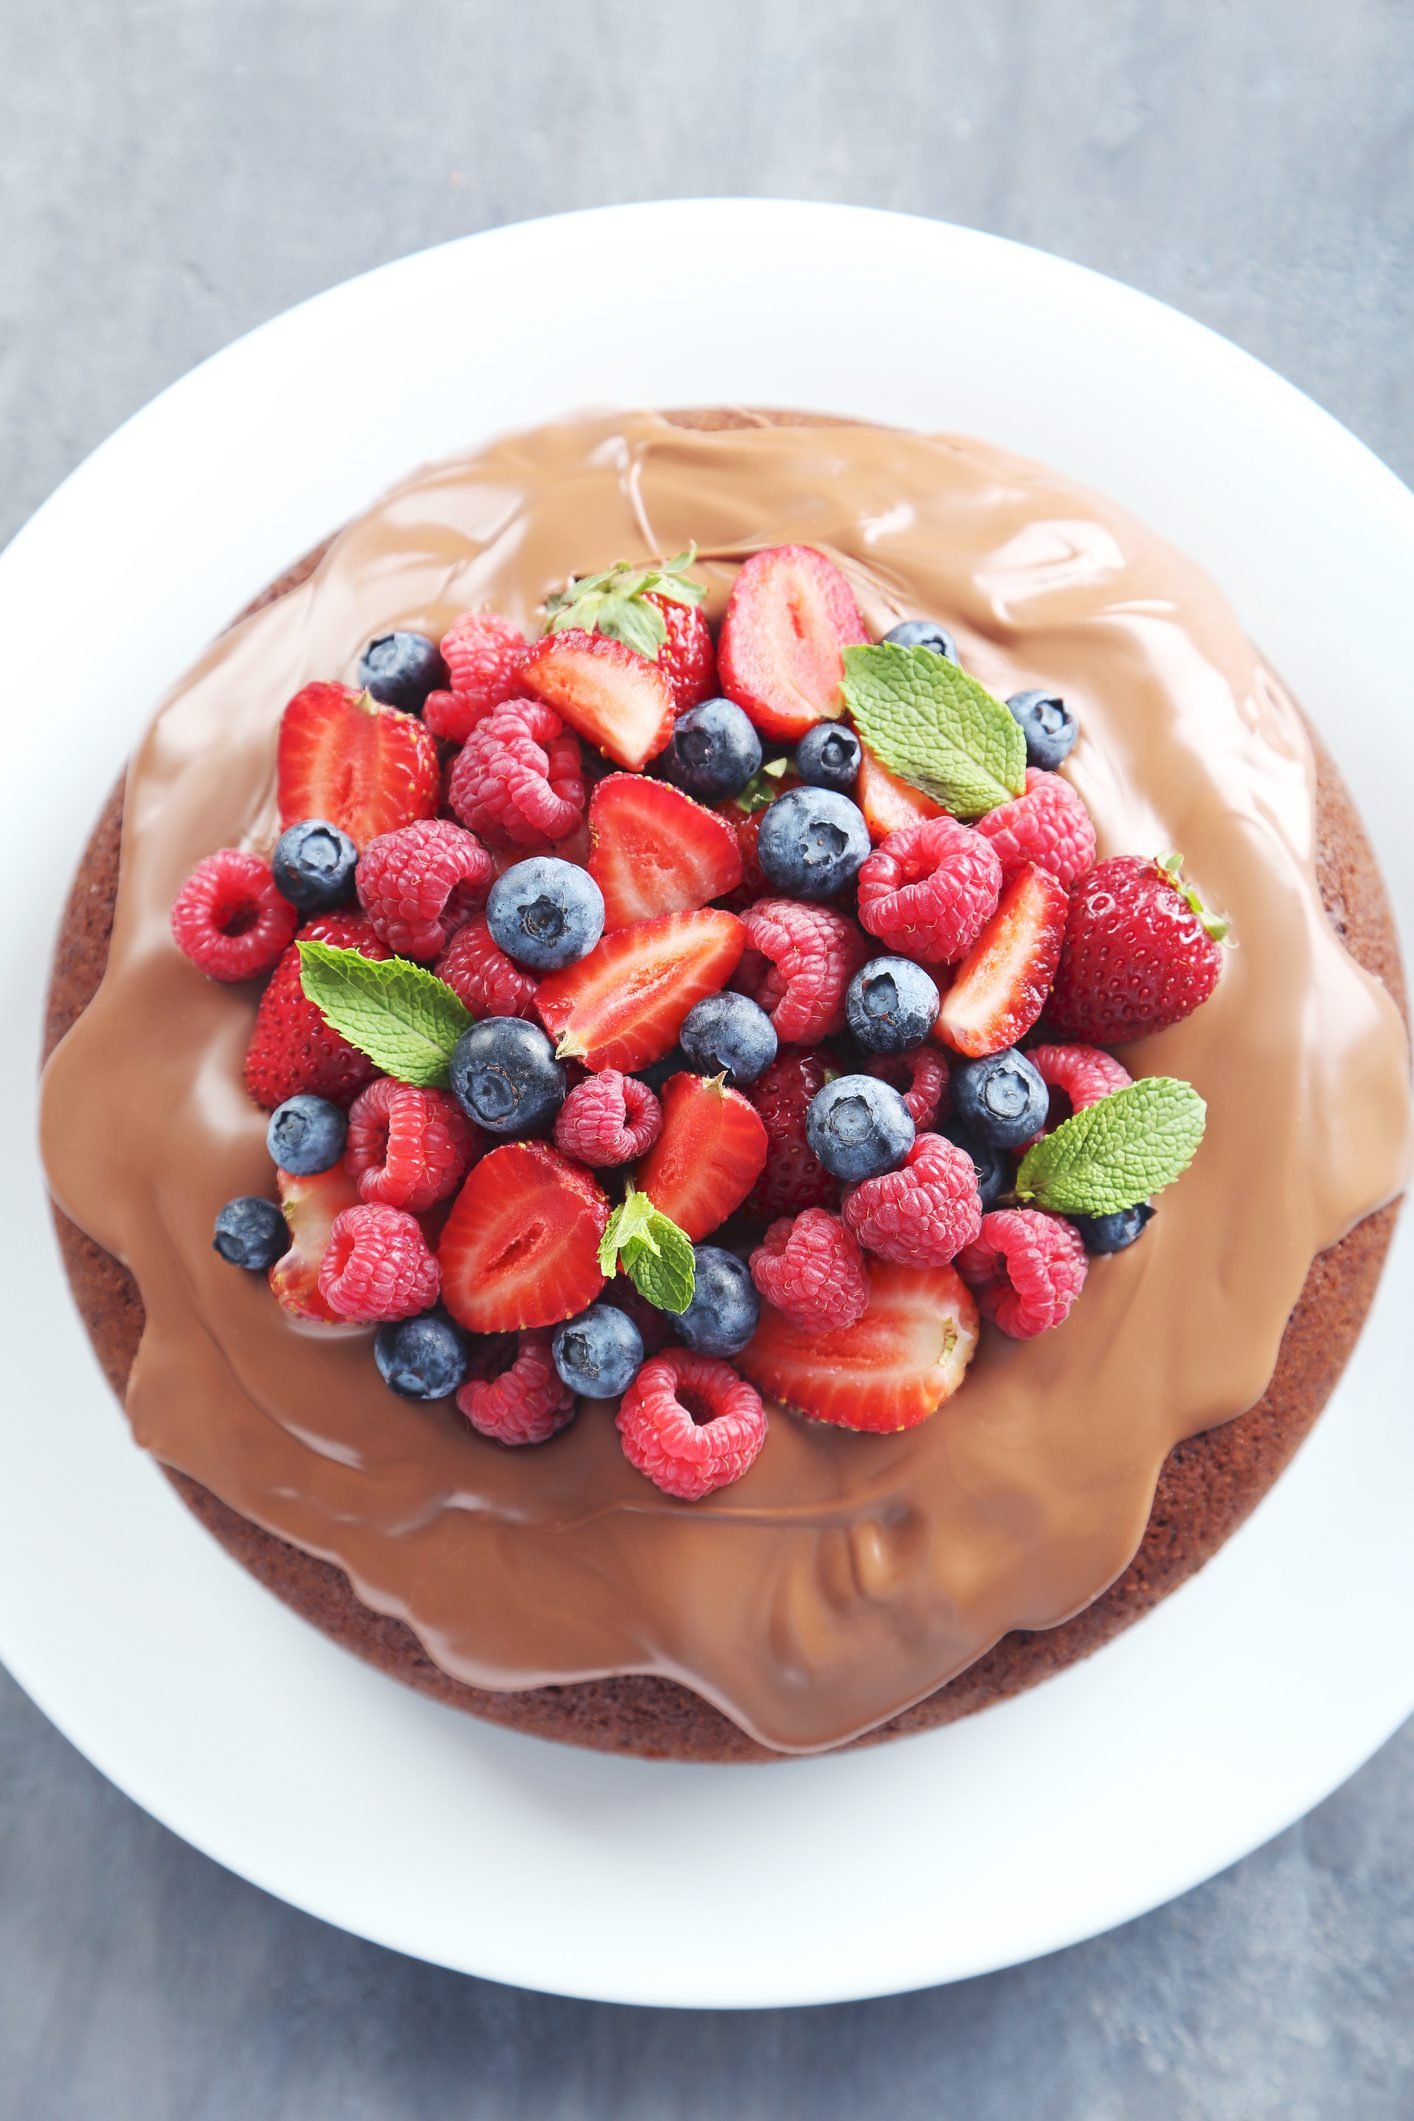
Try this: Skip the whipped cream entirely and finish with a ganache topping instead — 2 oz of chopped chocolate melted with 3 tablespoons of warm heavy cream, poured and smoothed over the set filling. Top with the raspberries once the ganache is just barely set. It looks much more dramatic and slices cleanly.
Which would you go for? Drop it in the comments.
How to Serve It
Straight from the fridge, cold, with a sharp knife wiped clean between slices. The filling cuts better cold and the slices hold their shape longer on the plate.
A small scoop of vanilla ice cream next to a slice works well — the cold creaminess against the chocolate is a good contrast, and the ice cream softens slightly against the pie in a way that’s hard to argue with.
If you want to serve it at a dinner party, plate it in advance and keep the slices in the fridge until you’re ready. Pull them out about 5 minutes before serving so the chill takes the edge off.
What would you pair it with?
Storing It Without Ruining It
Cover the whole pie loosely with plastic wrap or a large plate — not the same pressed-down wrap you used during setting, just draped over the top — and keep it in the fridge. It holds well for up to 3 days before the crust starts to soften noticeably.
If you’ve already added the whipped cream and raspberries, those don’t store well past day two. The cream starts to weep and the berries get soft. Honestly, eat that half first.
The filling on its own — without the toppings — freezes fine. Wrap it tightly and freeze for up to a month. Thaw overnight in the fridge and add the whipped cream and raspberries fresh before serving. The texture after freezing isn’t quite as smooth but it’s close.
No need to reheat. This pie is served cold and stays cold. Have you ever saved leftovers like this? Tell me below!
Mistakes I Made So You Don’t Have To
I once added the milk all at once instead of slowly, and I got a lumpy, streaky mess that I had to strain through a fine mesh sieve before it was usable. It worked, but it added 10 minutes and a lot of swearing to the process.
The filling cracked across the top on my third attempt because I cooled it on the counter too long before refrigerating. More than 20 minutes at room temperature and the surface starts to set unevenly. Pour it in, wrap it, fridge it — don’t let it sit around.
I also beat the whipped cream too far once and got something closer to butter than cream. It took about 4 minutes too long at high speed. Stop when the peaks are stiff but the cream still looks smooth, not grainy. Did something like this happen to you?
Questions People Actually Ask Me About This
Can I use frozen raspberries instead of fresh? They’ll work on top if you thaw and drain them very well, but the texture gets soft and they release a lot of liquid into the whipped cream. Fresh is noticeably better here. But if frozen is what you have, pat them dry for about 10 minutes on paper towels before placing them.
How far ahead can I make this? The filling sets beautifully up to 24 hours ahead. I tried this once and the texture was actually better — firmer and cleaner to slice. Add the cream and berries no more than 30 minutes before serving.
My filling didn’t set. What happened? It depends on whether it reached a full boil during cooking. And that’s usually the issue — people pull it off the heat too early. It needs to hit a gentle boil and hold it briefly for the cornstarch to activate fully. About 8 to 10 minutes at medium heat, stirring the whole time.
Can I make this without the graham cracker crust? Sure. A pre-baked shortbread crust works well and cuts even cleaner. I tried a store-bought chocolate cookie crust once and it was fine — not as good, but fine. No crust at all and you just have chocolate pudding cups, which, honestly, also not a bad outcome.
Is there a dairy-free version? It depends on how close to the original you want it. Full-fat coconut milk works in place of whole milk, and a dairy-free chocolate works fine. But the whipped cream is harder to replace — coconut cream whipped works, though it has a distinct flavor. I tried this once and it was good but different.
How many slices does this make? Eight if you cut it like a normal pie. Six if you’re being generous. Four if it’s just you and one other person who both want a lot. The nutrition info is based on eight slices — 485 calories, 28g fat, 6g protein per slice. And that’s before the extra chocolate shavings.
Which answer helped you most?
Go make it, seriously.
This pie has become the thing I bring when someone asks me to “just bring something sweet.” It looks involved. It isn’t.
The part that trips people up most — the custard setting time — just requires patience, not skill. Put it in the fridge and go do something else for a few hours.
Fun fact: Raspberries are part of the rose family, and they have more fiber per cup than most other common berries — about 8 grams — which means this pie is practically a health food. I’m kidding. But the fiber thing is real.
My sister thought the dark chocolate version needed more tartness, so she added a tablespoon of raspberry jam swirled into the filling before chilling. I haven’t tried it but I’m not opposed.
Will you make this soon? Drop a comment below and tell me which chocolate you’re going with — semi-sweet or dark. I’m curious what you end up preferring.
Happy cooking! —Marina Caldwell
Decadent Raspberry Chocolate Pie Worth Every Bite
Ingredients
- 1 9-inch graham cracker crust
- 6 oz semi-sweet chocolate, chopped
- 2 cups whole milk
- 1/4 cup cornstarch
- 1/4 cup cocoa powder
- 1/2 cup sugar
- 1/4 teaspoon salt
- 1 teaspoon vanilla extract
- 2 tablespoons butter
- 1 cup heavy whipping cream
- 2 tablespoons powdered sugar
- 2 cups fresh raspberries
- 1/4 cup chocolate shavings for garnish
Instructions
- 1Chill your graham cracker crust in the refrigerator while you prepare the filling.
- 2Whisk together cornstarch, cocoa powder, sugar, and salt in a medium saucepan until evenly combined.
- 3Slowly pour in milk while whisking continuously, ensuring a completely lump-free mixture.
- 4Place saucepan over medium heat, stirring constantly until the mixture thickens and reaches a gentle boil, roughly 8-10 minutes.
- 5Pull the pan from heat and fold in chopped chocolate and butter, stirring until completely melted and glossy.
- 6Stir in vanilla extract until fully incorporated.
- 7Retrieve the chilled crust and carefully pour the warm chocolate filling inside.
- 8Lay plastic wrap flush against the pudding surface to eliminate any skin from forming.
- 9Chill in the refrigerator for a minimum of 3 hours until firmly set.
- 10Beat heavy cream and powdered sugar together in a bowl until stiff peaks hold their shape.
- 11Unwrap the set pie and discard the plastic wrap.
- 12Generously spread whipped cream across the top, then nestle fresh raspberries throughout.
- 13Finish with a liberal scattering of chocolate shavings.
- 14Slice and serve immediately for best results.
Notes
– For an intensely richer flavor, substitute semi-sweet chocolate with 70% dark chocolate. – Pat raspberries completely dry before placing on the pie to prevent excess moisture from softening the whipped cream. – The pudding filling can be made one day ahead and stored covered in the refrigerator, adding toppings only just before serving.


