

The batch I almost didn’t finish.
My husband ate four of these before they had cooled for the full two minutes, and I genuinely could not be annoyed with him. The first time I made them, the centers came out cakey and pale — not what I wanted at all.
What the dough actually looks like.
It’s thick. Noticeably thicker than most cookie doughs I’ve worked with, and it holds its shape on the spoon without slumping.
When the butter and sugars come together — and I mean really come together after a full 3 minutes on medium — the mixture goes almost pale yellow and kind of airy looking. That’s when you know it’s ready for the eggs.
I thought about using dark brown sugar for a deeper flavor — actually no, I kept the regular packed brown sugar and it did exactly what I needed.
The part nobody tells you about the chocolate.
Use chunks, not chips. Chips are engineered to hold their shape in heat, which sounds good, but it means you don’t get those little puddles of melted chocolate spreading into the dough.
Real chocolate chunks — broken off a bar, uneven edges and all — melt unevenly in a way that makes each bite different. My neighbor Rosa brought over a bar of 70% dark chocolate once and I chopped it up instead of using my usual bag of chunks, and the cookies were noticeably more interesting.
Quick tip: Press a few extra chocolate pieces onto the tops of the dough balls right before they go into the oven — the cookies come out looking like they came from a bakery, and the exposed chocolate gets those slightly scorched edges that taste incredible.
375°F and not a degree more.
I ran mine at 400°F once because I was in a hurry, and the bottoms went dark brown in 9 minutes while the centers were still raw. Didn’t do that again.
At 375°F, mine turned golden at the edges in about 11 minutes — centers still looking soft and slightly underdone, which scared me the first few times but is exactly right.
The pan carries heat. Those cookies keep cooking for the full 2 minutes you leave them sitting there, and that’s what sets the chew.
It looked wrong. It wasn’t.
Pulling cookies out when they look underbaked goes against every instinct I have. Every time I stand at the oven, I have to actively talk myself out of giving them another 2 minutes.
Do you ever second-guess yourself at that exact moment and end up overbaking? Because I did it twice before I stopped.
The chill step. Worth it or not?
The notes say 30 minutes in the fridge intensifies flavor and stops the dough from spreading too thin. Honestly? It’s not that deep, but I did notice the cookies held a slightly thicker shape when I chilled the dough first.
The batch I made without chilling spread a little wider and came out crispier at the edges — some people would prefer that, actually. Not bad. Just different from what I was going for.
The batch I chilled for a full hour instead of 30 minutes didn’t taste any better than the 30-minute version, so I wouldn’t bother going longer than that.
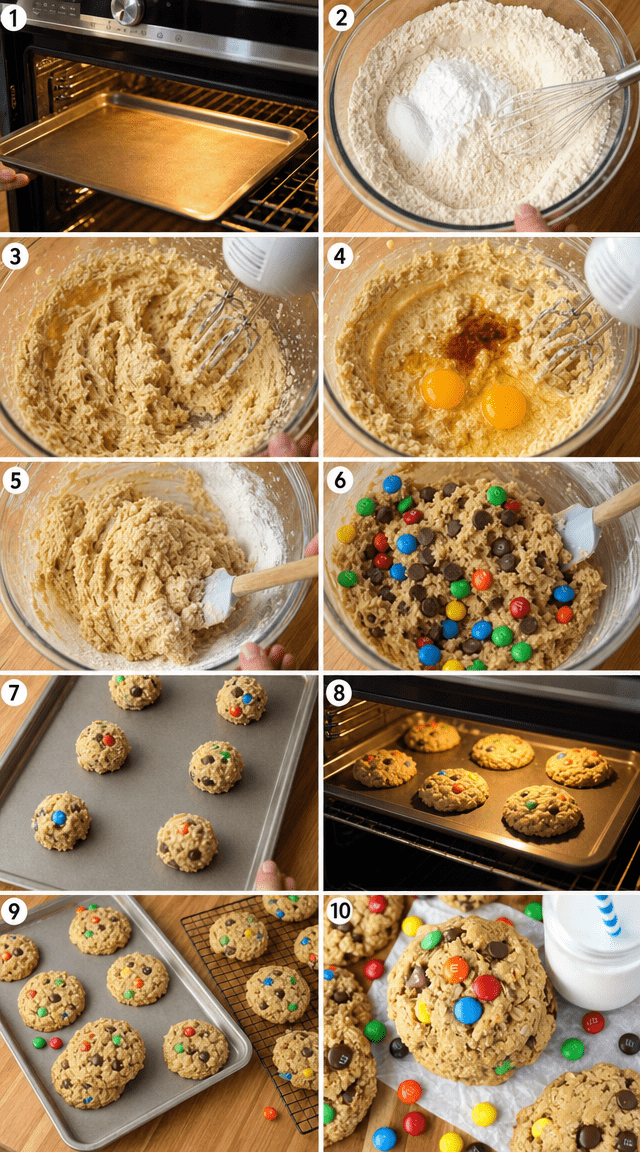
Step 1: Heat your oven to 375°F and set out two ungreased baking sheets. I used to grease mine out of habit — that was a mistake, the bottoms browned too fast and the cookies slid around weirdly when I tried to transfer them.
Step 2: Whisk together 2 1/4 cups all-purpose flour, 1 tsp baking soda, and 1 tsp salt in a medium bowl. Get it fully combined before you set it aside — uneven baking soda distribution will give you cookies with weird bitter spots in them. (I learned this the hard way on my third batch.)
Step 3: Beat 1 cup softened butter with 3/4 cup granulated sugar and 3/4 cup packed brown sugar on medium speed for about 2 to 3 minutes, until the mixture looks pale and fluffy. Don’t rush this step — undermixed butter makes the cookies dense in a way that doesn’t recover. This is genuinely the most satisfying part of the whole process to watch.
Step 4: Add 2 large eggs one at a time, mixing after each one, then blend in 2 tsp vanilla extract. Make sure the first egg is fully incorporated before you add the second — if you dump them both in at once, the fat in the batter can look split for a minute and you’ll panic for no reason. (It comes back together, but still.)
Step 5: Slowly add the flour mixture into the wet ingredients, stirring until a smooth dough forms. I add it in three rough additions rather than all at once so the flour doesn’t puff up everywhere. Does your mixer make a flour cloud the second you add dry ingredients? Tell us how you handle it — Share below!
Step 6: Fold in 2 cups of chocolate chunks until evenly distributed through the dough. If you’re chilling the dough — and I’d recommend it for a thicker cookie — cover the bowl now and refrigerate for 30 minutes before scooping.
Step 7: Scoop rounded tablespoons of dough onto the baking sheets, spacing them about 2 inches apart. I use a cookie scoop because my “rounded tablespoons” by hand were wildly inconsistent and I ended up with some tiny ones and some huge ones baking side by side. Not great.
Step 8: Bake for 10 to 12 minutes, until the edges are golden and the centers still look slightly soft. Pull them at 11 minutes if your oven runs warm. Rest on the pan for 2 full minutes before moving them — they’re still setting and they will fall apart if you rush it.
Ways to Change It Up
Try this: Swap the chocolate chunks for M&M’s — the candy shell stays intact while the chocolate inside melts just enough, and the colors make the cookies look cheerful in a way that’s hard to resist when you’re baking for kids.
Try this: Add 1/2 tsp of espresso powder to the dry ingredients. You won’t taste coffee — it just makes the chocolate hit harder and the whole cookie tastes a little more like something you’d pay too much for at a coffee shop.
Try this: Sprinkle flaky sea salt on top of each dough ball right before baking. The salt melts into the cookie as it bakes and you get these little pockets of contrast in every bite that make the whole thing more interesting.
Which would you go for? Drop it in the comments.
How to Serve It
Warm, about 5 minutes out of the oven, with a glass of cold whole milk — the chocolate is still slightly molten at that point and the contrast with the cold milk is genuinely hard to beat.
Cooled completely and sandwiched around a scoop of vanilla ice cream — pack the ice cream in tight, roll the edges in crushed pretzels if you want something that sounds ridiculous but tastes correct.
On a plate at room temperature next to coffee, the next morning, which is technically a breakfast decision and I stand by it.
What would you pair it with?

Storing It Without Ruining It
Room temperature in an airtight container with a slice of plain bread tucked in — the bread gives up its moisture to the cookies and keeps them soft for up to 5 days. Replace the bread slice after day 2 if you want to keep them going longer.
Freezer works great with these. Freeze baked cookies in a zip bag for up to 2 months, then let them sit at room temperature for about 20 minutes or pop them in a 300°F oven for 5 minutes to bring them back.
You can also freeze the raw dough balls on a sheet pan, then transfer them to a bag once solid. Bake straight from frozen — just add 2 to 3 minutes to the bake time and watch the edges, not the clock.
Have you ever saved leftovers like this? Tell me below!
Mistakes I Made So You Don’t Have To
I once used butter straight from the fridge because I didn’t plan ahead, and no amount of extra mixing got it to cream properly with the sugar. The cookies came out dense and a little greasy. I served them anyway because there were twelve people coming over and I wasn’t starting over.
Using a dark-colored baking sheet without adjusting the temperature — the bottoms cooked about 3 minutes faster than the tops and I pulled out cookies that were borderline burnt on the bottom with underdone centers. If you use dark pans, drop the oven to 350°F and watch them closely from the 9-minute mark.
Measuring flour straight from the bag by scooping the cup in — this packs the flour down and you end up adding probably 20 to 30 percent more than the recipe intends, which makes the cookies dry and crumbly. Spoon it into the cup and level off the top.
Did something like this happen to you?
Questions I actually get asked about these.
Can I use salted butter instead of unsalted? You can, and I’ve done it plenty of times — just skip the 1 tsp of salt in the dry ingredients, or use only half of it. The cookies come out a little saltier overall, which honestly works fine with the chocolate.
How long do these actually keep? About 4 to 5 days at room temperature with the bread trick in the container. Without the bread slice, they go noticeably harder by day 3. Frozen, they keep well for 2 months but I’ve never actually had them last that long in my house.
Can I make these without a mixer? It depends on how soft your butter is. If it’s genuinely room temperature — soft enough that your finger sinks in without pressing — you can cream it with a wooden spoon, but your arm will be tired. I tried this once and the creaming step took me about 6 minutes of actual effort. But it worked.
Why did my cookies spread flat? Butter too warm — if the butter was melting-soft instead of room-temperature-soft when you creamed it, the cookies will spread wide and thin in the oven. And skipping the chill step makes it worse. Try 30 minutes in the fridge before baking.
Can I double the recipe? Yes. Doubles cleanly. I’ve made a double batch in one stand mixer bowl without issue — just make sure not to overfill past the halfway point on the bowl when adding flour, or it goes everywhere.
Is the center supposed to look raw when I pull them? Yes. Slightly underdone in the center at 11 minutes is right. The residual heat from the pan finishes them during the 2-minute rest. If they look fully set in the oven, they’ll be overbaked once they cool. Pull them early every time.
Which answer helped you most?
Okay, go make them.
These are the cookies I make when I need something reliable — not flashy, not complicated, just a good cookie that comes out right when you follow the steps.
The chilling step and the early pull are the two things that separate a good batch from a great one. Both are easy. Neither requires anything you don’t already have.
Fun fact: Chocolate was used as currency by the Aztecs — cacao beans were considered more valuable than gold in some regions, which honestly makes sense after eating one of these warm out of the oven.
My youngest calls these “the real ones” to distinguish them from store-bought, which I’m choosing to take as a compliment.
Will you make this soon? Drop a comment when you do — I want to know if you went with the dark chocolate or the M&M’s.
Happy cooking! —Marina Caldwell
Irresistible Chocolate Chunk Cookies With Rich Buttery Flavor
Ingredients
- 2 1/4 cups all-purpose flour
- 1 tsp baking soda
- 1 tsp salt
- 1 cup butter, softened
- 3/4 cup granulated sugar
- 3/4 cup packed brown sugar
- 2 large eggs
- 2 tsp vanilla extract
- 2 cups chocolate pieces or M&M’s
Instructions
- 1Heat your oven to 375°F (190°C) and set aside two ungreased baking sheets.
- 2Whisk together flour, baking soda, and salt in a medium bowl until evenly combined.
- 3Using a hand or stand mixer, beat softened butter with both sugars on medium speed until light and fluffy, about 2-3 minutes.
- 4Mix in eggs one at a time, then blend in vanilla extract until fully incorporated.
- 5Slowly add the flour mixture into the wet ingredients, stirring until a smooth dough forms.
- 6Gently fold in chocolate pieces until evenly distributed throughout the dough.
- 7Scoop rounded tablespoons of dough onto prepared baking sheets, spacing them 2 inches apart.
- 8Bake for 10-12 minutes until edges are golden and centers appear slightly underdone.
- 9Rest cookies on the baking sheet for 2 minutes before transferring to a wire cooling rack.
Notes
– For chewier cookies, pull them out when centers still look slightly underbaked, as they continue cooking on the hot pan. – Chilling your dough for 30 minutes before baking intensifies flavor and prevents excess spreading. – Store cooled cookies in an airtight container with a slice of bread to maintain softness for up to five days.


