

The Crack Showed Up Around Hour Two
Cream cheese is not forgiving when you rush it. I learned that the first time I made this, when I got impatient with the water bath and skipped it entirely — and pulled out a cheesecake with a canyon running right down the middle.
The cherries covered it. But I knew it was there.
This is a New York cheesecake, which means it’s dense and cold and unapologetically plain until you spoon the cherry topping over it. There’s no shortcut that doesn’t show up somewhere on the surface or in the texture.
My neighbor Diane makes hers with a store-bought crust and I’ve never said a word about it, but I do think the pressed graham cracker base — slightly thicker at the edges where the pan curves up — is the part most people underestimate.
She also skips the water bath. Her cracks are legendary.
What the Crust Actually Needs
Two cups of graham cracker crumbs, half a cup of melted butter, a quarter cup of sugar. Press it in like you mean it.
Not with a spoon. With the flat bottom of a measuring cup. The corners especially — where the base meets the side of the springform — need real pressure or they fall apart the moment you slice into the finished cake.
Ten minutes at 325°F. Not nine, not twelve.
It should look barely golden when it comes out, not dark. Dark means dry. Dry means it crumbles when you try to get a clean slice onto a plate, and you’ll spend thirty seconds trying to reconstruct the base in front of your guests.
I thought about adding a pinch of cinnamon — actually no, I skipped it. The crust is a backdrop, not a flavor.
Quick tip: Let the crust cool for at least 10 minutes before pouring the filling in. Warm crust can make the bottom layer of cream cheese slightly grainy around the edges — you won’t see it, but you’ll feel it.

The Filling Is Where People Lose Their Nerve
32 ounces of cream cheese. All of it needs to be room temperature, actually room temperature — not “I left it on the counter for 20 minutes while I preheated the oven” temperature.
Cold cream cheese lumps. Those lumps survive the mixer, survive the oven, and show up in your slice as small, slightly dense patches that no one mentions out loud but everyone notices.
Beat it until smooth before you add anything else. You’ll know it’s ready when it stops looking like it’s fighting the beaters.
The cornstarch is doing more than you’d think. It keeps the structure from collapsing when the cheesecake cools — without it, the center sinks in a slow, discouraged way that the cherry topping can’t fully disguise. Add it with the sugar, not after.
Eggs go in one at a time. This is the instruction everyone reads and then ignores because it feels excessive.
Don’t ignore it. Each egg needs to be barely incorporated before the next one goes in — overmixing here adds air, and air is how you get cracks. I overmixed mine on the third attempt and the top looked like a topographic map by the time it cooled.
The Water Bath Situation
Most cheesecake recipes tell you the water bath is optional. They’re wrong.
Without it, the outer edge of the cheesecake cooks faster than the center — and that temperature difference is exactly what causes cracking. The water bath keeps the whole thing at an even, gentle heat so the center can catch up without the edges overcooking.
Wrap the outside of your springform pan in two layers of heavy-duty foil before it goes into the water. Not one. Two. Springform pans are not watertight — water will find its way through one layer and your crust will be soggy in a way that no amount of time in the refrigerator will fix.
The water goes up halfway. Hot water, not cold.
Cold water extends the bake time unevenly and you’ll be standing in front of a slightly underdone cheesecake at 10pm wondering if it’s done. It’s probably not. Add 15 more minutes and go sit down.
75 minutes at 325°F. The center should jiggle — a slow, unified jiggle, not a sloshing liquid jiggle. There’s a difference and you will learn it by feel more than by description.
The Oven Door. Leave It Cracked.
Turn the oven off. Crack the door four inches — I use a wooden spoon to prop it. Leave the cheesecake in there for a full hour.
This is not optional. Going from 325°F to room temperature in one move is a thermal shock,
and the surface contracts faster than the interior can handle, which is how you get cracks even after a perfect bake.
After that hour, it still needs 30 minutes on the counter. Then the refrigerator, for at least four hours — overnight if you have the patience, which I usually don’t, and the four-hour version is fine.
Don’t cover it with plastic wrap while it’s still warm. Condensation will collect on the surface and make it slightly wet in an unpleasant way. Wait until it’s fully at room temperature, then cover loosely and refrigerate.
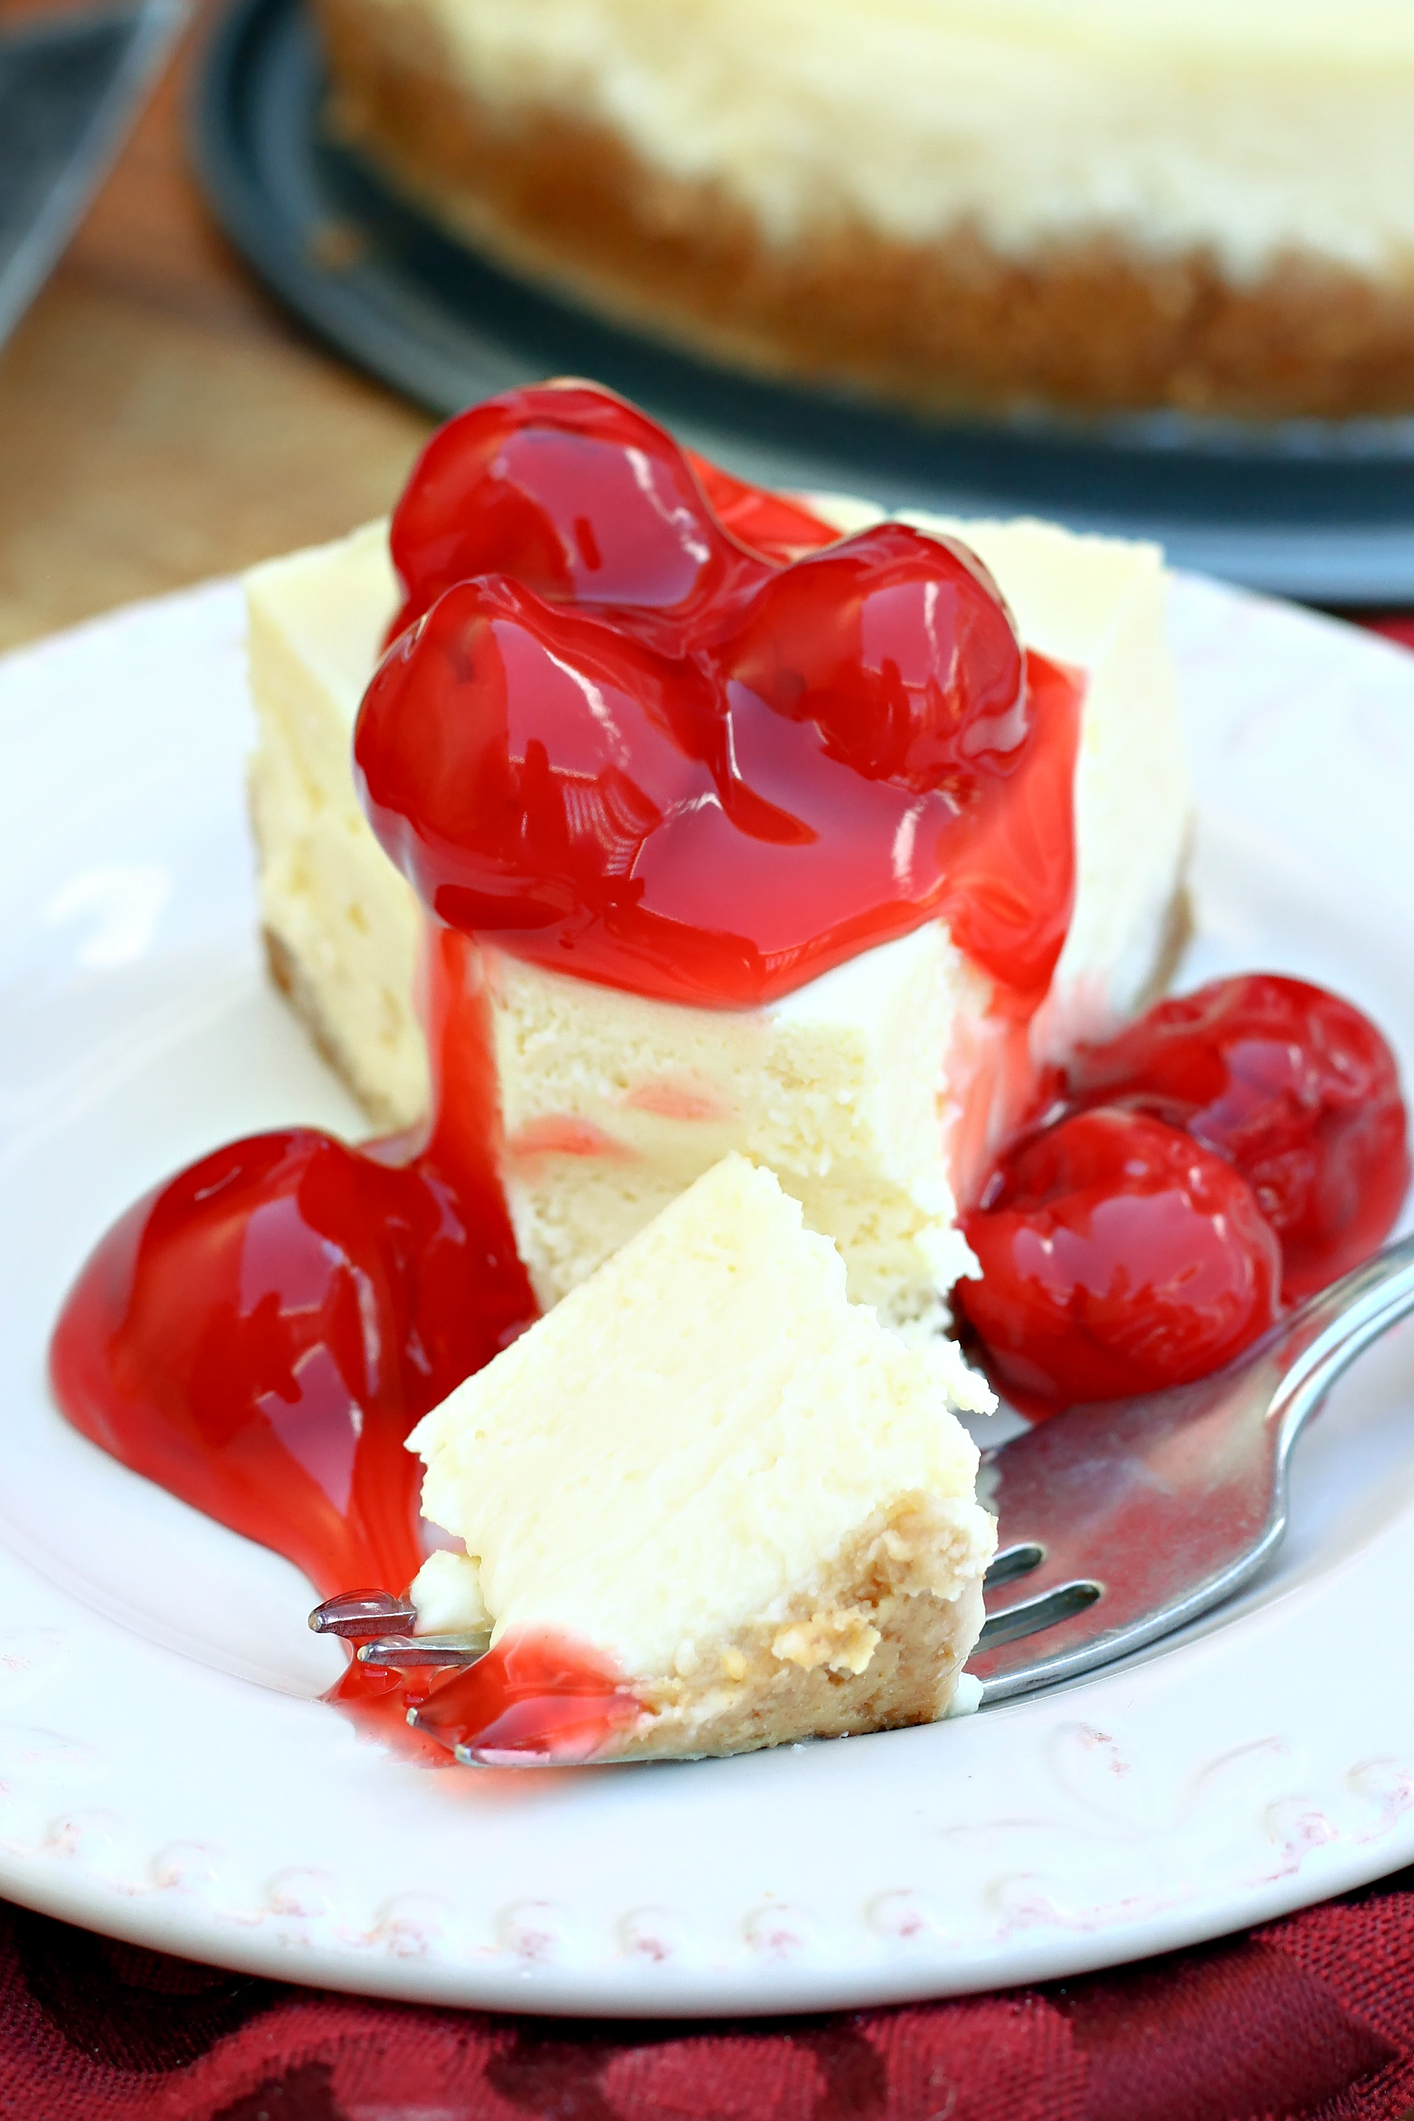
The Cherry Topping, Which Takes Six Minutes
Two cans of cherry pie filling, two tablespoons of lemon juice, one tablespoon of sugar. Medium heat, three to four minutes, stirring gently so the cherries don’t break apart into mush.
The lemon juice cuts the sweetness in a way that matters more than it sounds. Without it the topping tastes like canned filling, which it is — the lemon makes it taste like something you made, which is the entire point.
Cool it to room temperature before it goes on the cheesecake. Warm topping will soften the top layer of the cheesecake in a way that looks fine until you slice it, and then the whole thing shifts.
Slice with a hot, wet knife. Run it under hot water, wipe it dry, make the cut. Repeat for every single slice. Tedious? Yes. Worth it? The difference between a clean edge and a dragged, smeared one that looks like it got sat on.
Honestly? The cherry topping is the easiest part of this whole thing. Don’t overthink it.
—How to Make New York Cherry Cheesecake
Step 1: Preheat your oven to 325°F. Wrap the outside of a 9-inch springform pan with two layers of heavy-duty aluminum foil, making sure it goes all the way up the sides. This is the step that keeps your crust from turning into a wet sponge in the water bath.
Step 2: Combine 2 cups graham cracker crumbs, 1/2 cup melted butter, and 1/4 cup sugar in a bowl until the crumbs are evenly coated and clump together when pressed. Press the mixture firmly into the bottom of the prepared pan using the flat bottom of a measuring cup — work the edges first, then the center. Bake for 10 minutes, then set aside to cool. (Don’t skip the cooling time — filling a warm crust leads to a greasy, uneven base.)
Step 3: Beat 32 oz of room-temperature cream cheese on medium speed until there are absolutely no lumps — about 3 to 4 minutes of actual beating, not just stirring. Gradually add 1 cup sugar and 1/4 cup cornstarch and mix until fully combined. Scrape down the bowl twice during this step or you’ll have a dense ring of undermixed cheese at the bottom of your batter.
Step 4: Add 1 teaspoon vanilla, then add the 4 eggs one at a time, mixing on low just until each one disappears into the batter before adding the next. This is the step where I always want to rush, and the one time I did, the cheesecake cracked in a long diagonal line that no amount of cherries could hide. Last: fold in 1/2 cup sour cream by hand with a spatula. Don’t use the mixer here.
Step 5: Pour the filling over the cooled crust and smooth the top with an offset spatula or the back of a spoon. Set the springform pan inside a large roasting pan. Pour hot water into the roasting pan until it reaches halfway up the sides of the springform. Carefully transfer the whole thing to the oven. Did the water splash over the foil when you lifted it? Tell me below!
Step 6: Bake for 75 minutes. The center should still have a slow, even jiggle when you gently shake the pan — not liquid, not rigid. Turn the oven off, prop the door open about 4 inches with a wooden spoon, and leave the cheesecake inside for 1 full hour. Then remove it from the water bath and let it sit at room temperature for another 30 minutes before refrigerating uncovered until fully cool, then covering loosely.
Step 7: Refrigerate for at least 4 hours. Overnight is better. Before serving, combine both cans of cherry pie filling with 2 tablespoons lemon juice and 1 tablespoon sugar in a small saucepan over medium heat. Stir gently for 3 to 4 minutes, then remove from heat and cool to room temperature. Spoon over the chilled cheesecake just before slicing. Use a hot, wet knife for every cut.
Ways to Change It Up
Try this: Swap the cherry topping for a blueberry compote made with fresh or frozen blueberries, a tablespoon of sugar, and a squeeze of lemon — cook it down for about 8 minutes until it thickens slightly. The flavor is less sweet and holds up better if you’re serving it the next day.
Try this: Add a tablespoon of lemon zest directly into the cream cheese filling before the eggs go in. It doesn’t make it taste like lemon cheesecake — it just brightens the whole thing in a way that’s hard to pin down until it’s gone.
Try this: Use chocolate graham crackers for the crust instead of plain. The bitterness works against the sweet cherry topping in a way that actually makes both flavors more distinct rather than muddying them.
Which would you go for? Drop it in the comments.
How to Serve It
Serve it cold, straight from the refrigerator. Not room temperature — cold. The texture firms up in the fridge in a way that holds the slice together when you plate it, and a room-temperature New York cheesecake is slightly softer than it should be.
If you’re serving it for a gathering, spoon the cherry topping over the whole cake no more than an hour before people sit down. Much earlier and the liquid from the topping starts to soften the top layer of the cheesecake in a way that photographs fine but slices badly.
A small dollop of unsweetened whipped cream on the side cuts the richness without competing with the cherries. Coffee alongside it — not sweet coffee, just black or with a small amount of milk — is the one pairing that actually makes both things better.
What would you pair it with?
—Storing It Without Ruining It
Covered in the refrigerator, this keeps well for about four days. After that the crust starts to soften noticeably and the filling takes on a faint dairy smell that isn’t dangerous but isn’t great.
Store the cherry topping separately if you have any leftovers. Spooning it directly onto the cheesecake before refrigerating makes the top layer of the filling soft and slightly wet by the next morning.
For freezing: skip the cherry topping, wrap individual slices in plastic wrap and then foil, and freeze for up to a month. Thaw overnight in the refrigerator, not on the counter — counter thawing makes the texture slightly grainy at the edges in a way that refrigerator thawing doesn’t.
Reheating isn’t really a thing with cheesecake. Serve it cold or don’t serve it.
Have you ever saved leftovers like this? Tell me below!
Mistakes I Made So You Don’t Have To
I once used low-fat cream cheese because it was what I had, and the cheesecake never set properly in the center — it was soft and borderline runny even after six hours in the refrigerator. I served it anyway. Nobody said anything, which was generous of them.
Skipping the foil on the springform pan. Water got in, the crust turned into a wet paste, and the whole bottom layer had to be scraped off before serving. Two layers of foil, every time, no exceptions.
Pouring the cherry topping on while it was still warm — I was in a hurry, it was a Tuesday, I had things to do. The top of the cheesecake went soft and when I sliced it, the filling slid slightly off the crust in a slow, undignified way.
Did something like this happen to you?
Questions People Actually Ask
Can I make this without a water bath? You can. It will probably crack. Whether that bothers you depends entirely on whether the cherry topping will cover it — it usually does, but the texture around the edges will be slightly drier and more rubbery than a water bath version. It depends on how much you care about that.
How do I know when it’s done baking? The edges should be set and the center should jiggle in one unified motion when you nudge the pan — not slosh, not stay rigid. About 75 minutes at 325°F gets you there, but ovens vary by 25 degrees in either direction. I tried relying purely on time once and pulled it out underdone by a solid 15 minutes.
Can I use fresh cherries instead of canned? Yes, but it’s more work. Pit about 3 cups of fresh cherries, cook them with 3 tablespoons sugar and 1 tablespoon cornstarch dissolved in a splash of water until the liquid thickens — about 10 minutes. It tastes sharper and less sweet than the canned version. And honestly, sometimes canned is just fine.
Why did my filling have lumps? Cold cream cheese. Full stop. It has to be genuinely room temperature — 30 to 45 minutes out of the refrigerator minimum, closer to an hour in a cool kitchen. But if you already have lumps, keep beating on medium speed. They sometimes work themselves out before the three-minute mark.
Can I make this the day before? Yes, and you should. Overnight in the refrigerator gives the filling time to fully firm up. Add the cherry topping no more than an hour before you plan to slice it. Cheesecake made the same day feels slightly less set — not wrong, just softer.
How do I get clean slices? Hot water on the knife blade, wipe it dry, make one cut, then repeat. Every. Single. Slice. It’s annoying and it makes a difference of about two millimeters of cleanliness at the edge, which turns out to matter more than it should.
Which answer helped you most?
Before You Make It
This is a long recipe. Not difficult — long. The active time is maybe 40 minutes, but the passive time is most of a day, and that’s the part that trips people up when they decide at 3pm that they want cheesecake for dinner.
Plan it for the morning before the day you want to serve it. That’s the one scheduling decision that makes everything else easier.
Fun fact: Cream cheese was accidentally developed in 1872 by a New York dairyman trying to replicate a French Neufchâtel cheese — and it’s been the backbone of American cheesecake ever since.
The cherry topping is the part I keep tinkering with. The lemon juice is fixed — I won’t move on that — but the sugar amount shifts depending on how sweet the canned filling is, which is not something I have any control over from one batch to the next.
Will you make this soon?
I made it again last week and the center was slightly underdone — not dangerously so, just softer than I wanted in the middle two slices. I’m still not sure if the oven ran cool or if I pulled it five minutes early. It’s the thing I’ll be thinking about the next time I make it.
Happy cooking! —Marina Caldwell
New York Cherry Cheesecake Recipe for Beginners
Ingredients
- 2 cups graham cracker crumbs
- 1/2 cup melted butter
- 1/4 cup sugar
- 32 oz cream cheese, softened
- 1 cup sugar
- 1/4 cup cornstarch
- 1 teaspoon vanilla extract
- 4 large eggs
- 1/2 cup sour cream
- 2 cans (21 oz each) cherry pie filling
- 2 tablespoons lemon juice
- 1 tablespoon sugar
Instructions
- 1Preheat oven to 325°F. Wrap outside of 9-inch springform pan with foil.
- 2Mix graham cracker crumbs, melted butter, and 1/4 cup sugar. Press firmly into bottom of pan.
- 3Bake crust for 10 minutes until lightly golden. Remove and cool slightly.
- 4Beat softened cream cheese until smooth. Gradually add 1 cup sugar and cornstarch, mixing well.
- 5Add vanilla extract, then beat in eggs one at a time until just combined.
- 6Fold in sour cream gently until incorporated.
- 7Pour filling over cooled crust. Smooth the top.
- 8Place springform pan in larger roasting pan. Add hot water to roasting pan until it reaches halfway up the cheesecake.
- 9Bake for 75 minutes until center is almost set but still jiggles slightly when gently shaken.
- 10Turn off oven and crack door open 4 inches. Let cheesecake sit for 1 hour to cool gradually.
- 11Remove from oven and water bath. Cool completely at room temperature for 30 minutes.
- 12Refrigerate for at least 4 hours or overnight.
- 13Before serving, combine cherry pie filling, lemon juice, and 1 tablespoon sugar in saucepan.
- 14Heat cherry mixture over medium heat for 3-4 minutes, stirring gently.
- 15Cool cherry topping to room temperature, then spoon over cheesecake.
- 16Slice with a hot, wet knife and serve chilled.
Notes
See full recipe for nutritional information.


