

My fridge was already running and I hadn’t turned on the oven once.
My neighbor Rosa showed up with a bag of lemons and no plan, and somehow we ended up making this tart at 2pm on a Tuesday. The first time I did it alone, the crust crumbled when I cut it because I hadn’t pressed it firmly enough into the pan.
About the crust situation.
Two cups of graham cracker crumbs sounds like a lot until you’re pressing it into the pan and realizing you’ve barely covered the bottom.
The mixture needs to feel like wet sand — not damp, not dry. You’ll know it’s right when it holds its shape if you squeeze a small handful and it doesn’t fall apart immediately.
I thought about adding a pinch of cinnamon to the crust — actually no, I skipped it. The lemon filling is already doing enough work and I didn’t want anything competing with it.
It looked wrong at the mixing stage. It wasn’t.
When you first add the lemon juice to the cream cheese mixture, it looks slightly curdled for about 30 seconds.
Don’t panic. Keep mixing. It comes together into something smooth and almost glossy — the kind of filling that smells so good you’ll want to eat it straight from the bowl, and honestly I did, twice.
The 6 tablespoons of lemon juice is not a suggestion. The first time I eyeballed it with what I thought was “about the same,” the filling tasted flat, and no amount of extra zest fixed it after the fact.
The whipped cream fold — this part matters.
Whip the heavy cream in a bowl you’ve had in the freezer for 10 minutes. It takes about 3 minutes with a hand mixer to reach stiff peaks, maybe a little less if your cream was very cold going in.
Fold — don’t stir. I mean it. Stirring deflates everything you just built and the filling ends up dense instead of light, which is the whole point of going through the trouble of whipping cream separately.
Quick tip: Use a wide rubber spatula and go around the bowl in big sweeping motions from the bottom up — about 12 to 15 folds total before it’s incorporated enough to stop.
Four hours is the minimum. I know.
My youngest asked me every 45 minutes if it was ready, and I kept saying no, and she kept not believing me.
The filling — which looks set after maybe 2 hours — is still too soft to slice cleanly at that point. You’ll get a clean cut at 4 hours, and an even cleaner one if you leave it overnight. Have you ever tried to serve a tart that wasn’t fully set? It’s a mess and everyone knows it.
What I’d do differently next time.
The lemon slices on top curled a little because I cut them too thick. Maybe 2mm, not 4mm.
Also, I pulled the tart out a full 10 minutes before cutting, and that matters more than it sounds. Cold cream cheese filling straight from the fridge will stick to the knife and drag the top layer. Let it sit. The slices will actually look like slices.
I served it without mint the first time because I forgot to buy it, and it was fine.
—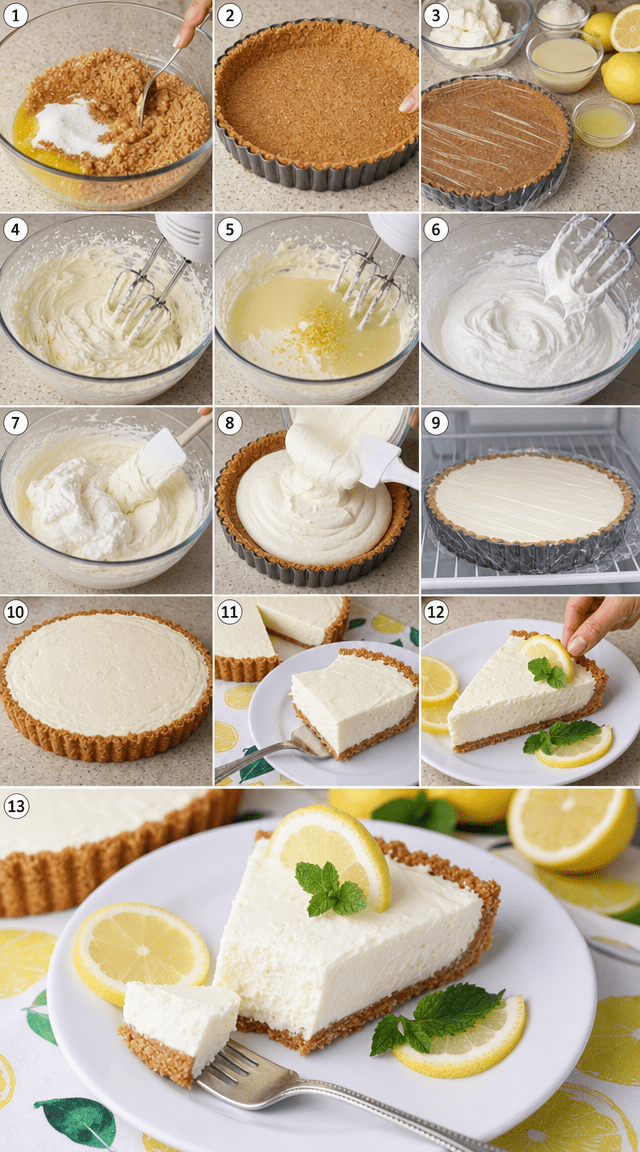
How to Make It
Step 1: Combine 2 cups of graham cracker crumbs, 6 tablespoons of melted butter, and 3 tablespoons of granulated sugar in a bowl. Mix until it looks and feels like wet sand — squeeze a pinch together and it should hold. (If it’s still crumbly, add another half tablespoon of butter, not more sugar.)
Step 2: Press the mixture into a 9-inch tart pan, starting at the center and working outward, then up the sides. Use the flat bottom of a measuring cup to press it firmly — this is the step I skimped on the first time and regretted immediately when the crust cracked on the first slice.
Step 3: Put the crust in the fridge for 15 minutes while you make the filling. Don’t skip this. The crust needs that time to firm up before you pour anything on top of it, or you’ll disturb all your pressing work when you spread the filling.
Step 4: Beat 1 pound of softened cream cheese on medium speed until there are zero lumps visible. This takes about 2 minutes with a hand mixer. (Don’t try to rush this with cream cheese that’s still cold — it won’t go smooth, it’ll stay chunky no matter how long you run the mixer.)
Step 5: Add 1 cup of sweetened condensed milk, 6 tablespoons of fresh lemon juice, and 2 tablespoons of lemon zest. Mix on medium until the whole thing is silky. It’ll look a little strange for the first 30 seconds after the lemon juice goes in — keep mixing, it smooths out.
Step 6: In a chilled bowl, whip 1 cup of heavy cream and 2 tablespoons of powdered sugar until stiff peaks form. I was genuinely surprised how fast this happened — about 3 minutes on high. The peaks should hold their shape when you lift the beaters, not flop over.
Step 7: Fold the whipped cream into the lemon filling using a rubber spatula, big sweeping motions from the bottom of the bowl up. Around 12 to 15 folds. Stop when there are no more visible white streaks. Don’t overfold or the whole thing deflates.
Step 8: Spoon the filling into the chilled crust and spread it smooth with a spatula. Work from the center out. Get it as even as you can across the top — it’ll look cleaner when you slice it.
Step 9: Cover the tart loosely with plastic wrap and refrigerate for at least 4 hours. Overnight is better. The filling sets firmer and the flavors pull together more by the next morning. Have you ever tried chilling a no-bake dessert overnight vs. just a few hours? What did you notice? Share below!
Step 10: Pull the tart from the fridge 10 minutes before you cut it. Run your knife under hot water, wipe it dry, make a cut, repeat for every single slice. This is not fussy — it’s just how you get clean edges instead of dragged, messy ones.
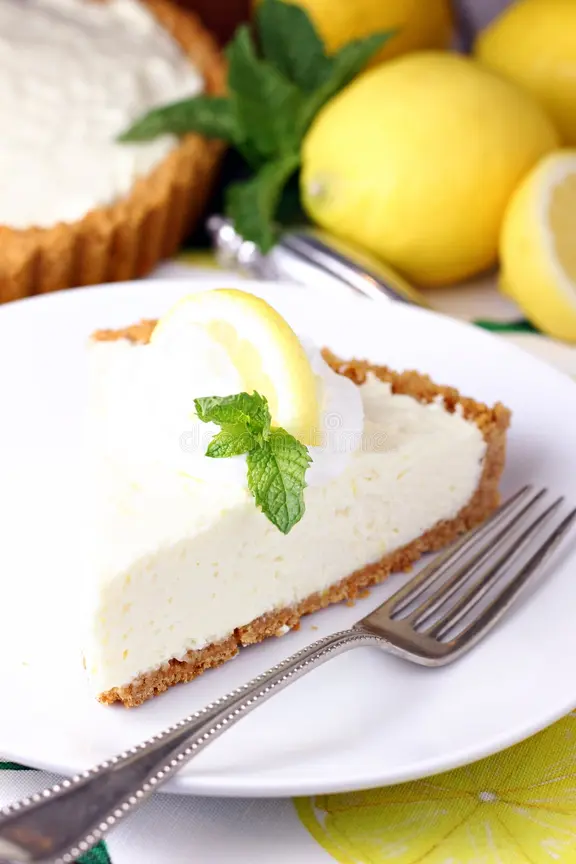
Step 11: Slice into 8 portions and plate each one on a white dish if you have them. Garnish with a thin lemon wheel and a sprig of fresh mint. Serve immediately, or keep plated slices in the fridge for up to 30 minutes before they lose the clean look.
Ways to Change It Up
Try this: Swap the graham cracker crust for crushed digestive biscuits mixed with a little orange zest in the crumbs. The flavor is slightly more toasty and pairs well with the lemon filling.
Try this: Replace 3 tablespoons of the lemon juice with fresh lime juice, and add 1 teaspoon of lime zest alongside the lemon zest. The filling takes on a sharper, more tropical edge that my husband keeps asking for.
Try this: Spread a thin layer of lemon curd over the top of the set filling before garnishing — about 3 tablespoons evenly spread. It adds another layer of citrus intensity and looks more finished when you slice it.
Which would you go for? Drop it in the comments.
How to Serve It
Slice cold, plate on white, and add the mint right before it hits the table — not before. Mint sitting in the fridge for an hour on a slice goes dark and sad-looking.
Serve alongside a small scoop of vanilla bean ice cream if you want something more substantial. The cold cream against the tart filling is a good contrast.
Or serve it with just a cup of strong coffee, no accompaniments, and let the tart do what it does. That’s how Rosa and I ate it the first time and neither of us complained.
What would you pair it with?
—
Storing It Without Ruining It
Cover the tart loosely with plastic wrap and keep it in the fridge. It holds well for about 3 days before the crust starts to soften and lose its texture.
You can freeze individual slices wrapped tightly in plastic, then foil. Pull one out and let it thaw in the fridge for about 2 hours — don’t try to speed it up on the counter or the filling gets a weird texture on the surface.
No reheating. Ever. This is a cold dessert and that’s non-negotiable.
Have you ever saved leftovers like this? Tell me below!
Mistakes I Made So You Don’t Have To
I once used cold cream cheese straight from the fridge because I was impatient, and the filling had small white lumps throughout no matter how long I ran the mixer. Not the end of the world, but not what I wanted either.
I also skipped the hot-knife trick the first two times I made this because it sounded like unnecessary effort, and both times the slices looked like they’d been cut with a spoon. The knife trick takes 20 extra seconds per slice. Do it.
The crust crumbled on my third attempt because I used low-fat butter thinking it wouldn’t matter — it matters. Full-fat butter is what binds the crumbs. Did something like this happen to you?
Questions I Actually Get About This Tart
Can I make this the day before? Yes, and honestly it’s better that way. Overnight chilling gives you the cleanest slices and the flavors settle into each other more. I’d say make it the night before if you can.
What if I don’t have a tart pan? A 9-inch pie plate works. But the sides won’t be as neat and you’ll lose that defined edge when you plate it. I tried this once and it looked more like a no-bake cheesecake than a tart — which is fine, it just looks different.
Can I use bottled lemon juice instead of fresh? It depends on how much the citrus flavor matters to you. Fresh juice gives a brighter, sharper taste. Bottled works but the filling ends up tasting a bit flat. And if you’re making this for people you want to impress, fresh is the call.
How long does it take to whip the cream to stiff peaks? About 3 minutes on high with a hand mixer if your cream and bowl are cold. But if your cream was sitting at room temperature, it could take twice as long and the result is less stable. Cold bowl, cold cream, every time.
Can I add other citrus, like orange or grapefruit? You can swap part of the lemon juice for another citrus — I’d try no more than 2 tablespoons of orange juice in place of lemon without adjusting the rest of the filling. Grapefruit is a little bitter and I tried it once. Not my favorite. But it depends on whether you like that edge.
Is 4 hours really the minimum chill time? Yes. Four hours. The filling looks set before then but it isn’t — it cuts like pudding at 2 hours and makes a mess on the plate. I’ve tested this more than I’d like to admit.
Which answer helped you most?
Okay, go make it.
This tart doesn’t require a lot of skill. It requires patience — mostly just the waiting.
The steps are straightforward enough that Rosa made it herself the following week with no help from me, and she texted me a photo of clean slices that looked better than mine did.
My kids ate it so I called it a win.
Will you make this soon? Drop a comment and let me know how it went, especially if you tried one of the variations.
Fun fact: Lemon zest contains significantly more fragrant essential oils than the juice itself — one lemon’s worth of zest can deliver more citrus aroma to a dish than twice as much of its juice.
Happy cooking! —Marina Caldwell
Refreshing No Bake Citrus Tart Dessert Recipe
Ingredients
- 2 cups graham cracker crumbs
- 6 tablespoons melted butter
- 3 tablespoons granulated sugar
- 1 pound cream cheese, softened
- 1 cup sweetened condensed milk
- 6 tablespoons fresh lemon juice
- 2 tablespoons lemon zest
- 1 cup heavy whipping cream
- 2 tablespoons powdered sugar
- Fresh mint leaves for garnish
- Lemon slices for garnish
Instructions
- 1Combine graham cracker crumbs, melted butter, and granulated sugar until the mixture resembles wet sand.
- 2Transfer crumb mixture into a 9-inch tart pan, pressing firmly and evenly across the bottom and up the sides.
- 3Set crust in refrigerator for 15 minutes to firm up while you prepare the filling.
- 4Using a hand or stand mixer, beat cream cheese on medium speed until completely lump-free and velvety.
- 5Pour in condensed milk, fresh lemon juice, and lemon zest, blending until silky and uniform.
- 6In a chilled bowl, whip heavy cream together with powdered sugar until stiff, cloud-like peaks hold their shape.
- 7Using a rubber spatula, carefully fold whipped cream into the lemon-cream cheese mixture with gentle sweeping motions.
- 8Spoon filling into the chilled crust, spreading evenly with a spatula for a smooth, clean surface.
- 9Cover loosely and refrigerate a minimum of 4 hours until the filling is fully set and sliceable.
- 10Pull tart from refrigerator 10 minutes before serving to slightly soften for cleaner cuts.
- 11Slice into 8 equal portions and plate individually on white dishes for visual contrast.
- 12Top each slice with a delicate lemon wheel and a sprig of fresh mint before serving.
Notes
– For a sharper citrus punch, increase lemon zest to 1 full tablespoon per serving or add a pinch of lemon extract to the filling. – Overnight chilling produces the cleanest, firmest slices and allows the flavors to fully develop and meld together. – Run your knife under hot water and wipe dry between each cut for perfectly neat, restaurant-quality slices.


