

The skillet was already hot.
My husband pulled it out of the oven to check on the butter and nearly dropped the whole thing on the floor.
That first time I made this, the topping baked up pale on one side and dark brown on the other because I’d set the skillet off-center on the rack. I ate it anyway.
But I kept coming back to this cobbler — kept tweaking the sugar ratio, kept adjusting the buttermilk, kept burning my fingers trying to scoop it too soon. The version I’m writing down here is the one I’ve made at least six times now, and it’s the one I’d actually hand to a friend.
About the peaches.
Six fresh peaches, sliced — not too thin.
You want the slices thick enough that they hold some texture after 45 minutes in the oven, because there’s nothing sadder than peach filling that turns to mush with no body left. About half an inch works. I thought about doing thicker — actually no, half an inch is right.
The lemon juice matters more than you’d think. It cuts through the sugar and keeps the fruit tasting like itself instead of just sweet.
It looked wrong. It wasn’t.
When you dollop the batter on top and slide it into the oven, it looks patchy and messy and like you made a mistake.
You didn’t. Those gaps are — and this took me a while to trust — exactly what the cobbler needs to let steam out and get the peach juices bubbling up through the biscuit layer. The first time I saw the gaps close and the filling push through, I genuinely thought something had gone wrong,
and then I tasted it and stopped worrying.
Okay, the butter situation.
Cold. Very cold.
I cut the butter for the topping, then stick it in the freezer for about 10 minutes before I work it into the flour. The warmth of your hands will start softening it the second you touch it, so the colder it starts, the better shot you have at getting those rough, pea-sized crumbles that make the biscuit top flaky instead of dense.
Quick tip: Don’t use a food processor for the butter — your fingers give you more control, and you’ll feel when the crumbles are right.
Has your cast iron ever done something unexpected in the oven?
Mine runs hot on the bottom, which means the peach layer at the base gets a little caramelized right where it meets the melted butter.
Not burned. Just a shade darker, slightly jammy. My youngest scraped that part out before I could even get a spoon in.
What I’d tell you if you were standing in my kitchen.
Wait the 10 minutes before you scoop. I know it’s hard. The skillet will be bubbling and the whole house smells like cinnamon and caramelized peach, but if you dig in too early the filling runs everywhere and you lose the whole thing.
Ten minutes. Set a timer.
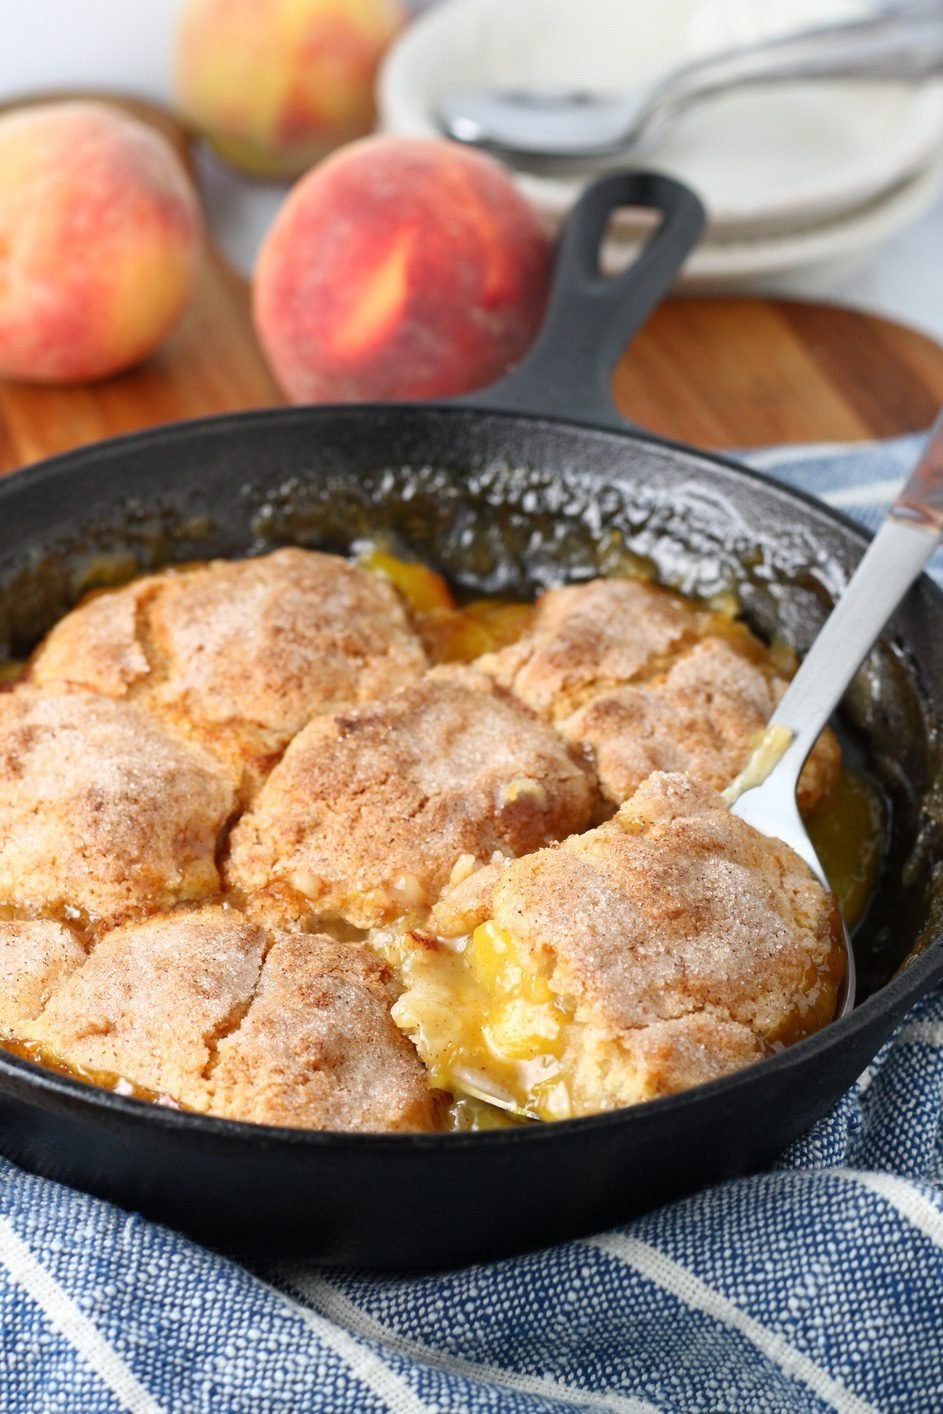
Serve it warm with vanilla ice cream melting down into the gaps. Honestly? That’s it. That’s the whole thing.
How to Make It
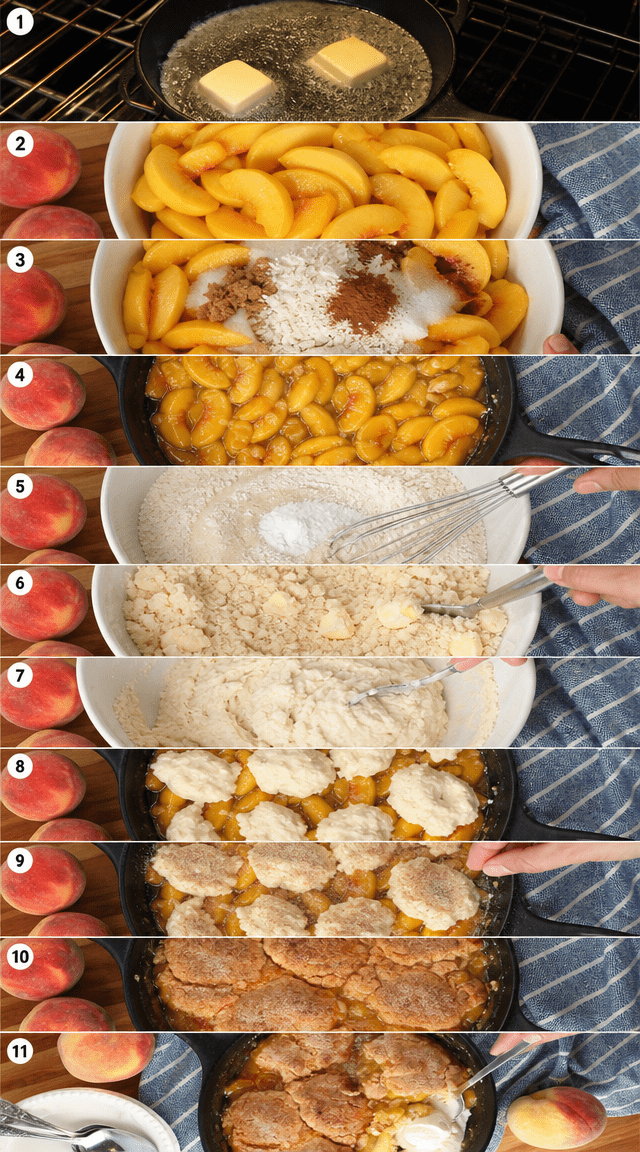
Step 1: Heat your oven to 375°F. Drop 2 tablespoons of butter into your 10-inch cast iron skillet and let the oven do the work — by the time it preheats, the butter will be melted and just starting to foam at the edges. (Don’t walk away and forget it, or you’ll come back to browned butter, which smells great but changes the whole base flavor.)
Step 2: Peel, pit, and slice your 6 fresh peaches into roughly half-inch pieces and get them into a large bowl. This is the step where I always end up with peach juice running down my arm, and I’ve just accepted that.
Step 3: Toss the peach slices with 3/4 cup granulated sugar, 1/4 cup brown sugar, 1/4 cup flour, 1 teaspoon vanilla, 1/2 teaspoon cinnamon, 1/4 teaspoon nutmeg, and 1 tablespoon lemon juice. Stir until every slice is evenly coated — you’ll see the sugars start pulling juice out of the peaches almost immediately.
Step 4: Pour the peach mixture over the melted butter in your hot skillet and spread it into an even layer. (The skillet is hot — use a real oven mitt, not a dish towel, learned that the hard way.) Do you prefer a thicker or thinner peach layer in your cobblers? Share below!
Step 5: In a separate bowl, whisk together 1 cup flour, 1/2 cup sugar, 1 1/2 teaspoons baking powder, and 1/4 teaspoon salt until combined. Pull your cold butter — 6 tablespoons, cut into small cubes — from the freezer and work it into the dry mixture with your fingertips until you’ve got rough, pea-sized crumbles.
Step 6: Pour in 1/2 cup buttermilk and fold the mixture gently — just until a thick, shaggy batter comes together. Stop before you think you should. Overmixing is what turns a biscuit-top cobbler into something dense and rubbery, and I’ve been there.
Step 7: Dollop generous spoonfuls of batter across the peach layer and leave the gaps open. Scatter 2 tablespoons of coarse sugar evenly over the top.
Step 8: Bake uncovered for 45 minutes. The topping should be deep golden — not pale, not just golden, deep — and you should see the peach filling bubbling at the edges. Let it rest 10 full minutes before scooping. Serve warm.
Ways to Change It Up
Try this: Swap half the peaches for fresh blueberries — the berries burst and stain the biscuit top purple in spots, which looks wild and tastes even better.
Try this: Add 1/4 teaspoon cardamom to the peach mixture alongside the cinnamon and nutmeg. It shifts the whole flavor profile slightly warmer and more floral — my sister tried this version and said it tasted more grown-up, whatever that means.
Try this: Use frozen peaches when fresh aren’t around. Thaw them completely and drain the liquid thoroughly — squeeze them gently in a clean towel if you have to — or your filling will be watery instead of jammy.
Which would you go for? Drop it in the comments.
How to Serve It
Warm, straight from the skillet, with a scoop of vanilla ice cream dropped right on top so it melts into the gaps in the biscuit. That’s the version. That’s the one.
If ice cream isn’t your thing, a heavy spoonful of cold whipped cream works — the temperature contrast between the warm filling and the cold cream is the point, so don’t let it come to room temperature first.
I’ve also served this at room temperature the next morning alongside coffee and nobody at the table complained. Cold cobbler for breakfast is an underrated decision.
What would you pair it with?
Storing It Without Ruining It
Cover the skillet tightly with foil or transfer leftovers to an airtight container and refrigerate. It keeps well for about 3 days — the topping softens a little, but the flavor actually gets deeper overnight.
To reheat, I put individual scoops in a 325°F oven for about 12 minutes rather than microwaving. The microwave makes the biscuit top gummy in a way that’s hard to come back from.
For freezing — it works, but the biscuit topping loses its texture pretty significantly once thawed. I’d freeze only the peach filling on its own and make a fresh biscuit top when you’re ready to bake it again.
Have you ever saved leftovers like this? Tell me below!
Mistakes I Made So You Don’t Have To
I once used a 12-inch skillet instead of a 10-inch because mine was dirty and I didn’t want to wash it. The peach layer spread too thin, cooked too fast, and the edges were borderline burnt before the center even set. Use the right size pan.
I skipped the resting time once — just dove straight in at the 45-minute mark — and the filling poured out liquid all over the plate. It needed those 10 minutes to thicken up. The filling was soupy. I served it in a bowl and called it a deconstructed situation.
I also overmixed the batter on my third attempt, trying to get rid of every lump, and the topping baked up dense and bready instead of flaky and biscuit-like. Lumpy batter going into the oven is fine. More than fine, actually. Did something like this happen to you?
Questions I Actually Get About This Cobbler
Can I use canned peaches? You can, but drain them really well — and I mean really well, press them gently with a paper towel — because canned peaches carry a lot of syrup that makes the filling run thin. The flavor won’t be as bright. But it works in a pinch.
What if I don’t have buttermilk? I tried this once with regular whole milk mixed with a teaspoon of white vinegar, left to sit for 5 minutes. Worked fine. The topping was slightly less tender but nothing that would ruin your day.
Can I make this ahead of time? It depends on how far ahead. Assembled but unbaked — yes, refrigerate it for up to a day and bake straight from cold, adding about 5 to 8 extra minutes. Already baked — it reheats okay, but it’s best the day it comes out of the oven. No way around that.
Do I have to use a cast iron skillet? No. A 9×13 baking dish works. But the cast iron gets hotter at the base and gives the peach filling that slightly caramelized bottom layer that a glass dish just doesn’t replicate. And the whole thing keeps warm longer at the table.
How do I know when the biscuit topping is actually done? Deep golden, not pale golden. The color should be a couple of shades past what looks “safe.” And tap the center — it should sound hollow and feel set, not soft. If it gives when you press it lightly, give it another 5 minutes.
Can I reduce the sugar? It depends on how sweet your peaches are. I’ve gone down to 1/2 cup granulated sugar in the filling when peaches were very ripe, and it was fine — actually good. But cut too much and you lose the caramelization that makes the filling jammy. I wouldn’t go below 1/2 cup total.
Which answer helped you most?
Go make this one.
This cobbler isn’t fussy. It’s not trying to be anything other than warm peaches and a flaky biscuit top and butter underneath holding it all together.
The cast iron does most of the work. You’re mostly just getting out of the way.
Fun fact: Peaches are actually members of the rose family — the same botanical family as apples, pears, and cherries — which might be why they respond so well to warm spices like cinnamon and nutmeg that traditionally pair with those fruits.
Have some fresh peaches sitting on your counter right now? Slice them. Don’t wait until they’re overripe and starting to wrinkle.
Will you make this soon? Drop a comment when you do — I want to hear how the topping turns out for you, especially if your oven runs hot like mine.
Happy cooking! —Marina Caldwell
Rustic Cast Iron Peach Cobbler Worth Savoring
Ingredients
- 6 fresh peaches, peeled and sliced
- 3/4 cup granulated sugar
- 1/4 cup brown sugar
- 1/4 cup all-purpose flour
- 1 teaspoon vanilla extract
- 1/2 teaspoon cinnamon
- 1/4 teaspoon nutmeg
- 1 tablespoon lemon juice
- 1 cup all-purpose flour
- 1/2 cup granulated sugar
- 1 1/2 teaspoons baking powder
- 1/4 teaspoon salt
- 6 tablespoons cold butter
- 1/2 cup buttermilk
- 2 tablespoons coarse sugar for topping
Instructions
- 1Heat oven to 375°F. Add 2 tablespoons butter to a 10-inch cast iron skillet and let it melt inside the preheating oven.
- 2Peel, pit, and cut peaches into slices, transferring them into a large mixing bowl.
- 3Toss sliced peaches with both sugars, 1/4 cup flour, vanilla, cinnamon, nutmeg, and fresh lemon juice until evenly coated.
- 4Pour the seasoned peach mixture directly over the melted butter in your hot skillet, spreading it into an even layer.
- 5Whisk together the remaining 1 cup flour, 1/2 cup sugar, baking powder, and salt in a separate bowl.
- 6Using a pastry cutter or fingertips, work the cold butter into the dry mixture until it forms rough, pea-sized crumbles.
- 7Pour in the buttermilk and fold gently until a thick, shaggy batter just comes together — do not overmix.
- 8Dollop generous spoonfuls of batter across the peach layer, intentionally leaving open gaps throughout.
- 9Finish with an even dusting of coarse sugar over the entire topping.
- 10Bake uncovered for 45 minutes until the biscuit topping turns deep golden and the peach filling bubbles around the edges.
- 11Rest for 10 minutes before scooping and serving warm alongside vanilla ice cream.
Notes
– For the flakiest topping, ensure your butter stays as cold as possible — chill it in the freezer for 10 minutes before cutting it in. – If fresh peaches are out of season, frozen peaches work well; thaw and drain excess liquid thoroughly before using to prevent a watery filling. – The gaps left in the batter topping are intentional — they allow steam to release and let the sweet peach juices bubble up beautifully through the crust.


