

The batch that almost didn’t happen.
My youngest had been asking for butterscotch cookies for three weeks straight, and I finally caved on a Tuesday night when I had exactly half a bag of butterscotch chips left and nothing else planned.
The first batch burned on the bottom.
Not the tops — the bottoms, which is somehow more embarrassing, like the oven was trying to make a point.
What actually makes these soft.
Melting part of the butterscotch chips and beating them directly into the butter mixture — that’s the move that changes the whole texture of the dough.
It makes the dough dense in a way that flour alone never would. The whole balls barely spread in the oven, and then the edges pull in just enough to crinkle the tops around minute ten or eleven.
I thought about adding a pinch of cinnamon — actually no, I skipped it. The butterscotch is doing enough work on its own.
The coarse sugar thing. It matters.
Regular granulated sugar will dissolve into the dough as it bakes and you’ll lose that crunch on the outside, which is kind of the whole point.
Coarse sugar — sometimes sold as “sparkling sugar” or “sanding sugar” — stays put. You can feel it when you pick the cookie up, a slight graininess on the bottom of your fingers.
Quick tip: Roll each dough ball twice in the coarse sugar, pressing lightly the second time so it actually sticks before it hits the pan.
It looked wrong. It wasn’t.
At the ten-minute mark, these cookies look underdone — pale in the center, edges just barely golden, tops still slightly matte.
Pull them anyway.
They finish on the pan during those two minutes of resting, and if you wait for them to look done in the oven, you’re going to end up with something that’s more cracker than cookie by the time it cools. Have you ever pulled something from the oven too early and felt weirdly nervous about it? That’s exactly how this feels — and you just have to trust the two minutes.
About the whole chips in the dough.
You’re folding in another half cup of whole butterscotch chips after the dough is mixed, and I’ll be honest: the first time I made these, I forgot that step entirely.
The cookies were still fine.
But the version with the whole chips has these little pools of melted butterscotch inside — not big pockets, just these small interruptions of something softer — and it’s worth not forgetting them the way I did.
The dough, chilled or not.
Chilling for 30 minutes before rolling gives you a cleaner crinkle and a slightly thicker cookie, because the butter firms back up and the dough doesn’t spread too fast in the first few minutes of baking.
I skipped chilling twice and both times the cookies spread a little flat, nothing dramatic but you could tell,
and my neighbor Rosa said they tasted identical but looked different side by side.
Honestly? It’s not that deep. But if you have the thirty minutes, use them.
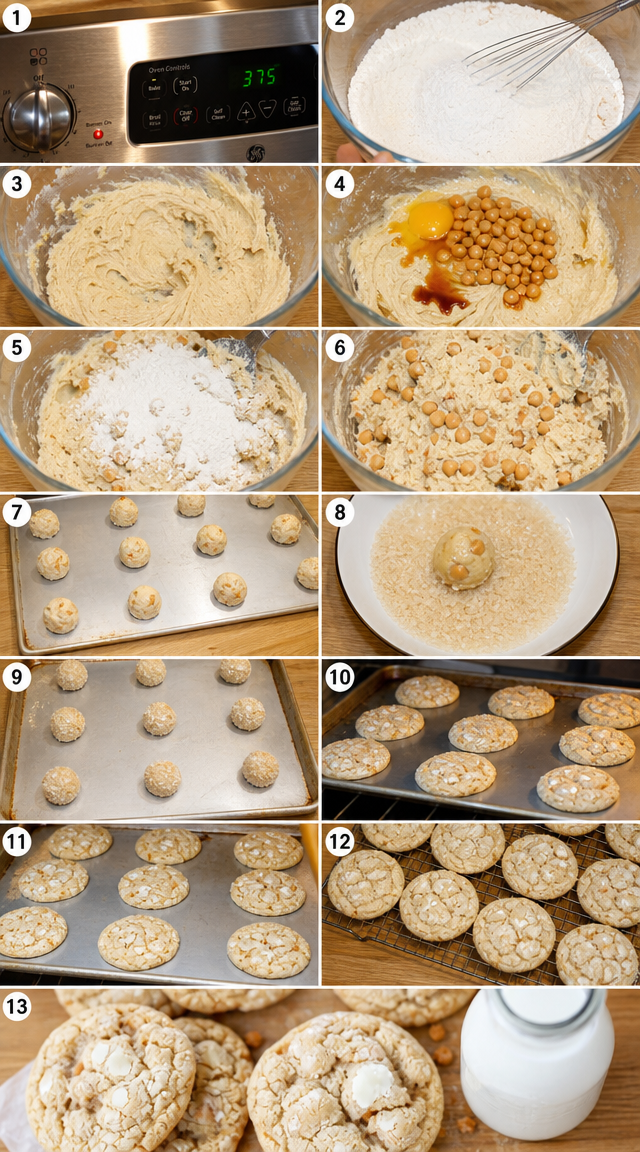
Step 1: Heat your oven to 375°F and set out your baking sheets — no greasing, no parchment needed. I always forget that ungreased pans are actually the right call here, and I’ve re-read that line three times just to be sure.
Step 2: Whisk together the 2¼ cups flour, 1 teaspoon baking soda, and ½ teaspoon salt in a medium bowl. Set it aside while you get the wet ingredients going. (Don’t skip the whisk — just dumping them in together leaves little pockets of baking soda that you’ll taste later in a bad way.)
Step 3: Cream the softened butter with ¾ cup granulated sugar and ¼ cup packed brown sugar in a large bowl until the mixture looks lighter in color and a bit fluffy, about 2 minutes with a hand mixer. The brown sugar is doing something here — there’s a faint molasses edge in the dough that plays off the butterscotch later.
Step 4: Beat in the 1 cup of melted butterscotch chips, the egg, and the vanilla extract until everything is fully combined and the dough looks glossy and a little sticky. (Melt the chips in 30-second bursts in the microwave and let them cool for a few minutes before adding — hot chips will cook the egg.)
Step 5: Slowly add the dry ingredients to the wet mixture, mixing on low until a soft dough forms. Don’t overmix once it comes together. Stop the second you don’t see dry flour anymore.
Step 6: Fold in the remaining ½ cup whole butterscotch chips with a spatula. This is the step I forgot the first time, and as I mentioned, you’ll want to actually do it.
Step 7: Scoop the dough into 1-inch balls and roll each one generously in the coarse sugar. Arrange them 2 inches apart on your baking sheets. Are you a double-roller or a single-dip kind of baker? Share below!
Step 8: Bake for 10 to 12 minutes, until the edges are golden and the tops have crinkled. Pull them at 10 minutes if your oven runs hot. Rest them on the baking sheet for exactly 2 minutes before moving to a wire rack — they need that time to set up or they’ll fall apart when you lift them.
Step 9: Let them cool completely before serving, then pour yourself a glass of cold milk because that’s the only correct pairing for these.
Ways to Change It Up
Try this: Brown the butter before creaming it with the sugars. Let it cool until it’s solid again — about 20 minutes in the fridge — and then proceed as normal. The cookies end up with a nuttier, slightly deeper flavor underneath the butterscotch.
Try this: Swap the coarse sugar coating for a mix of coarse sugar and flaky sea salt, half and half. The salt cuts through the sweetness in a way that makes you reach for a second one faster than you planned.
Try this: Press a whole butterscotch chip into the top of each ball right before baking. It melts slightly in the oven and gives you a little visual cue of what’s inside, plus it looks like you tried harder than you did.
Which would you go for? Drop it in the comments.
How to Serve It
Cold milk is the obvious answer and also the correct one — the fat in the milk softens the sweetness and the cold temperature makes the chew more noticeable somehow.
Stack three on a small plate alongside a scoop of vanilla bean ice cream and serve them still slightly warm. The cookies soften a little from the cold of the ice cream and that contrast is worth planning around.
If you’re bringing these somewhere, wrap them individually in wax paper and stack them in a tin — they hold their texture for about 24 hours that way without going soft or sticking together.
What would you pair it with?

Storing It Without Ruining It
Room temperature in an airtight container is where these live best. They stay chewy in the center for up to five days — after that the texture starts to shift toward something drier and more crumbly.
Fridge is fine if you need to stretch them past five days, but pull them out at least 20 minutes before eating. Cold makes these taste flat and a little stiff.
Freezer works well — lay them flat in a single layer on a sheet pan, freeze for an hour, then transfer to a zip bag. They come back to room temperature in about 30 minutes and taste like you just made them, which still surprises me every time.
You can also freeze the raw dough balls before the sugar coating. Roll in coarse sugar right before baking from frozen — just add 2 extra minutes to the bake time. Have you ever saved leftovers like this? Tell me below!
Mistakes I Made So You Don’t Have To
I once added the melted butterscotch chips while they were still hot from the microwave — like, maybe 45 seconds out — and the egg scrambled slightly when I beat everything together. The cookies baked up fine but the dough looked strange and had these tiny cooked egg bits in it. Let the melted chips cool.
I greased the baking sheet the second time I made these because I was on autopilot, and the bottoms spread too fast and came out greasy and thin. Ungreased really is the instruction, not just a suggestion.
The coarse sugar coating slid right off the first batch I made because I rolled the balls and immediately put them in the oven without pressing the sugar in at all. Press. It. In. Gently, but firmly enough that it’s not just sitting on the surface. Did something like this happen to you?
Things people keep asking me about these cookies.
Can I use butterscotch extract instead of melting the chips? It depends on how much butterscotch flavor you actually want. Extract alone gives you a faint background note, but melting the chips into the dough is what makes these taste like actual butterscotch and not just vanilla-adjacent. I tried extract once and it wasn’t the same.
Do these cookies have to chill before baking? No. But 30 minutes in the fridge makes a real difference in how tall and defined the crinkle is. Skip it if you’re in a rush — the cookies still work. And honestly the texture is close enough that most people won’t notice.
How long do they stay soft? About four to five days in a sealed container at room temperature. After that the edges go first — they get harder while the centers stay okay for another day or two. But day two is usually when they’re best, after the flavors have settled overnight.
Can I make these gluten-free? It depends entirely on your flour substitute and how it handles moisture. I haven’t tested a GF version. A 1:1 GF blend might work but the dough may need an extra tablespoon or two of flour if it seems too sticky to roll.
Why did my cookies go completely flat? A few possibilities: butter too warm, dough not chilled, or oven temperature off. Get an oven thermometer if you’re consistently getting flat cookies — my oven runs about 15 degrees low and I had no idea for months.
Can I double the recipe? Yes, easily. Double everything straight across. But bake one sheet at a time in the center of the oven — two sheets in at once meant uneven heat and the bottom sheet came out pale on top with overdone edges when I tried it. Which answer helped you most?
Okay, go make them.
These aren’t complicated. Soft dough, coarse sugar, eleven minutes, done.
The butterscotch flavor is real and present without being cloying, which I was genuinely worried about the first time I read through the ingredient list.
My youngest ate four before I got the wire rack cleared. That’s the review that matters most in this house.
Fun fact: Butterscotch gets its name not from Scotland, but likely from the word “scotch,” meaning to score or cut — because the original candy was scored into pieces before it hardened.
Will you make this soon? Drop a comment and let me know how they turn out — or what you changed, because I’m always curious what people do differently.
Happy cooking! —Marina Caldwell
Soft Butterscotch Crinkle Cookies Dusted in Sweet Sugar
Ingredients
- 2 1/4 cups all-purpose flour
- 1 teaspoon baking soda
- 1/2 teaspoon salt
- 1/2 cup butter, softened
- 1 cup butterscotch chips, melted
- 3/4 cup granulated sugar
- 1/4 cup brown sugar, packed
- 1 large egg
- 1 teaspoon vanilla extract
- 1/2 cup butterscotch chips, whole
- 1/3 cup coarse sugar, for rolling
- Milk, for serving
Instructions
- 1Heat oven to 375°F (190°C) and set out ungreased baking sheets.
- 2Whisk together flour, baking soda, and salt in a medium bowl and set aside.
- 3Cream softened butter with both sugars in a large bowl until light and fluffy.
- 4Beat melted butterscotch chips, egg, and vanilla into the butter mixture until fully combined.
- 5Slowly incorporate the dry ingredients into the wet mixture until a soft dough forms.
- 6Gently stir in the whole butterscotch chips throughout the dough.
- 7Scoop and shape dough into 1-inch balls, then generously coat each in coarse sugar.
- 8Arrange sugared dough balls 2 inches apart on prepared baking sheets.
- 9Bake for 10-12 minutes until edges turn golden and tops form classic crinkles.
- 10Rest cookies on the baking sheet for 2 minutes before transferring to a wire rack.
- 11Allow to cool completely, then serve alongside an ice-cold glass of milk.
Notes
– For deeper butterscotch flavor, brown the butter slightly before creaming it with the sugars. – Chilling the dough for 30 minutes before rolling helps the cookies hold their shape and enhances crinkle formation. – Store cooled cookies in an airtight container for up to five days to maintain their chewy centers.


