

The pan was still warm when my neighbor Rosa grabbed her third one.
I’d made 24 of them and thought that would be enough for four people.
It wasn’t.
How this even started.
I needed something to bring to a potluck that wasn’t another dip situation, and I had a pint of cherry tomatoes going soft on the counter.
The first batch came out watery. Genuinely kind of sad. I hadn’t patted the tomatoes dry after hollowing them, so the cream cheese filling slid around and went thin at the bottom — nobody said anything but I knew.
Paper towels. That’s the fix. Dry the insides before you fill them and the whole thing holds together.
About the filling.
Cream cheese, sour cream, sharp cheddar, bacon, green onion, garlic — I thought about adding paprika — actually yes, keep the paprika, it does something important to the color and gives the filling a faint smokiness that you’d miss if it wasn’t there.
The garlic goes in raw and minced fine. It mellows out in the oven in those 12 to 15 minutes, just enough.
The thing only someone who’s made these would notice.
When you pull them at the 12-minute mark, the tops look pale and you’ll think they need more time.
They don’t. The filling sets as they rest — give them 2 full minutes on the pan before you move them, or the bottoms go soft and they tip.
Quick tip: Pipe the filling with a zip-lock bag with one corner snipped — spoons work but a bag gets the filling deeper into the cavity without squishing the tomato walls.
It looked wrong. It wasn’t.
The filling is quite pale before it bakes, and when you first spoon it in — honestly it looks like you made a mistake, like it’s too dense or too heavy for something this small.
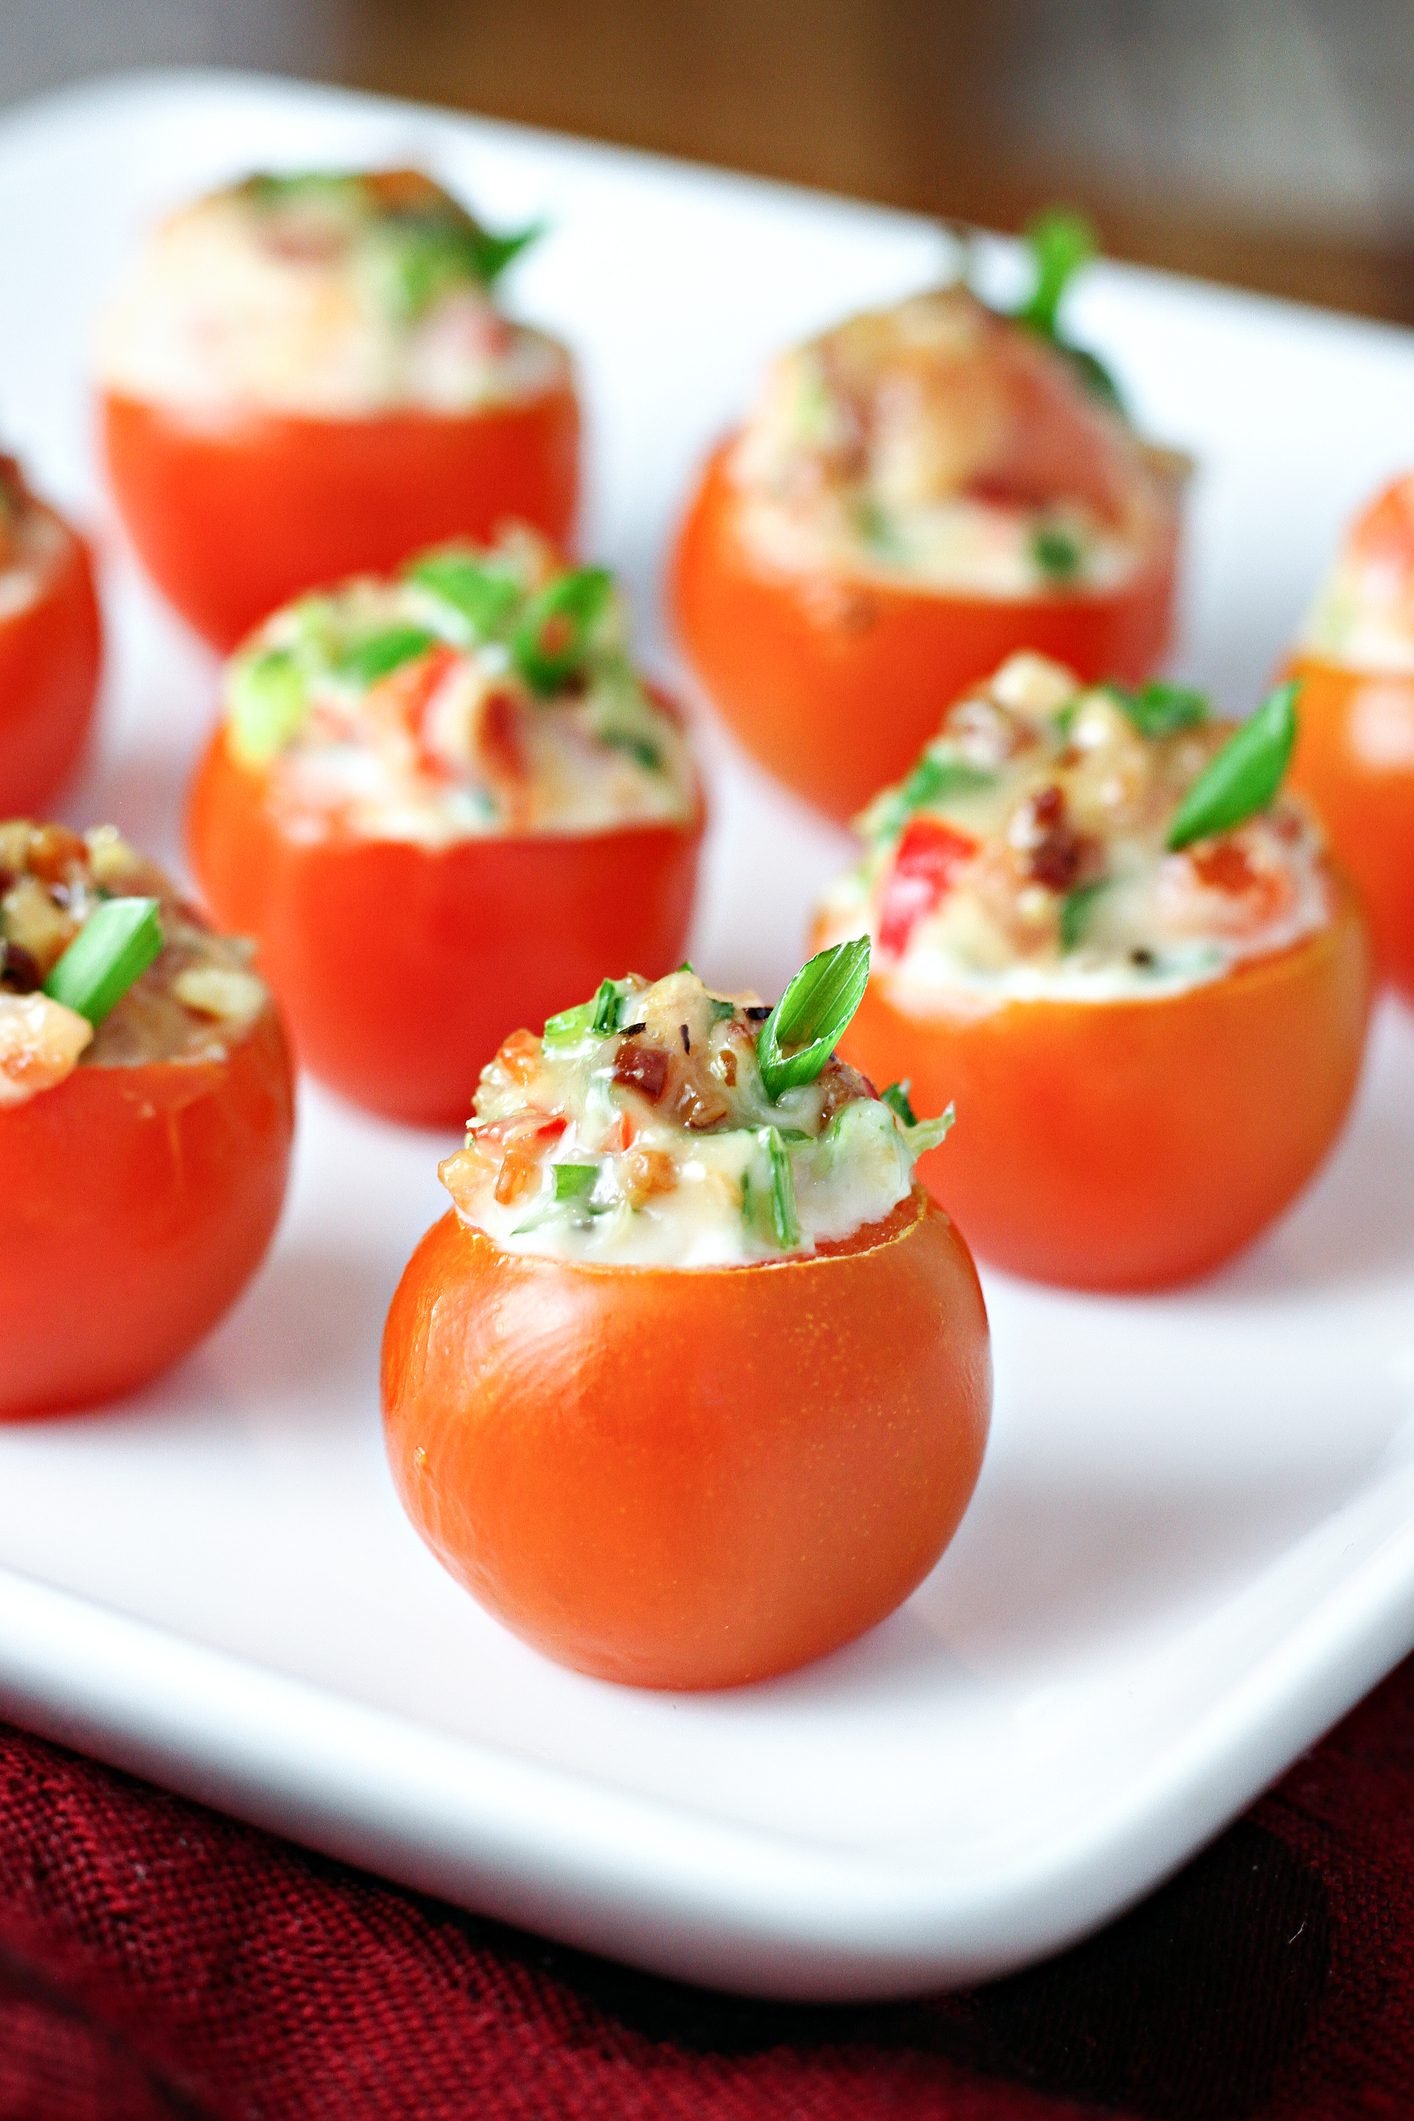
Then it bakes and turns just golden on top, barely, and the tomato softens to exactly the right point where it gives when you bite but doesn’t fall apart in your hand.
Have you ever had an appetizer where the ratio of filling to vessel is actually right? Because most stuffed tomatoes are 80% tomato and a smear of something. These aren’t.
An honest admission.
I’ve made these four times now and I’ve overcooked them once — left them in for 17 minutes because I got distracted talking, and the tomato skins started splitting and the filling dried out on top.
I served them anyway.
My kids ate them so I called it a win, but 12 to 15 minutes is genuinely the window — don’t push it.
Crispy Bacon & Cheese Filled Cherry Tomatoes — Full Instructions
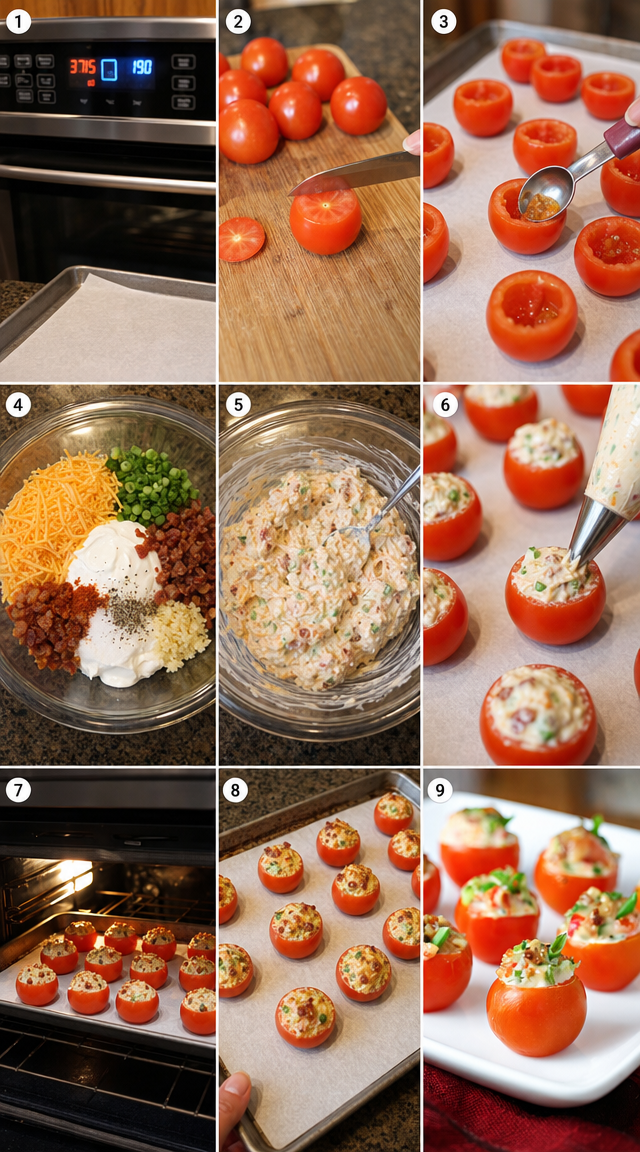
Step 1: Heat your oven to 375°F and line a baking sheet with parchment paper. Get this going first so the oven is fully up to temp by the time you’re done prepping — it matters here because the filling needs immediate heat to set rather than warm up slowly.
Step 2: Rinse your 24 cherry tomatoes and slice off the top quarter of each one. Keep the little lids if you want them for presentation, though I usually just toss them — they slide off during baking anyway.
Step 3: Use a melon baller or a small spoon to scoop out the seeds and pulp from each tomato. (This is the step most people rush, and you really can’t — take out as much pulp as you can without breaking through the walls.) Then press the insides dry with paper towels, standing them cut-side down for a minute if you can.
Step 4: Beat 1/2 cup softened cream cheese with 1/4 cup sour cream until the mixture is smooth and no lumps remain. I use a fork and it takes about 90 seconds of actual effort — a hand mixer is faster but honestly not worth the extra dishes for this volume.
Step 5: Fold in the crumbled bacon, 1/4 cup shredded sharp cheddar, 2 finely chopped green onions, 2 cloves minced garlic, 1/2 teaspoon paprika, salt, and pepper. Mix until everything is evenly distributed. Does your filling taste a little underseasoned at this point? That’s normal — the bacon adds more salt as it heats. Share below!
Step 6: Spoon or pipe the filling generously into each hollowed tomato, letting it mound slightly above the rim. Arrange them cut-side up on the prepared baking sheet, close enough that they can’t tip but not touching.
Step 7: Bake for 12 to 15 minutes until the filling is heated through and the tops are just barely golden. Pull them at 12 minutes and check — if the tops have any color at all, they’re done.
Step 8: Let them rest on the pan for 2 to 3 minutes before moving them. Scatter fresh parsley over the top and serve warm or at room temperature. Room temperature is actually fine here — they held up well on Rosa’s counter for about 40 minutes and nobody complained.
Ways to Change It Up
Try this: Swap regular paprika for smoked paprika and add a pinch of cayenne to the filling. It doesn’t make them spicy exactly — just gives a low background heat that makes people reach for a second one before they realize why.
Try this: Use crumbled Italian sausage instead of bacon. Cook it fine and drain it well before mixing in — the fat content is higher than bacon and your filling will get greasy if you skip the drain step.
Try this: Skip the baking entirely and serve them cold. Mix the filling the same way, leave out the garlic or use garlic powder instead of raw, and refrigerate the filled tomatoes for at least 30 minutes before serving. Completely different result but still good.
Which would you go for? Drop it in the comments.
How to Serve It
These work best on a flat plate or a small board where they can stand upright without rolling — a rimmed platter is ideal. Put them close together so guests can grab one cleanly without knocking the rest over.
They pair well next to something crisp and plain: crackers, cucumber slices, or a handful of radishes. The filling is rich and the tomato is acidic, so you want something neutral nearby to reset between bites.
I’ve also served these as a starter before a simple pasta dinner — just four or five per person on a small plate with a glass of something cold. That works.
What would you pair it with?
Storing It Without Ruining It
Baked ones keep in the fridge for up to 3 days in an airtight container. They’re best the day of, but day two is still totally fine — the tomato gets a little softer but the filling stays intact.
Don’t freeze them. Cream cheese after freezing and thawing gets grainy and the tomatoes turn to mush. I tried it once because I had leftovers I didn’t want to waste, and it was not good.
To reheat: 350°F oven for about 6 minutes. The microwave technically works but the tomato skin goes rubbery. If you’re doing room temperature for a party, pull them from the fridge 20 minutes before serving and they’re fine.
The filling on its own — before it goes into the tomatoes — keeps refrigerated for up to 24 hours. That’s the move if you’re prepping ahead for a gathering.
Have you ever saved leftovers like this? Tell me below!
Mistakes I Made So You Don’t Have To
Skipping the paper towel step. I mentioned this already but it bears repeating: wet tomato walls make the filling slide and pool at the bottom of each one, and by the time they come out of the oven you’ve got a soupy mess inside a tomato shell. Two minutes with paper towels prevents all of it.
I once used low-fat cream cheese because that’s what was in the fridge, and the filling came out thin and slightly grainy after baking — it never quite set the way it should. Full-fat cream cheese only here.
Overfilling. The first time I piled the filling way above the rim, thinking more is better, and the excess bubbled over the sides during baking, burned onto the parchment, and made the bottoms of the tomatoes sticky. A small mound above the rim is fine. A mountain is not. Did something like this happen to you?
Questions people actually ask about these.
Can I make these ahead of time? The filling holds in the fridge for up to 24 hours — make it the night before and just assemble and bake the day of. And honestly, filling made the night before tastes slightly better because the garlic has time to mellow into everything else.
What’s the best way to hollow the tomatoes? A melon baller is faster, but a small spoon with a pointed tip works too. The goal is to remove as much pulp as possible without punching through the bottom. Go slow on your first few and you’ll get a feel for how firm the walls are.
Can I use regular tomatoes instead of cherry tomatoes? It depends on what you’re going for. Roma tomatoes cut in half would work structurally, but the bite-size thing is what makes these easy to eat standing up at a party. Bigger tomatoes turn this into a sit-down situation. I tried it once with small camparis and the ratio felt off — too much tomato per bite.
How long do they take from start to finish? About 35 minutes total. 20 minutes of prep — hollowing 24 tomatoes takes longer than you think — and 12 to 15 minutes of baking. But if your filling is already made, you can cut that to about 20 minutes flat.
Do they work at room temperature for a party? Yes. I’ve left them out for up to 45 minutes and they were still good. But past an hour the tomato skin starts looking tired. Pull them from the fridge about 15 minutes before guests arrive if you want to serve them cool rather than warm.
Can I make a vegetarian version? Leave out the bacon and add a tablespoon of finely diced sun-dried tomatoes and a pinch of smoked paprika to make up for the depth. It’s not the same, but it works on its own terms. And the filling will be slightly looser without the bacon, so you may want to reduce the sour cream by a tablespoon.
Which answer helped you most?
Okay, go make them.
These come together faster than most appetizers I know, and there’s very little that can go wrong once you’ve patted those tomatoes dry.
The filling is forgiving. You can make it saltier, smokier, spicier — it takes adjustments well. Taste it before it goes into the tomatoes and trust yourself.
Fun fact: Cherry tomatoes have a higher sugar-to-acid ratio than larger tomatoes, which is why they caramelize slightly at the edges during baking instead of just going soft — that little bit of color on the cut rim is flavor, not just appearance.
Twenty-four sounds like a lot until you’re standing in the kitchen watching them disappear two at a time.
Make extra.
Will you make this soon? I’d genuinely love to hear how yours turn out — drop a note in the comments, especially if you tried one of the variations.
Happy cooking! —Marina Caldwell
Stuffed Cherry Tomatoes Loaded With Bacon And Cheese
Ingredients
- 24 cherry tomatoes
- 6 slices bacon, cooked and crumbled
- 1/2 cup cream cheese, softened
- 1/4 cup sour cream
- 1/4 cup sharp cheddar cheese, shredded
- 2 green onions, finely chopped
- 2 cloves garlic, minced
- 1/2 teaspoon paprika
- Salt and pepper to taste
- Fresh parsley for garnish
Instructions
- 1Heat oven to 375°F (190°C) and line a baking sheet with parchment paper.
- 2Rinse cherry tomatoes and slice off the top quarter of each one to create a lid.
- 3Use a melon baller or small spoon to hollow out the seeds and pulp, then arrange tomatoes cut-side up on the prepared baking sheet.
- 4Beat cream cheese and sour cream together in a bowl until smooth and creamy.
- 5Fold in crumbled bacon, shredded cheddar, green onions, minced garlic, paprika, salt, and pepper until evenly incorporated.
- 6Spoon or pipe the cheesy bacon filling generously into each hollowed tomato.
- 7Bake for 12-15 minutes until the filling is heated through and slightly golden on top.
- 8Allow to rest for 2-3 minutes before plating.
- 9Scatter fresh parsley over the top and serve warm or at room temperature.
Notes
– Pat the hollowed tomatoes dry with paper towels before filling to prevent excess moisture from making the filling runny. – The filling can be prepared up to 24 hours ahead and refrigerated, making assembly quick and easy for entertaining. – For extra flavor depth, substitute smoked paprika in place of regular paprika and add a pinch of cayenne for subtle heat.


