

The batch that started it.
I used two full sticks of butter the first time I made these, and they spread so thin they looked like lace on the pan. My husband picked one up before it cooled and it immediately folded in half.
That was a Tuesday. I made them again on Wednesday.
What nobody tells you about the spread.
The butter has to be softened, not melted — actually, that’s the part I kept getting wrong. Melted butter will give you a flat puddle. Softened butter, beaten for a full 3 minutes with both sugars, gives you something that holds just enough air to matter.
You won’t see a difference while you’re mixing. You’ll see it at minute 10 in the oven.
The edges go golden and pull away from the center while the middle still looks underdone, almost wet. That’s exactly when you want to pull them out.
The sugar situation.
Both sugars doing different jobs here. The granulated sugar is what makes those edges shatter when you bite in.
Brown sugar — packed, not just scooped — pulls moisture into the center and keeps it from going completely crisp all the way through, which would just be sad.
I thought about reducing the brown sugar to 1/2 cup to get more crunch — actually no, I tried it and the cookie tasted flat, like something was missing but I couldn’t name it.
It looked wrong. It wasn’t.
First time I pulled them at 9 minutes, the centers looked genuinely raw.
I put them back in for 3 more minutes and they turned into hockey pucks. I served them anyway, and my youngest ate four, so I don’t know what to tell you.
Quick tip: Pull the cookies at 9–11 minutes even when the centers look underdone — they carry-cook on the hot pan for about 2 full minutes and that’s where the texture actually sets.
One thing I noticed that I haven’t seen written anywhere.
If you let the dough sit on the sheet for even 5 minutes before it goes into the oven, the cookies spread slightly less — the fat firms back up a little.
Not a huge difference. But if you want that sharper, more defined edge instead of a full puddle, it’s worth knowing.
Does your oven run hot?
Mine does, and I didn’t figure that out until I’d made three batches that went golden in about 8 minutes instead of 11. Have you checked yours with a thermometer, or are you just trusting the dial?
An oven that runs 25°F hot will take these from crisp-edged to fully bronzed before you’ve even set a timer. Just something to think about before you preheat to 375°F and walk away.
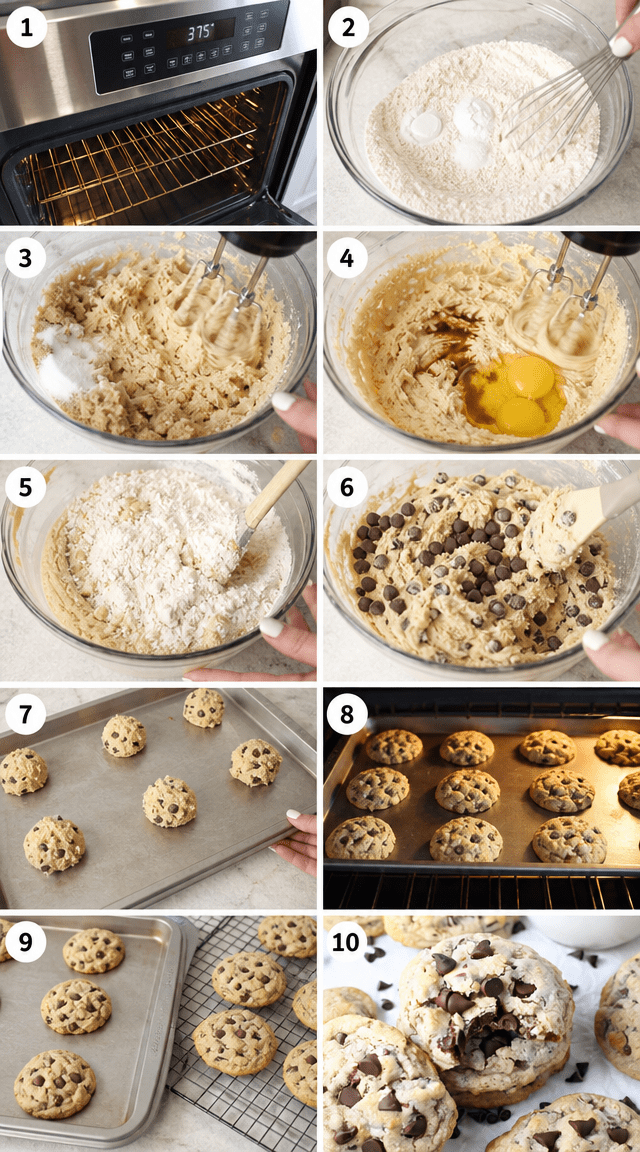
Step 1: Heat your oven to 375°F and line your baking sheets with parchment paper. Don’t skip the parchment — the first time I used a bare pan, the bottoms went dark at minute 9 while the tops were still pale. Parchment slows that bottom heat down just enough.
Step 2: Whisk together 2 1/4 cups all-purpose flour, 1 teaspoon baking soda, and 1 teaspoon salt in a medium bowl, then set it aside. (Measure flour by spooning it into the cup and leveling off — packing it in adds almost 20% more flour and the cookies will come out thick and cakey instead of thin.)
Step 3: Beat 1 cup softened butter with 3/4 cup granulated sugar and 3/4 cup packed brown sugar for a full 3 minutes. It should look noticeably lighter and a little fluffy before you move on. If you cut it short, the cookies won’t spread the same way.
Step 4: Add 2 large eggs one at a time, mixing after each, then pour in 2 teaspoons vanilla and blend until everything looks smooth and even. I always stop to scrape down the sides of the bowl here — there’s always a pocket of unmixed butter hiding at the bottom, and you’ll taste it in the finished cookie if you don’t get it.
Step 5: Slowly fold the flour mixture into the wet ingredients until just combined. Stop the moment you stop seeing dry streaks. Overmixing at this stage develops gluten and you’ll end up with something that chews more like bread than a cookie.
Step 6: Stir in 2 cups chocolate chips by hand and make sure they’re spread evenly through the dough. (If you want to refrigerate the dough for an hour before baking, now is the time — it deepens the flavor and the cookies hold their shape a little better in the oven.)
Step 7: Scoop rounded tablespoons of dough onto your prepared sheets, spaced about 2 inches apart. These do spread, so don’t crowd them — my second batch, I got overconfident and squeezed 14 cookies onto one sheet and they all connected into one giant pan cookie.
Step 8: Bake 9–12 minutes until the edges are golden and the centers still look slightly soft. Pull them out even if your instinct says they’re not done. Let them sit on the hot pan for 2 minutes before moving to a wire rack — that rest time is doing real work.
Did you chill your dough before baking, or go straight in? Share below!
Ways to Change It Up
Try this: Swap 1 cup of the chocolate chips for roughly chopped walnuts or pecans. The contrast between the crisp cookie and the slightly bitter nut is genuinely good, and it slows people down enough that the cookies actually last more than 20 minutes on the counter.
Try this: Use brown butter instead of softened butter. Melt the butter in a saucepan over medium heat until the milk solids turn amber and it smells nutty — about 7 minutes — then let it solidify in the fridge before creaming. The cookies come out with a deeper, almost toffee-like background flavor.
Try this: Add a pinch of flaky sea salt on top of each dough ball right before they go in the oven. It does something to the chocolate that I can’t fully explain, but my neighbor Rosa asked me what I did differently the first time I tried it.
Which would you go for? Drop it in the comments.
How to Serve It
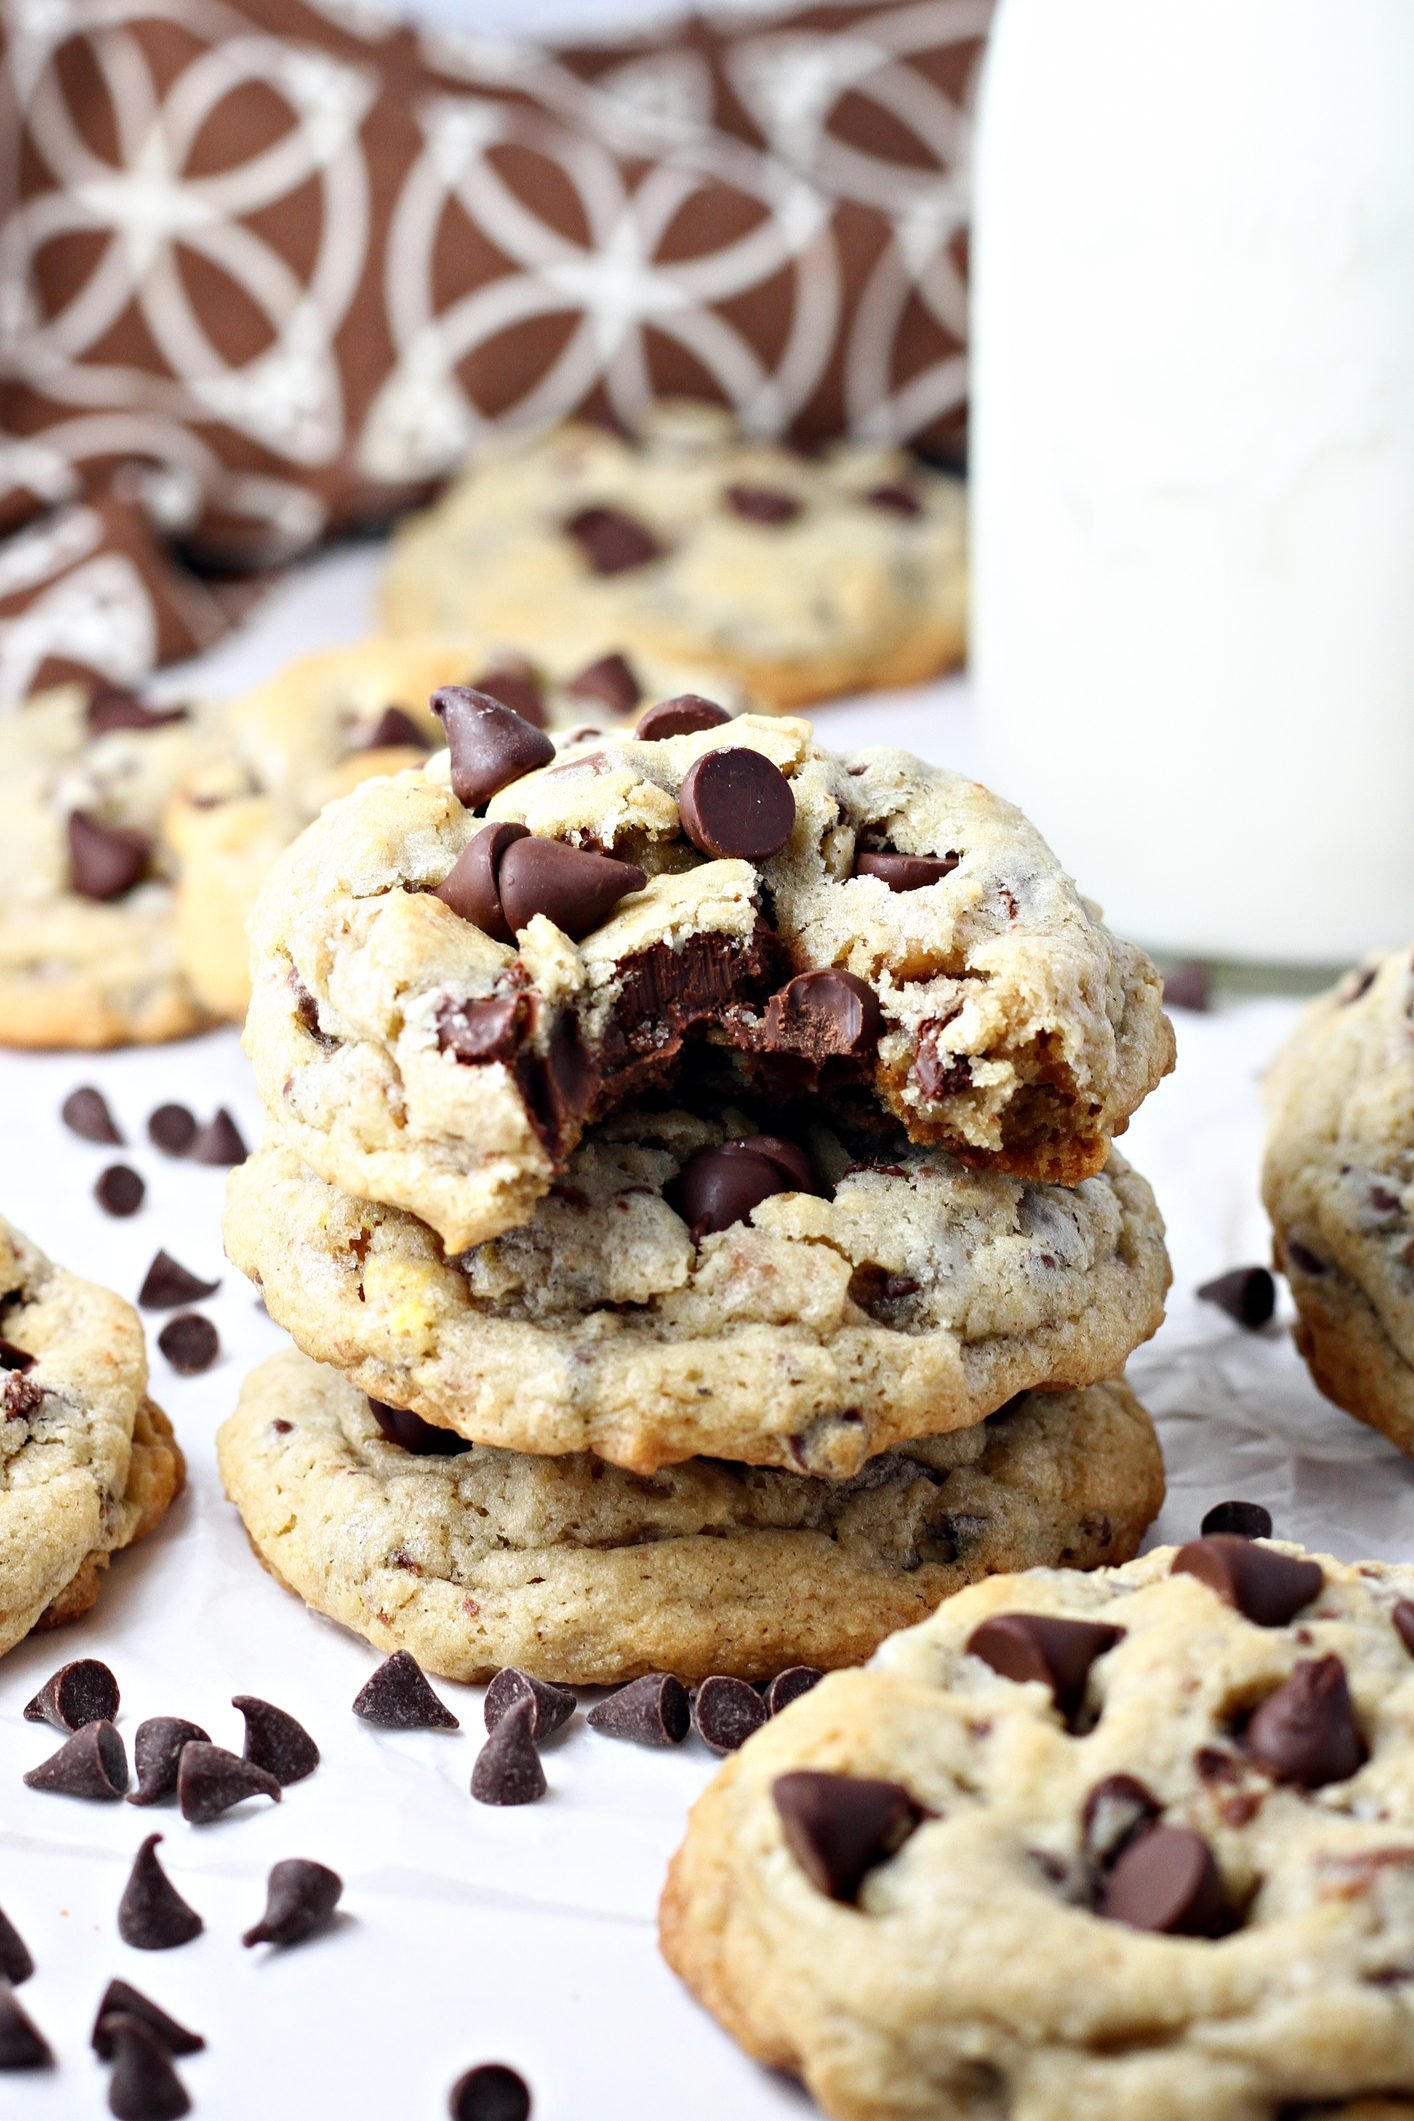
These are best about 15 minutes out of the oven, when the edges have set but the chocolate chips are still soft enough to smear slightly when you break the cookie in half. Serve them with cold whole milk or a very strong cup of black coffee — the bitterness does something good against all that butter and sugar.
They also hold up well as the base of an ice cream sandwich. Press a scoop of vanilla between two cooled cookies, wrap them individually in plastic wrap, and freeze for at least 2 hours before you eat them so everything firms up.
Or just eat one standing over the kitchen counter while the rest cool. That counts.
What would you pair it with?
Storing It Without Ruining It
Room temperature is fine for up to 4 days in an airtight container. Don’t refrigerate them — cold air turns them stale faster than leaving them out, and the texture gets weirdly dense.
For longer storage, freeze the baked cookies in a zip-top bag with as much air pressed out as possible. They’re good frozen for about 2 months. Pull one out and leave it on the counter for 20 minutes, or microwave it for 10 seconds if you can’t wait.
You can also freeze the raw dough as individual scooped balls on a sheet, then transfer to a bag once frozen solid. Bake straight from frozen at 375°F — just add about 2–3 minutes to the bake time.
Have you ever saved leftovers like this? Tell me below!
Mistakes I Made So You Don’t Have To
I once used cold butter straight from the fridge because I forgot to pull it out ahead of time. I told myself it would be fine if I just beat it longer. It was not fine — the dough looked curdled and the cookies baked up uneven, thick in the middle and raw at the edges even at 13 minutes.
I also packed the brown sugar loosely the first few times because I didn’t want to deal with it clumping in the bowl. The cookies came out less chewy than they should have been, and I couldn’t figure out why for three whole batches. Packed means packed — press it into the measuring cup hard enough that it holds the shape when you dump it out.
And I skipped the 2-minute rest on the pan once because I was in a hurry. The cookies broke apart when I tried to lift them with the spatula. Not cracked — just came apart in chunks. Did something like this happen to you?
Questions I Actually Get About These Cookies
Can I use salted butter instead of unsalted?
Yes, but drop the added salt to 1/2 teaspoon. I tried it once with the full teaspoon and the saltiness was noticeable in a way that wasn’t quite right. It depends on the brand too — some salted butters are saltier than others.
Why do my cookies come out puffy instead of thin?
Usually too much flour or butter that was too cold. Spoon and level the flour — don’t scoop. And give your butter a real 3-minute cream with the sugar, not just a quick stir. And honestly? Oven temperature matters a lot here — too low and they puff before they spread.
Can I make the dough ahead of time?
The dough keeps in the fridge for about 3 days wrapped tightly. I tried going to 5 days once and the cookies tasted a little off — not bad, just something faint I couldn’t place. But 24–48 hours in the fridge actually improves the flavor.
What kind of chocolate chips should I use?
It depends entirely on how sweet you want the finished cookie. Semisweet is the standard and works well. But I’ve used dark chocolate chips — 60% or higher — and they push back against the sweetness in a way I really liked. Milk chocolate makes the whole thing taste like candy.
Do I have to use parchment paper?
Technically no. But I’ve baked on bare ungreased sheets and greased sheets and neither gives the same result. Dark bottoms on bare metal. Greasy spread on buttered pans. Parchment is about 20 cents a sheet. Use parchment.
How do I get even-sized cookies?
A cookie scoop — the kind with a spring release — is the fastest way. About 1.5 tablespoons per scoop. I used two spoons for years and the size variation drove me a little insane. Uneven cookies bake unevenly. The small ones burn while the big ones are still raw in the middle.
Which answer helped you most?
Okay, go make them.
These aren’t complicated. Forty minutes start to finish if you don’t chill the dough, and most of that is oven time.
The shatteringly crisp edges — that’s the butter and granulated sugar doing exactly what they’re supposed to do at 375°F. You don’t have to do anything special. Just don’t overbake them.
Fun fact: Chocolate chips were invented in 1937 by Ruth Wakefield, who reportedly chopped up a Nestlé bar expecting it to melt into the dough — it didn’t, and the chocolate chip cookie was born from what was basically an experiment gone sideways.
I’ve made worse recipes with more steps and less payoff. These deliver every single time, and my husband requests them specifically when he’s had a bad week at work.
Will you make this soon? Let me know in the comments how yours turn out — and if you changed anything, I genuinely want to hear about it.
Happy cooking! —Marina Caldwell
Thin Buttery Chocolate Chip Cookies With Shatteringly Crisp Edges
Ingredients
- 2 1/4 cups all-purpose flour
- 1 teaspoon baking soda
- 1 teaspoon salt
- 1 cup butter, softened (2 sticks)
- 3/4 cup granulated sugar
- 3/4 cup packed brown sugar
- 2 large eggs
- 2 teaspoons vanilla extract
- 2 cups chocolate chips
Instructions
- 1Heat oven to 375°F (190°C) and line cookie sheets with parchment paper.
- 2Whisk together flour, baking soda, and salt in a medium bowl and set aside.
- 3Beat butter with both sugars in a large bowl until light and fluffy, about 3 minutes.
- 4Mix in eggs one at a time, then add vanilla, blending until fully incorporated.
- 5Slowly fold the dry flour mixture into the wet ingredients until just combined.
- 6Gently stir in chocolate chips, ensuring even distribution throughout the dough.
- 7Scoop rounded tablespoons of dough onto prepared sheets, spacing 2 inches apart.
- 8Bake 9-12 minutes until edges turn golden while centers remain slightly soft.
- 9Rest cookies on the sheet for 2 minutes before moving to a wire rack.
- 10Enjoy warm or store cooled cookies in a sealed airtight container.
Notes
– For chewier cookies, refrigerate the dough for at least one hour before baking to deepen the flavor and firm the texture. – Always pull cookies out while centers still look underdone, as they continue cooking on the hot pan during resting. – Swap half the chocolate chips for chopped walnuts or pecans to add a satisfying crunch to every bite.


